Ashampoo Snap 4 Review
Features - 97%
Usability - 94%
Support - 93%
Pricing - 93%
94%
Very Good
Ideal for anyone who regularly works with various types of media on their PC, Snap 14 allows various screenshot capture scenarios to take place alongside the ability to edit any screenshot media within the application itself.
Snap 14 is a powerful productivity tool which helps take screen capture and screen recording tasks on Windows devices to a whole new level!
Whilst Windows has for a long time included a very basic “print screen” option via a dedicated keyboard key, many PC users now require much more than a basic (whole screen) screenshot can offer (not to mention that post screenshot processing in a separate editing application can be a very time consuming way of working with screenshots). Not only does Snap 14 offer a multitude of different screen capture options (including region capture, freehand capture and automatic time interval options amongst others) but also has a built-in image editing tool for making any necessary adjustments to captures without the hassle or cost of specialist image editing software!
Add on to the above that Snap 14 also includes several other features including a powerful and fully functional screen recording utility, automated and time delayed screenshots, built-in web based sharing tools plus the ability to edit any video recordings via the built-in video editing utility and it starts to become clear how valuable this tool can be.
I last tested Ashampoo Snap (version 11) all the way back in 2019 and was impressed at how much screen capture functionality Ashampoo had managed to fit into a small and easy to use package, as such, I’m looking forwards to testing out this latest version – Let’s go!
Are you looking for help and advice on choosing the best backup software for your PC or Mac? If so then be sure to check out our guide to choosing backup software which also contains a list of our favorite choices as tested here on BestBackupReviews.com!
Key Features
- (New) Full Support for Windows 11
- (New) Re-designed and easy-to-use interface
- (New) Enhanced audio quality and bitrates
- Built-in image & video editing software
- Capture both screenshots and video
- Full screen and specific region capture
- Create animated GIFs from within the video editor
- Automatic (time interval) based captures
- Webcam & external sound integration
- Multiple displays up to 4K resolution supported
- Full screen game capture functionality (including 3D support)
- Easy cloud sharing via Ashampoo Web (social media / QR code / URL)
- Built-in cloud sharing (Dropbox, OneDrive, Google Drive etc.)
- Competitively priced at a one-off $39.99 (for 3x PCs)
- 30 Day free trial also available (requires a free Ashampoo account)
Snap 14 Usability
In this section of my review I will be making use of the Snap 14 application for myself, this includes downloading, installing and registering the software before starting to look at some of the many screen recording and video capture functionalities available within.
This work begins in the next section of this review where I will be looking at some the new features available in this latest version before going on to installing and using Snap 14 for myself. If you would like to try the software for yourself then please note that Ashampoo offer a 30 day free trial via the Snap 14 webpage (this involves registering a free Ashampoo account to activate the trial).
What’s new in Snap 14?
One of the first and most notable new features of Snap 14 is that it now includes full support for the latest version of the Windows 11 operating system!
Moving on from Windows 11 support and we also see several other new features have been added to Snap 14 alongside improvements to many of the existing ones. This begins with the brand new image editing suite which makes post screenshot image processing easier than ever before alongside the addition of improved audio bitrates and support for up to 4K resolutions in the screen recording tool (amongst several other small improvements).
Another big improvement in Snap 14 is the interface itself, Ashampoo have clearly continued to work hard in this regard and the result is a clean and easy to use application interface which makes simply getting to the tools you require from it very quick and simple. In-fact, thanks to Snap 14 running minimised in the Windows system tray and also being available via a floating menu and hotkeys it is both unobtrusive whilst running yet still quick and easy to access the required functionality whenever it is needed!
Users of older versions of Snap can upgrade to version 14 and take advantage of full Windows 11 comparability (alongside the other functionality and interface improvements mentioned above, plus the licence now covering up to 3x PCs) for just $14.99 – Click Here for more information via the official Snap 14 webpage.
Installing Snap 14
As with all Ashampoo software, the installation process for Snap 14 is both simple and straightforward, a process which begins over at the official Ashampoo website where the Snap 14 installer can be downloaded. At just 107MB in size this is a fairly quick download and in my own instance I had the installer up and running just a few moments later:
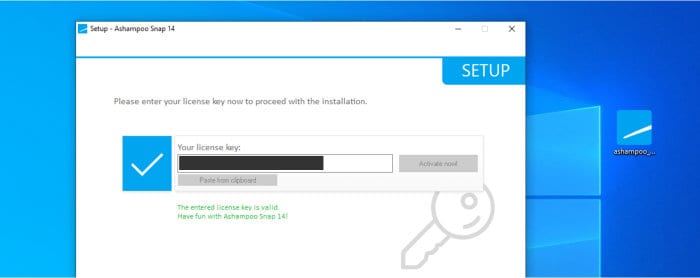
As can be seen above, when installing Snap 14 we must either licence the software before the installation can complete or, alternatively, opt to make use of the 30 day free trial version (which requires registering a free Ashampoo account if you haven’t already got one).
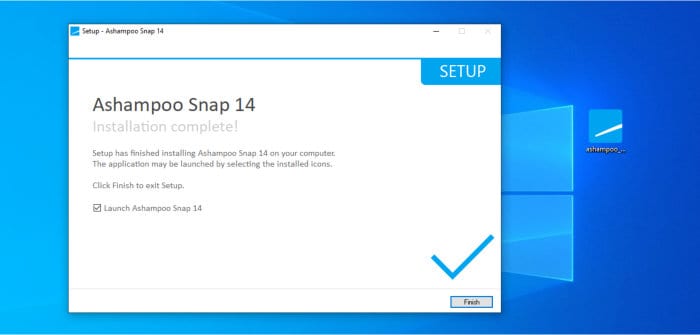
With registration (or the free trial configuration) complete, we can now close the installer and open up the full Snap 14 software which will be ready for use straight afterwards! In the next section I will be looking at the screenshot functionality and some of the advanced functionality it brings to a Windows PC and then later on looking at the video capture functionality where we can also make use of the built-in video editing tools amongst a few other things along the way!
Capturing ScreenShots
When opening Snap 14 for the first time, the application will actually start in its minimised form and can be accessed via an icon in the Windows system tray which is found at the bottom right of the screen (as can be seen below). Right clicking on the Snap 14 logo will open up what is (essentially) the main application menu and will help us quickly get to the correct part of the application given the task we are trying to accomplish.
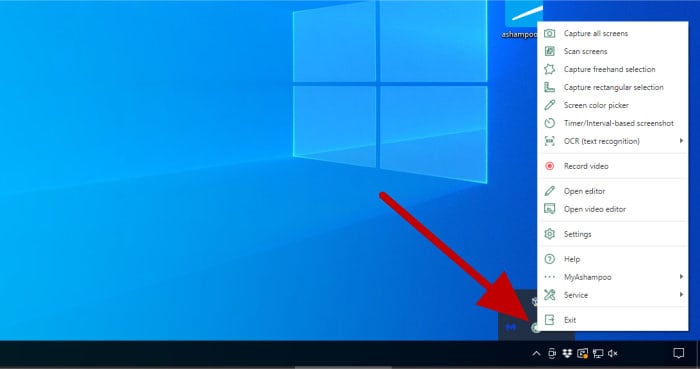
In this section I am going to be focusing on the screenshot abilities of Snap 14, as such, I will select the first of the screenshot tools, this being “Capture all screens” in this instance:
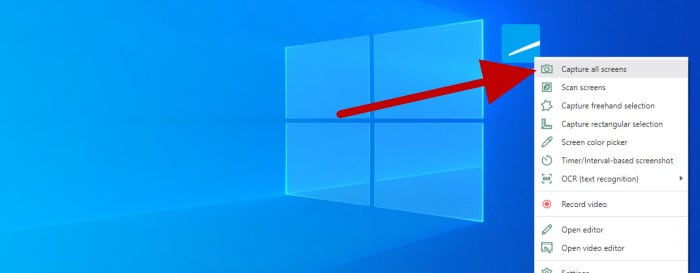
As can be seen above, when selecting “Capture all screens” from the main menu the software will automatically screenshot all connected displays at once (when using more than a single display). Once the screenshot process is complete, we will then get our first glimpse of the built-in imaging editor which will open up automatically afterwards with any screenshots already loaded up and ready for any editing.
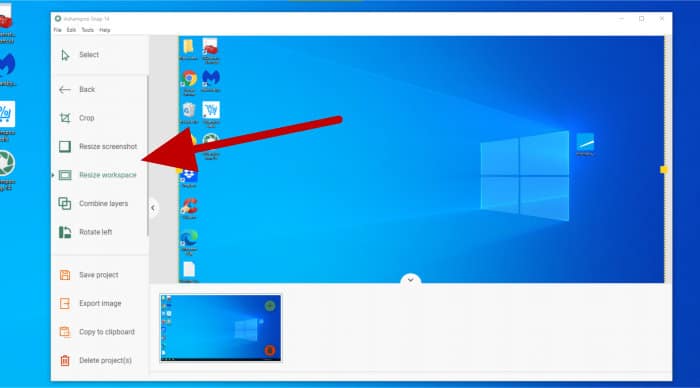
NB – Just a quick side note here, all images will also automatically be saved in the current Windows users “Pictures” folder after they are taken – this will be in the “Ashampoo Snap 14” folder found within.
The main toolbar for the screenshot editing tool can be found on the left side of the window, from here we have access to the most popular set of editing tools with the full set being available via the main “Tools” menu from the top of the screen as can be seen below:
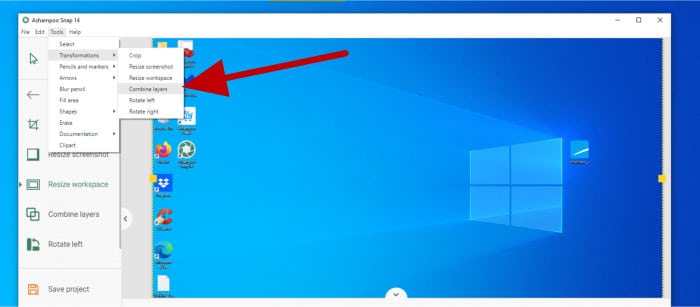
Unfortunately, given there are quite a lot of editing tools available here, I cant go into detail for all of them in this review. I will, however, be looking at some of the most commonly used tools, this starts with the image transformation tools which includes the crop tool, the resize tool, the rotate tools and tools for combining multiple image layers which might be selected within the editor.
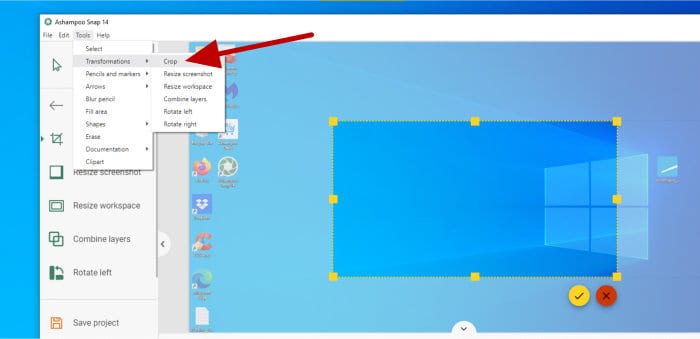
As can be seen above, cropping sections of an image is really easy as is exporting said cropped areas as new image files immediately afterwards (via the “Export image” option which will create a new image file and allow continued working with the screenshot in the main editor window). Other tools in the “Transformations” menu include those for rotating images right or left as well as tools for combining multiple layers of the edited image into a single layer.
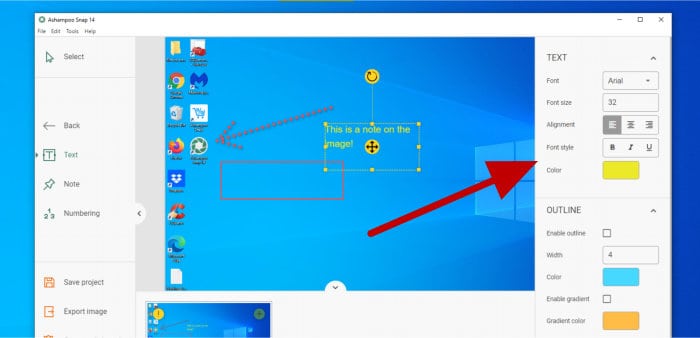
Moving on and the Snap 14 image editor also includes many graphics tools which can be used to easily enhance and annotate the screenshot currently being worked on. As can be seen below, we can easily add many different shapes to an image, add text boxes (and highlight any existing text), add arrows of varying different shapes, styles and sizes and finally, also make use of the freehand drawing tools to add custom shapes and annotations as might be required.
Finally, whilst still discussing the image editing tools, one of the last big features worthy of mention here is the built-in clip-art library (part of which can be seen below):
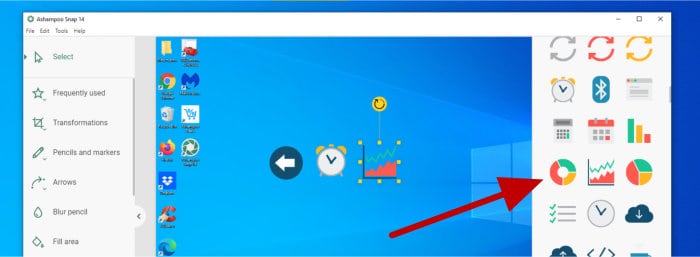
The clip-art library contains a very good selection of commonly used icons, this covers topics such as business, presentations, national flags, social media logos, arrows, mathematical symbols and much more to help make for a very useful post-screenshot editing tool overall!
Finally, when any screenshot editing is compete, we can use Snap 14 to either save the project (meaning we can continue working on it at a later date), copy the edited image to the clipboard for use in another application or to simply export the completed image as a JPG, PNG, PSD or even a PDF file ready for saving or sharing.
NB – Snap 14 makes use of a very powerful web-based sharing tool called Ashampoo Web, this is something I will be looking at in more depth later on in this review.
Moving on and at this point we can also have a look at another very useful feature found within Snap 14, this is the Countdown / Interval Timer screenshot tool which allows for the taking of a time delayed screen shot (or the automatic taking of multiple screenshots with a time delay in-between each one).
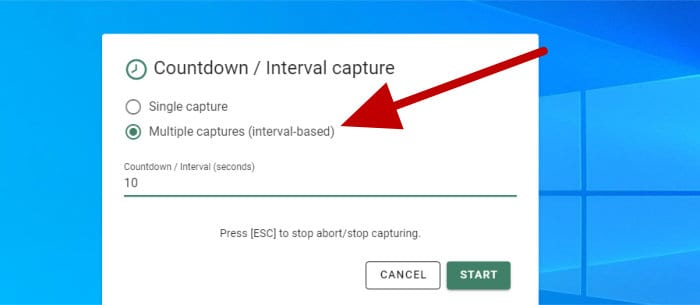
As can be seen above, making use of this tool simply requires we first select the correct mode (single capture or multiple captures) and then specify either the time delay or, when taking multiple screenshots, the delay in-between each automatic screenshot. With the timing options selected (I am going to look at the multiple screen captures mode), clicking on “Start” will then open the region selection tool as can be seen below:
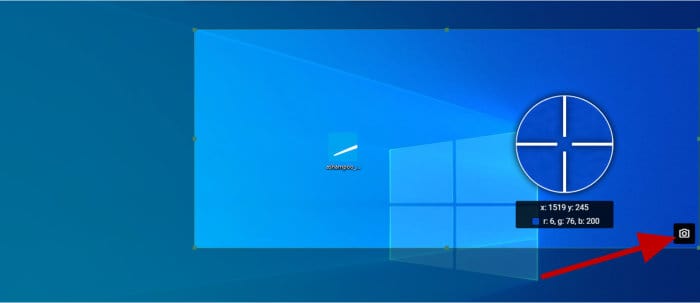
As can be seen above, the next stage in the process of taking automatic (time interval based) screenshots involves selecting the area of the screen to be captured. Here we can manually specify (draw) a region of the screen which is to be captured or, alternatively, click on the “Full screen selection” button which at this stage appears in order to capture the entire display. With the region selected, the final step here is to click the camera icon (pointed out in the above image) which will start running the process of making automated screenshots every few seconds as specified.
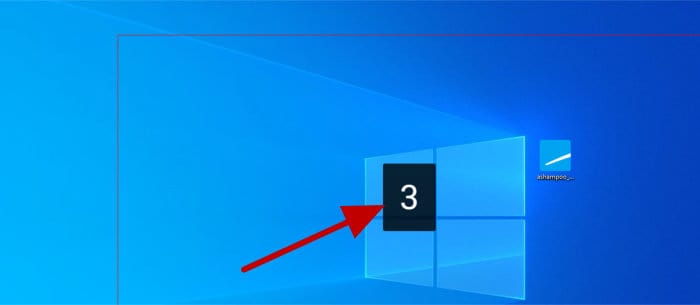
As can be seen above, when the automatic screenshots are in the process of being taken, we will see a countdown timer showing the time left before the next screenshot will be taken, a process which will continue automatically until we intervene and press the escape (ESC) key to stop it. Upon stopping this process the built-in editor will automatically open up with any screenshots already loaded up within it and ready to be processed:
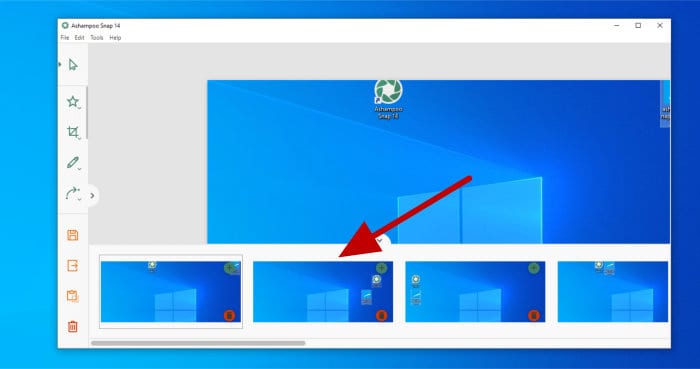
NB – By default, the Snap 14 editor will automatically open up whenever a screenshot (or video) is captured, this can be changed in the application setting should you not want this to happen and the screenshot just be saved to disk!
Before moving on to the video capture functionality within Snap 14 in the next section of this review, the final screenshot capture mode I want to cover here comes via the “Rectangular section” tool, a tool which makes working with pre-selected screen regions and aspect ratios very quick and easy:
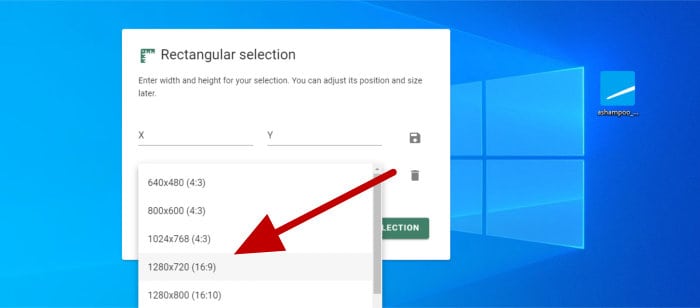
As can be seen above, not only can we manually specify a manually sized region for the tool to work within but also take advantage of many pre-set regions via the drop-down box (which can be seen expanded in the image above). Having easy access to pre-specified aspect ratios (such as 16:9, 16:10 or 4:3) can be a great time saver for many users when needing to work with specific media sizes later on in the screenshot capture process.
NB – If an area is specified manually then it can then be saved to the list of pre-determined areas (the drop-down box shown above) by simply clicking on the disc icon to the right of the Rectangular selection window.
With the specified area selected (either manually or via the pre-set drop down), Snap 14 will then show this region on the display thus allowing it to be positioned as appropriate, once in the correct place all that is left to do is (again) click the camera icon to take the screenshot.
Capturing On-Screen Video
Whilst the advanced capturing of screenshots is one of the core features of Snap 14, another very useful tool which is built directly into the suite is the screen recording utility:
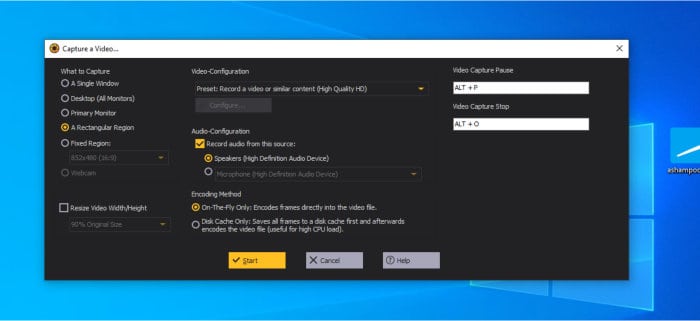
As can be seen in the screenshot above, the video capture utility opens up in its own separate window and thanks to its ability to record multiple monitors, fixed screen regions and even include external webcam and audio input, it becomes a fully featured screen recording utility in its own right.
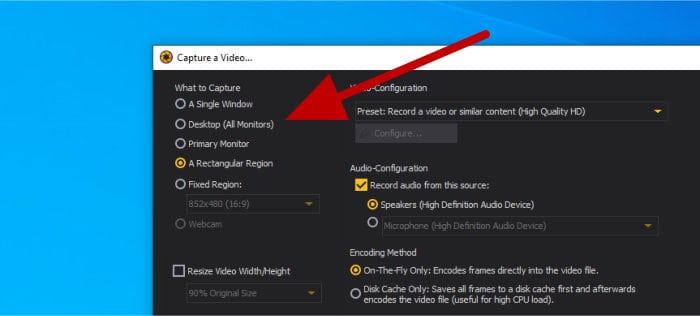
Creating a screen recording first begins by selecting what is to be captured on the left side of the recording tool window, here we can select one or more whole displays, a webcam input or a specified screen region which is to be be included in the recording and then (optionally) resize the video width and height pre-recording using the boxes seen below:
Moving to the middle of the recording app and here we can set the recording quality settings, the audio configuration (if any is to be included) and the video encoding method (should you need to minimize the impact the recording will have on the rest of the working system). With all recording settings configured (the default settings will be fine in most cases) the next stage is making the recording itself, pressing the “Start” button will open up the video capture recording tool where we can set some other (optional) settings and then start the recording:
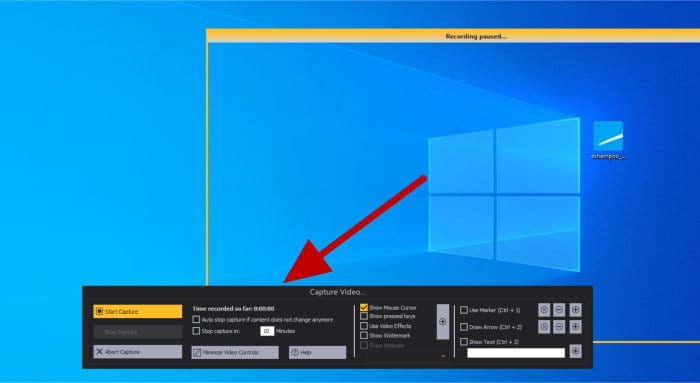
As can be seen above (as in my case) when choosing to make a recording of a specified region of the screen, this region must be drawn out first and only then will the recording tool be visible. With the recording tool now visible, we can then specify some final options (such as an auto-stop time and the option to show the mouse cursor in the recording) before recording can finally begin by pressing the “Start Capture” button towards the left of the tool.
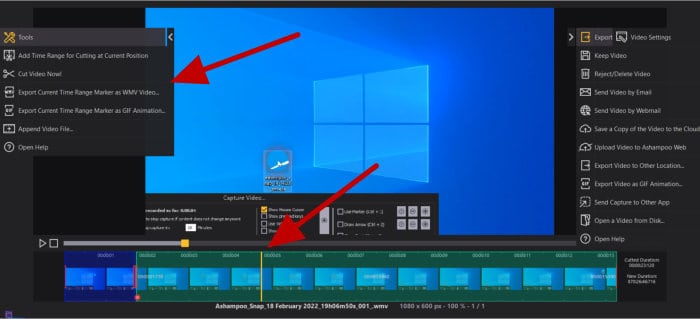
Once recording has finished (either by pressing the “Stop Capture” button or making use of the auto stop or timed stop features) the tool will then automatically load the newly made video clip into the built-in video editing suite (as can be seen above, unless otherwise specified not to open via the app settings).
With the video editing suite now open, we can begin making changes to the newly recorded clip using the tools found in toolbars on both sides of the screen (seen above), the most important editing focused tools of which all appearing on the left side menu:
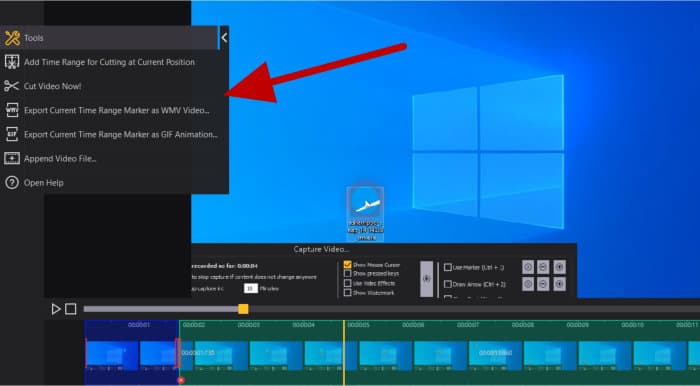
As can be seen above, the left editing menu allows us to perform several commonly used video editing tasks, these include being able to cut snippets out of the video at specified points (including trimming the beginning and end of the video) as well as exporting selected cut locations as individual video files and the ability to append an existing video file to the clip which is currently being worked on.
NB – Whilst the video editing tools within Snap 14 will more than cover the video editing basics for most users, if you are looking for a much more powerful video editing suite then remember to check out Movie Studio Pro 3 (also from Ashampoo). You can also click here to read our Movie Studio Pro 3 review.
Moving on to the right menu and we see even more options available within the app, this time more orientated towards working with the file itself than editing its contents as is the case with the editing menu on the left.
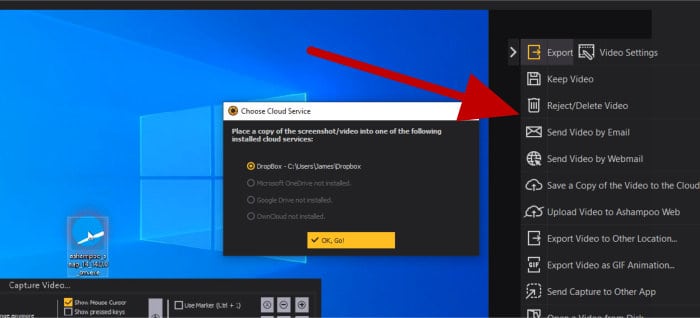
As can be seen above, the right side (file) menu allows us to save or discard the video clip currently being worked on as well as make use of several options for easily sharing the clip via several other services (including Google Drive, Microsoft OneDrive, Dropbox and the Ashampoo Web cloud service itself). We can also at this point simply save the clip as a video file on the local device or select the “Export Video as GIF Animation” option to export the clip as a working GIF file.
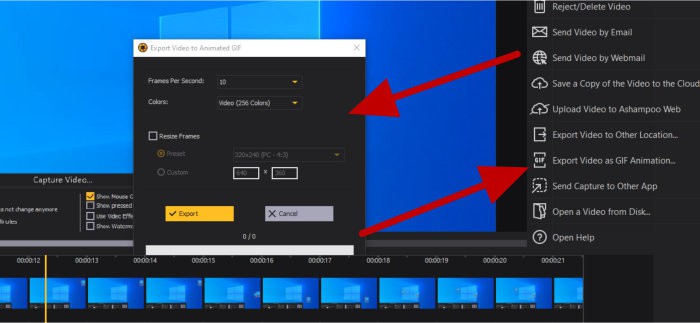
And with this the main workflow of the video capture process is complete! Personally, I think this is a great addition to the Snap 14 suite and is, in-fact, powerful enough to be a software product in its own right given the number of features it brings to the table!
Ashampoo Web Sharing
With the main screen image and video capture tools within Snap 14 now covered, it is time to look at what is another great addition to the Snap 14 suite – this being the free to use and subscription-free cloud sharing service, Ashampoo Web!

As can be seen above, sending any edited screenshots or video clips to the Ashampoo Web service for quick sharing can easily be achieved thanks to this service being built-in to the Snap 14 suite itself. Once uploaded, any media will remain hosted on the Ashampoo cloud for 1 month and can be shared multiple times during this period.
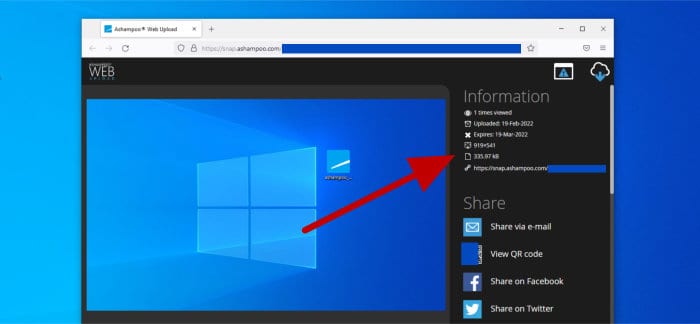
As can be seen above, when sending a file to the Ashampoo Web upload service we will automatically get a browser window open up straight afterwards with the file and sharing details showing, these include the size of the file, the expiry date (1 month away), a view counter and a special URL which can be given out to anyone you might want to share the file with.
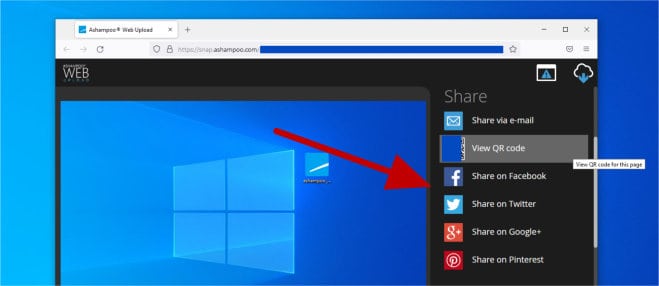
Moving further down the right-side sharing menu (as can be seen above) and here we find even more sharing options built into this service, these include the ability to create a special QR code for sharing the file as well as tool for easily sharing over popular social media networks including Facebook and Twitter amongst others.
Overall, Ashampoo Web is a great inclusion to Snap 14, it comes free to make use of (and subscription free) and makes the sharing of files (both images and videos) across email, URL, QR Code and other popular social media networks very quick and easy, great work!
Other Features of Snap 14
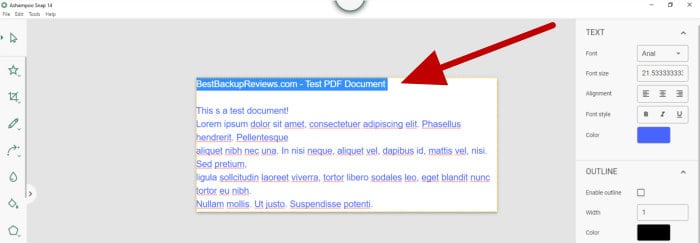
Having now seen the core components of the Ashampoo Snap 14 suite (including the integrated “Ashampoo Web” cloud sharing platform) it is time to quickly review a few other additional features before bringing this review to a conclusion. This starts with the inclusion of advanced OCR (Optical Character Recognition) technology which can be used to turn the contents of an image capture into editable text.
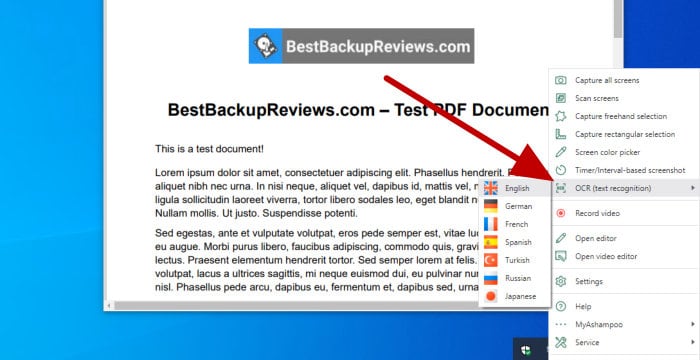
As can be seen above, when wanting to select and transform any text from within a screenshot (such as a PDF file as I’m doing in the above image) we can select the OCR tool form the main Snap 14 system tray menu and then select the region of the screen with the text to begin. Once the OCR process has completed we will have (in the image editing tool) a copy of the text in an editable format which can either be edited further or copied straight into another application:
Moving on and another useful feature within Snap 14(one which can be turned on or off to suit) is the floating toolbar which can be placed at the side of the main display so as to make accessing the Snap 14 tool set quick and easy whenever it is needed:
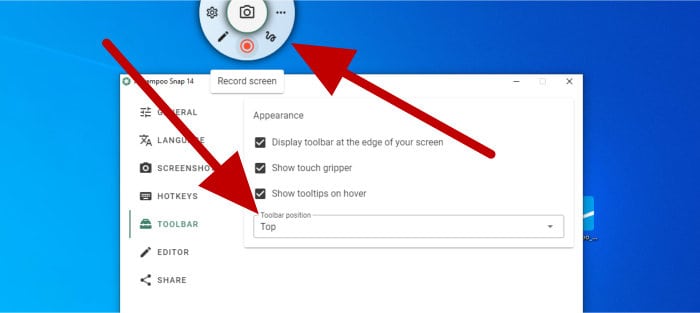
As can be seen above, not only can we turn the floating toolbar feature on or off, but also specify some other options such as what part of the screen it will appear on (top, bottom, left or right). Overall, a very useful addition which makes accessing the wide range of tools within Snap 14 even easier!
Finally, amongst the many additional features and functions available within Snap 14, the last one I will be looking at in this section is the customisable hotkeys functionality:
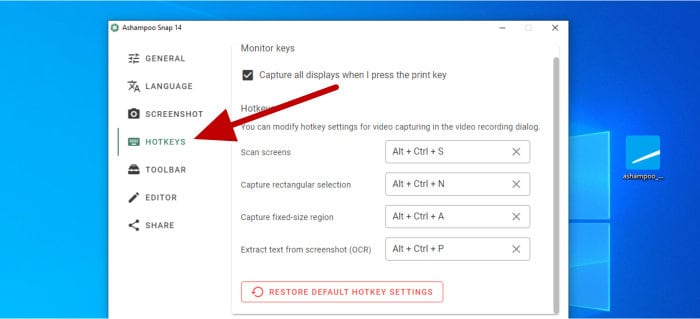
As can be seen above, we can optionally make use of hotkeys for performing certain functions within Snap 14 and even specify what keys will make up each hotkey (as well as specify that all displays be captured or not when making use of the keyboard’s “print screen” key, as per the top of the settings page seen above). Overall, whilst accessing the various different tools within Snap 14 is fairly easy to begin with, especially so with help from the floating menu, it is still great to see that hotkeys are readily available for power users wanting even quicker screen captures!
Snap 4 Security
Snap 14 is a piece of PC multimedia software and security functionality is not really relevant in this particular review, as such I will be omitting it from the final rating.
Ashampoo Support
Ashampoo have a very useful help and support section on their website featuring product documentation for Snap 14 alongside a comprehensive FAQ section which should be capable of handling most problems you might encounter. Should you still need to get in touch with a support representative you can submit support tickets online.
Snap 14 Pricing
Ashampoo Snap 14 is priced at a one-off $39.99 for a single, perpetual licence covering use on up to 3x PCs. Also note that users of a previous version of Ashampoo Snap can simply upgrade to this latest version for just $14.99 (again, covering 3x PCs)!
Also be sure to also check out the Ashampoo deals page to find regular special offers across all Ashampoo software including Ashampoo Snap 14!
Snap 14 FAQ
Yes, Snap 14 is a very useful application which helps take the making of screenshots and screen video captures to a whole new level! Not only are several very useful functions included in the application (including OCR text recognition, pre-set screen capture regions, built-in image and video editors plus the ability to make GIFs within the application) but Ashampoo also provide some great sharing functionality thanks to the (free to use and subscription-free) Ashampoo Web sharing service.
No, Snap 14 is priced at a one-off $39.99 for a single (perpetual) licence covering use on up to 3x PCs. An upgrade licence is also available for users of older versions of Snap and is priced at $14.99 (again, covering usage on up to 3x PCs).
A 30 day free trial of Snap 14 is also available via the official Ashampoo website!
Once installed, all screen and video capture tools within Snap 14 can easily be accessed via the main application menu found on the Windows system tray (bottom right of the screen). Snap 14 also provides the use of a floating menu which can be docked at the side of the screen as well as the option of using hotkeys for easily accessing commonly used screen capture functionality.
Snap 14 Alternatives
In this section I will be looking at some alternatives to Snap 14, these are tools which help bring additional screen capture functionality to PC users over what would otherwise be available via the commonly available (and very basic) “Print Screen” keyboard key.
1) Snipping Tool (Windows)
If you are using a fairly modern version of Windows (version 7 onwards) then you will most likely already have a (slightly) more powerful screenshot utility available, this being the built-in Windows Snipping Tool application!
The Windows Sniping Tool goes one step further than the basic “Print Screen” key and allows PC users to select a specified region of a screen in order to capture (it also allows a time delay to be worked into that capture, although does not allows multiple, time-delayed screenshots as Snap 14 does). Once a screenshot has been taken in the Snipping Tool, a basic editing windows is available where simple makings can be made on the image (but this is very basic in comparison to what can be done in the Snap 14 editing window seen earlier on in this review).
It should also be pointed out that the Windows Snipping Tool can only be used to capture static images and does not have any screen video capture technology (as we see in Snap 14).
There is no need to download the Windows Snipping Tool as (in the vast majority of cases) it should come pre-installed and ready to use with a modern version of Windows!
2) Corel VideoStudio
Corel VideoStudio is not a screen capture utility in itself, but instead a fully functional video editing suite. Despite this fact it does include amongst it’s many features a very useful and well designed screen video capture tool which can be used in a similar way as the one included in Snap 14.
Whilst the similarity to Snap 14 doesn’t go much further than this screen video capture utility it should be pointed out this is also a very competent video editing suite and might be of use for anyone wanting to do more advanced video editing of any screen recordings they might be taking!
Click Here to visit the official Corel VideoStudio webpage and take advantage of the 30 day free trial!
Ashampoo Snap 14 Review Summary
Snap 14 is a really useful tool which helps take Windows screenshots (and video captures) to a whole new level. Ideal for anyone who regularly works with various types of media on their PC, Snap 14 allows various screenshot capture scenarios to take place including the capturing of pre-specified regions, automatic (time delayed) screenshots, freehand region captures plus the ability to edit any screenshots directly within the application itself.
Moving past screenshots and it is also great to see what is a fully functional screen recording app also built-in to the Snap 14 suite! In-fact, with multiple recording modes, automatic stop, the ability to include webcam and external audio plus a built-in video editing suite (amongst many other features), it is fair to say this is a very welcome addition and potentially even worthy of being a software product in its own right!
After finishing any screenshot or video capture work it is also great to see that that Ashampoo have clearly thought hard about making sharing such media as easy as is possible. The built-in Ashampoo Web cloud sharing service compliments several built-in cloud services such as OneDrive and Dropbox and makes sharing quick and easy and thanks to integrations with popular social media sites, QR codes and sharing download links amongst other things. Best of all, this cloud service will retain any shared files free of any charges for up to 1 month after being used!
Overall, I was impressed the last time I looked at Snap (version 11) a couple of years back and it is great to see that Ashampoo have continued to build upon this useful little utility making it better than ever before – great work Ashampoo!
Are you looking for help and advice on choosing the best backup software for your PC or Mac? If so then be sure to check out our guide to choosing backup software which also contains a list of our favorite choices as tested here on BestBackupReviews.com!

