Installing Mountain Duck
Installing Mountain Duck begins by heading over to the Mountain Duck website where a 14 day free trial version can be downloaded. At just over 65MB the installer can be downloaded and set running very easily, a restart was required during my install although, overall, the process was both quick and easy.

Very little user intervention was required during the install, just a couple of clicks and then the application was ready to use after the restart. When starting Mountain Duck for the first time we will be asked to provide a licence key or, alternatively, request the 14 day trial.
With the licencing or free trial out of the way the application itself will now be ready to use!
Mounting Cloud Storage with Mountain Duck
Now we have the application installed and ready to use we can start mounting some cloud storage on our device, I will be using Windows 10 during my testing but Mountain Duck also provide a MacOS version of the software for those on Apple devices.
Upon first opening the software we will see a blank form for configuring the details of our first cloud storage drive, the drop-down menu at the very top allows us to initially specify which cloud service or protocol we want to make use of.
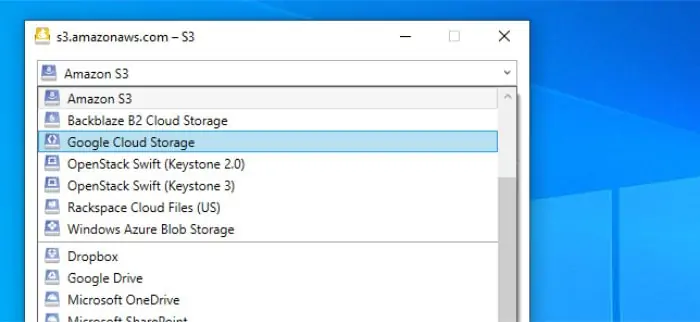
For the purposes of testing I will be using Dropbox, but it is interesting to see that a good selection of commonly used cloud storage providers are supported including:
Amazon S3
Backblaze B2
Google Cloud Storage
Microsoft Azure Blob Storage
Microsoft OneDrive
Google Drive
Files.com
Plus others!
In addition the above, commonly used, services we also see support for using FTP, FTPS, SFTP (SSH secure file transfer) and WebDAV, together making potentially many more storage sources available for use with Mountain Duck.
Having seen this impressive list of supported cloud storage, let’s get on with the task of configuring a mounted drive using Dropbox. I will start by selecting “Dropbox” from the available storage menu at the top of the configuration screen and then, just below this, give this new drive a nickname so it is easy to recognise which storage is in use.
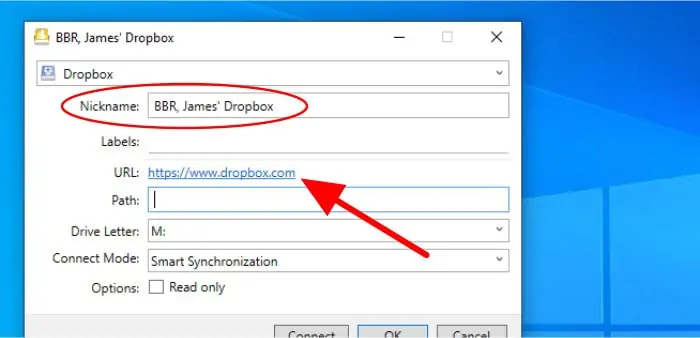
As can be seen above, the URL for the service is automatically added for us when using Dropbox, this means we can now move on to optionally setting a path for pointing to a specified folder within the cloud storage (or leave blank to mount the entire cloud drive).
Next, we can move on to setting the drive letter, this is basically the letter upon which the mounted cloud storage will be accessible from within Windows.
Finally, we can set the “Connect Mode” and “read-only” options for this connection. The connect mode allows us to specify how the synchronisation of the mounted drive works in the background and the read-only option allows making any mounted files read only (this being read-only from the device in use, not read only on the cloud storage platform itself).
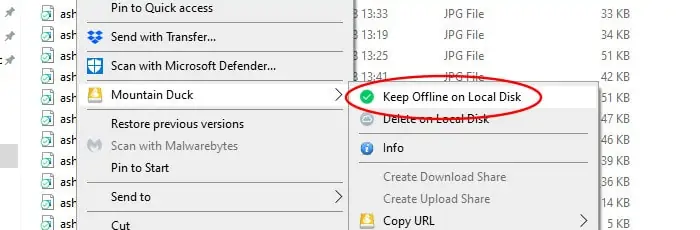
The two important connection modes available to us are “Online” and “Smart Synchronisation”. The “Online” option does not take up any local disk space on our device, however, it does mean that files are only accessible when an internet connection to the storage provider is active. The “Smart Synchronisation” option makes some files available for offline use depending upon when they are being used or otherwise specified as being available offline, specifying files as available offline can be done after the cloud storage is configured by using the Mountain Duck context menu which is shown below:
For my testing I will stick with the “Smart Synchronisation” option and omit the read-only flag as I intend to use this new storage as if it were locally attached for testing purposes.
With these settings complete we can now move on to the next step which is authenticating Mountain Duck to connect to our chosen cloud provider. This authentication process will, of course, vary depending upon the cloud storage provider being used and their own security protocols.

As can be seen above, when using Dropbox we are taken to a page to authorize Cyberduck (the developer of Mountain Duck) to have access to our Dropbox account. This process involves logging into Dropbox and then copying an authorisation code to the Mountain Duck box which appears asking for such a code at this time.
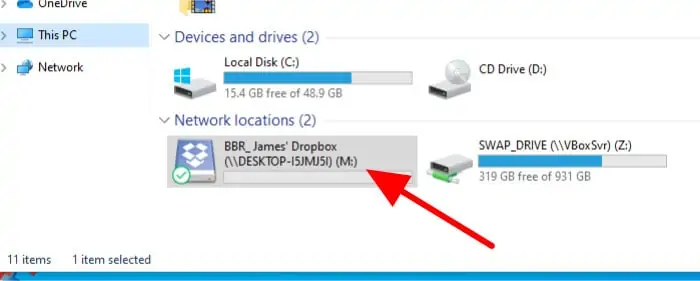
With the authentication complete we will be ready to start using our cloud storage locally on our device, the new virtual drive should now be available to see within Windows Explorer using the drive letter we specified earlier on.
Performance Issues
With Mountain Duck making use of cloud storage we need to be aware of any performance issues which might crop up and potentially cause us problems working with our files. Such problems will almost always be linked to slow or unreliable internet connections and, in-turn, probably affect larger files much more than they might smaller files.
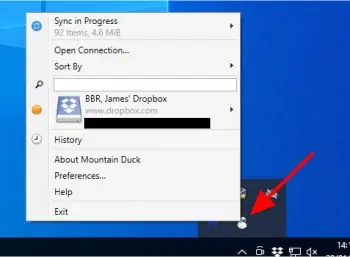
With the above in mind, it is great to see Mountain Duck comes with a very useful system tray tool which, amongst other things, helps us see the synchronisation status of any cloud storage drives we might have attached. By being able to see the synchronisation status and, if needed, easily detach or re-attach any drives which might be causing connection troubles, we can more effectively manage our storage and internet connection.
The system tray tool also allows us to get to the main application preferences window which I will look at in more depth in the next section.
Advanced Settings
Mountain Duck is a very focused tool and with the mounting of cloud storage aside offers little other functionality. Having said this, once we reach the preferences menu we can fine-tune how the application works and set-up many advanced settings to get the most from our cloud drives in the process.
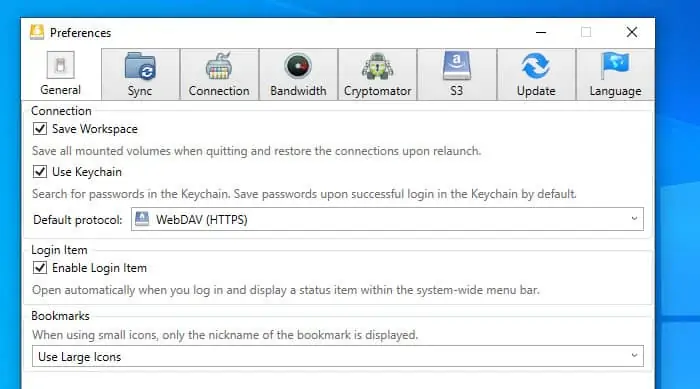
This preferences window can be opened up via the Mountain Duck system tray utility (found at the bottom right of a Windows system), once loaded up we will have access to many advanced settings including the synchronisation, bandwidth and encryption options used by the app.
Starting off in the “General” tab (as is seen above) we can set some of the most important settings relating to logging into the cloud services in-use. By default the application will save authentication details and automatically log into and mount any cloud drives for us when logging into our device, in this General tab we can leave this as is or alternatively turn some or all of this functionality off.
Moving across to the “Sync” tab we can switch between working in the “Online” mode (which doesn’t store any files locally) and the “Smart Synchronisation” mode which allows certain files to be cached locally on the device.
Other tabs including the bandwidth tab, which lets us potentially limit the bandwidth being used, the “Cryptomator” tab which allows for setting encryption and a couple of other tabs allow us to have very good control over how this application actually goes about doing its job.
Whilst, as I mentioned earlier on, this is a very focused tool we are still given a good level of control over how it works and can configure it for our individual circumstances, e.g. if we have a slower internet connection we can make use of caching and bandwidth limiting and also make use of the Cryptomator vaults if we have sensitive data to store.
Other Things to be Aware of
I just wanted to append a small section to my review to make any potential Mountain Duck users aware of two things which could potentially be an issue when using such a tool, these are cloud storage costs and network connectivity issues.
Since we are relying heavily on the internet when using such a tool you will need to be aware of what happens if, for example, your internet connection suddenly becomes unavailable! Of course, you could set Mountain Duck to cache some or all of your files locally which means you can then still work on them during any network outage and they will then auto-update with the cloud when the network connection is restored, but this is still something to think about!
The other important thing to think about is the cost of cloud storage and how this might affect you. Whilst some providers issue a fixed allocation of storage for a fixed cost (e.g. Google Drive) other providers such as AWS S3 is priced per GB / per month, this means, basically, the more your store with such providers the more you will end up paying (so please keep a check on this and make use of any cloud budgeting tools if available).
Setting-up an Encrypted Vault
To configure an encrypted vault we must first have a cloud drive configured and mounted on our PC. Once at this stage we can begin by opening our virtual drive within Windows Explorer and then right clicking where in the drive and opening up the Cryptomator window from the menu (as can be seen below).

Once in the Cryptomator set-up screen we simply need to enter a name for the vault and then set a password, after doing this our new vault folder will be created and ready to use.
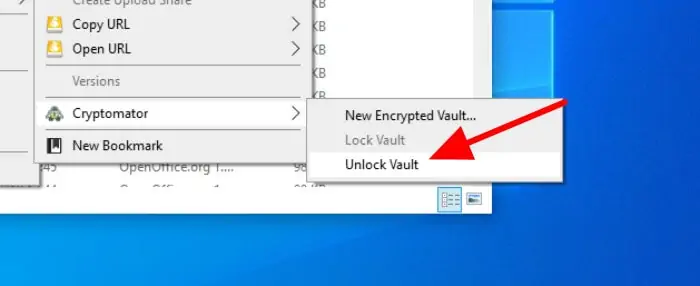
Once configured the vault will then be controlled, again, by the Mountain Duck right-click menu, this is how we will lock and unlock the files in the vault going forwards:
NB – If you do make use of the vault functionality do not forget your password! This set-up has been configured so as recovery of data is not possible without the password, please beware of this!
With all of the above in mind the vault can now be used within Windows Explorer in the same way as any other folder given that encryption is done automatically as files are added. A great feature to see and one which definitely helps Mountain Duck stand out as a great tool to have installed!