Ashampoo Movie Studio Pro 3 Review
Features - 91%
Usability - 97%
Support - 93%
Pricing - 92%
93%
Very Good
Movie Studio Pro 3 provides an easy to use and cost effective way to give videos a professional look, simple and expert editing modes plus several stand alone tools make this a great editing suite
Movie Studio Pro 3 from Ashampoo provides an easy and cost effective way to edit and optimise videos from your own PC! Such editing functionality helps give videos a professional look and allows easy removal of any scenes you don’t want to make the final cut!
With two editing modes available (Simple and Expert), many specialist editing tools, video format conversion and support for both 4K video and Dolby 5.1 sound, Movie Studio Pro allows users of any ability to easily make the most of their videos.
I have been a big fan of Movie Studio Pro 2 for a few years now, so I am excited to finally upgrade to version 3 and see what this latest edition can do, let’s go!
Are you looking for help and advice on choosing the best backup software for your PC or Mac? If so then be sure to check out our guide to choosing backup software which also contains a list of our favorite choices as tested here on BestBackupReviews.com!
Key Features
- (New) Fully up-to-date video editing suite
- (New) Improved user interface
- Very well designed and easy to use
- Support for 4K video and Dolby 5.1 sound
- Simple and Expert editing modes available
- Turn movies into photos (photo extraction)
- Video format conversion tools
- Commercial cutting tool (ideal for TV recordings)
- All major formats supported (MP4, H264, MPEG2, Apple m4v, WMV etc.)
- Support for DVD and Blu-ray formats
- Faster encoding support for Nvidia video cards
- Excellent value at only $59.99!
Movie Studio Pro 3 Usability
What’s New in Movie Studio Pro 3
Ashampoo have clearly been busy since the days of Movie Studio Pro 2 and with this version 3 brings a whole host of new features and improvements!
Starting off with the main editing features themselves, we see the introduction of powerful drag and drop functionality throughout the suite, a new multi-track editor, a powerful media library tool, slow motion and time-lapse effects and many new video transitions, templates and overlay effects amongst many other things added.
Alongside this collection of new editing features we also have many other additions and enhancements including improved navigation throughout the application, a new commercial removal tool for easily editing the commercials out of any TV recordings and over 100 output profiles now available within the suite including MP4, MPG, MPG2, M4V, WMV plus support for Blu-ray and DVD formats amongst others.
Installing Movie Studio Pro 3
As with all Ashampoo software titles, the installation of Movie Studio Pro 3 was very easy, this starts with the downloading of the free Movie Studio Pro 3 installer from the Ashampoo website (Click here to download Ashampoo Movie Studio Pro 3).
At just over 444MB this is quite a big download, once running however, the installer will take only a few moments to do its work and after a couple of clicks the installation will be complete.
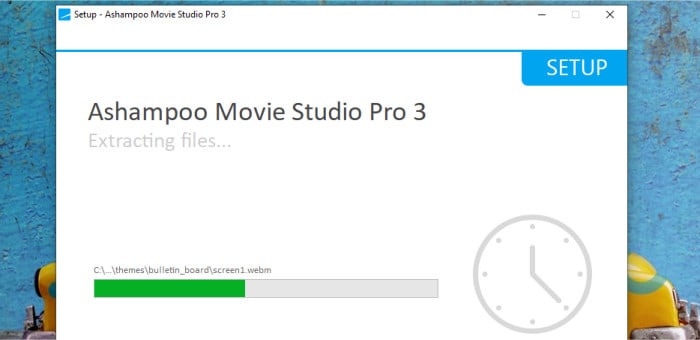
With the install now complete, the software will then load up and be ready for use, at this point we must either activate the licence or, if you are testing the software out, click to take advantage of the full 10 day free trial (which will be extended to 30 days if you choose to register for a free Ashampoo account during this install).

And with this the software is installed and ready to use! Next, I will continue my review with a look at some of the excellent video editing functionality within Movie Studio Pro 3 before moving on to some of the other useful inclusions such as the commercial removal tool, the editing wizard and the video format convertor amongst others.
Video Editing (Simple Mode)
One of the main benefits of Movie Studio Pro 3 is that is features both a Simple editing mode as well as an Advanced mode, this means if you are new to video editing you can get going very quickly and if experienced you will have a very powerful set of tools available when you need them. In this section of this review I will first be looking at the Simple mode before taking a look at the Advanced mode a little later on.
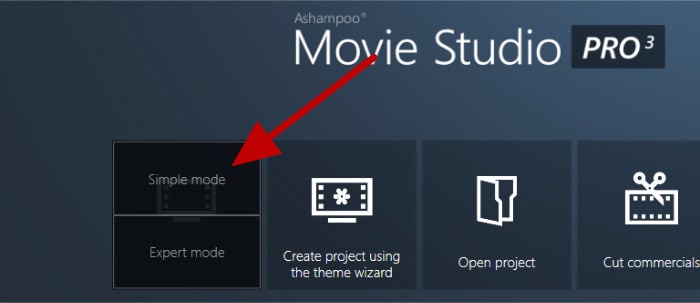
Starting on the main home screen we can enter the simple editing mode by clicking on the “Create new project” button on the left of the window first and then selecting “Simple Mode” out of the two available options.
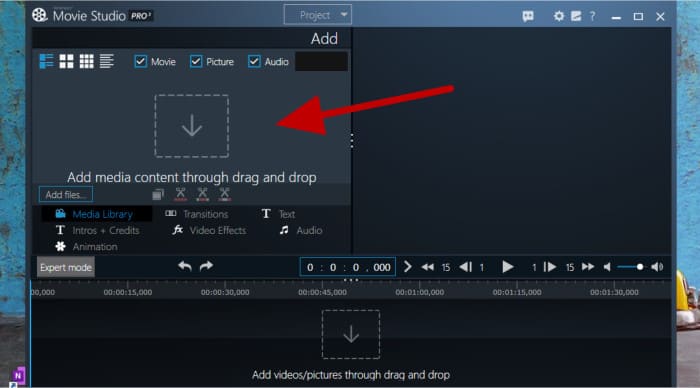
Once we are in the simple editing interface, one of the first things to do will be to add one or more video files we wish to edit, this can be done using the file picker available on the top left of the screen or simply by dragging and dropping a video file from Windows Explorer into the Movie Studio Pro 3 window.
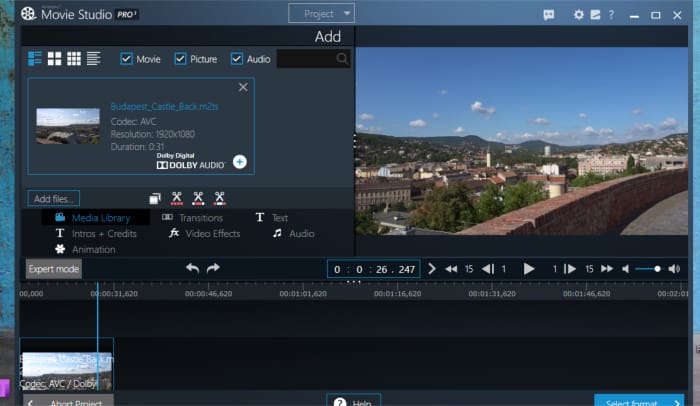
Once our video (or multiple videos) is added to the project we can then add each clip to the editing track so that it makes up part of the final film, the easiest way to do this been simply to drag and drop each file from the media library window (at the top left of the window) to the editing track along the bottom of the window. At this point we will now we will have a video which is ready to begin editing within the software!
At this point one of the most important functions needed from a video editor is the ability to easily cut out unwanted sections of the video. Usually such sections to be removed are at the beginning and end of a clip and, as such, Movie Studio Pro 3 have included a very useful tool specifically designed to make cutting a section at the beginning and end of a video very quick and easy:
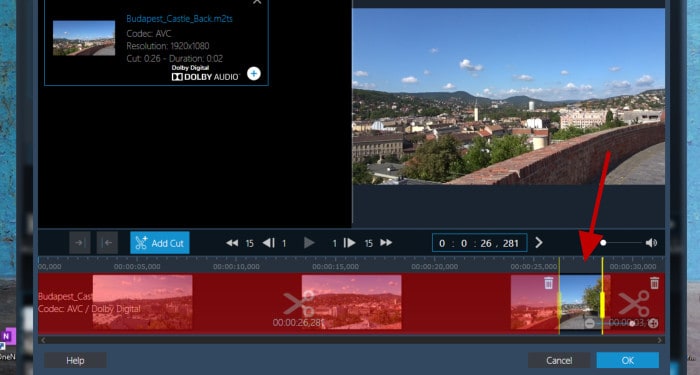
As can be seen above, using the special “cut start / end” tool we simply need to drag the red bars to the point where we want our edited video to begin and then end and the software will then take care of removing the rest. This is ideal if you want to edit you videos down to size as this really is a very quick and easy tool to make use of in such circumstances.
Next, the “split” tool is very useful when performing more complex edits and can be accessed by right-clicking on a video clip already added to the editing track (as per the below image):
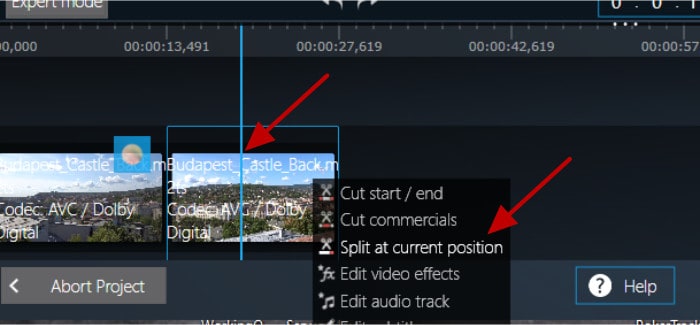
Once selected, the “split” tool will then split up the selected clip into two separate clips on the editing track at the point at which the video time indicator is currently set to. In other words, if we set the time indicator in the middle of a video clip it will split said clip it in the middle into two separate clips like in the above inamge (the left arrow).
This is a particularity useful tool as, once a clip is split, we can easily edit the start and end of each new clip using the “cut start end” tool which we looked at earlier on, this now affords us the ability to cut out or keep an unlimited number of sections from within an original video added to the project!
In addition to continuously cutting out different sections of a spilt-up clip, the “split” tool also allows us to add transitions in-between the two split segments. This process is very simple thanks to the transitions menu, simply select the desired transition effect and drag and drop it into the gap between the two newly split segments of the clip on the editing track (like below):
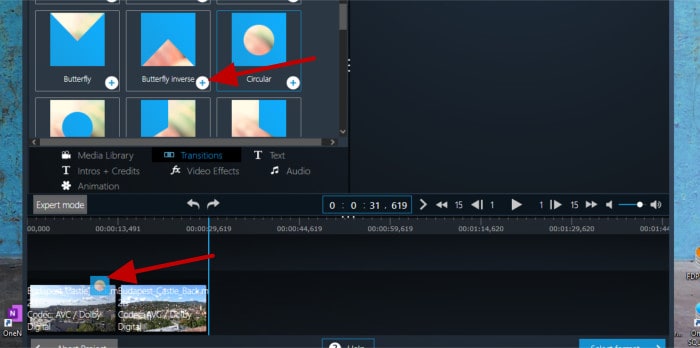
Other visual effects from templates including intros and credits screens, text, audio, animations and video effects can also be added to the project via the editing track in much the same way as transitions above. The effects menu, found in the middle of the screen lists all of these available options within the simple editing mode like below:

Another two useful cutting tools available within the simple editing mode are the “Extract video clips” tool and the “Cut commercials” tool. Starting with the “Extract video clips” tool, which can be accessed via an icon in the media library, we can easily move a set of two red bars across a timeline of the selected clip and “cut out” the remaining middle part (making this middle section into a new clip). This process can be repeated multiple times meaning several new, individual clips can be easily made from one long clip.
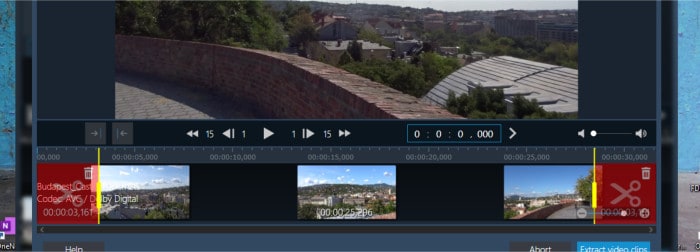
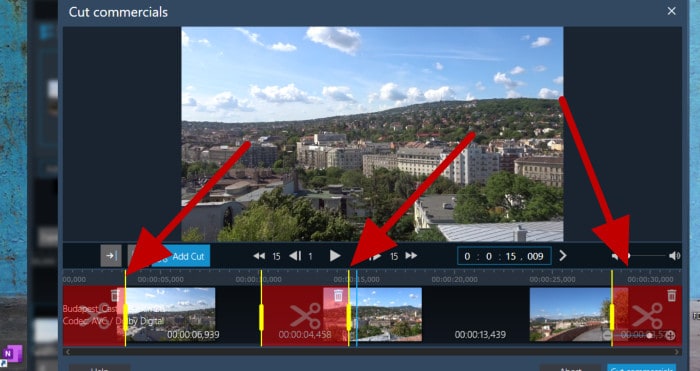
The “Cut commercials” tool works in a similar way to the above, only this time we start with a beginning and end bar (for commercials before and after the TV show being cut) and then also have the ability to add an (optional) third bar in the middle for cutting out any mid-point commercials. As can be seen below, this is as simple as using the included preview box to identify the start and end point of any commercials and adjust the red bars to match. When the red bars have been aligned and everything is ready, simply click on “Cut commercials” to have the editing done automatically in the background and the adjusted clip ready for further work or converting into another file format thereafter.
Finally, once all editing work is done and any transitions and effects have been added, we are ready to both save the project (should we need to do further work on it in the future) and then export the final video clip into one of many formats.
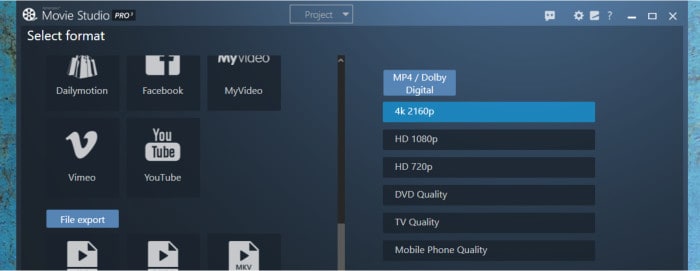
As can be seen above, we have many different export options available for our final video, these include device specific formats for selected smartphones, Blu-ray or DVD discs, social media sites including Facebook and YouTube and multiple standard video formats including WMV, MP4, AVI amongst any others.
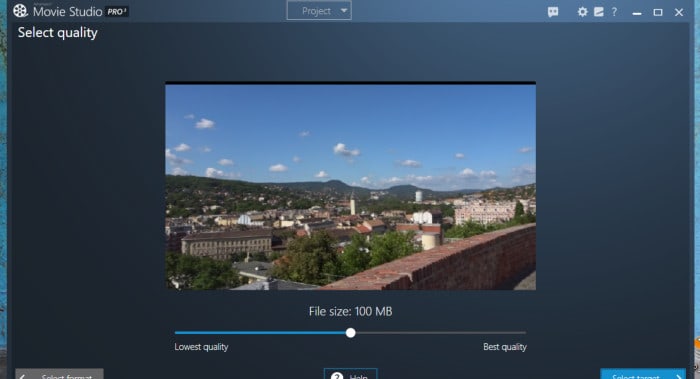
With the file format selected for our video export we can also choose a quality level thanks to the easy to understand quality menu which appears before the export is completed. As can be seen above, we can select a low quality (e.g. TV quality) level which will result in a smaller file size or anything in-between all the way up to 4K quality (which will, naturally, mean bigger file sizes are produced).
Finally, once we have a file type and a quality we are then given a chance to improve / reduce the quality of the final video even further should we need to, this is done by a final “slider” screen whereby the final quality can be tweaked even further if required (as is seen below):
All that is now left to do now is specify a target location to save the new video to and after some processing the video will be ready! In the next section I will be looking at the expert editing mode and some of the more advanced tools and techniques which are available over those in the simple mode which were looked at in this section.
Video Editing (Expert Mode)
Having just seen Movie Studio Pro 3 in use within the simple editing mode, I think it is very impressive the power and functionality this editing tool provides to people who might have limited video editing skills (or none whatsoever even). Thanks to the innovative user interface and the very easy to use and understand tools, such as the splitting and extract clips tools, Movie Studio Pro 3 is a great asset to those wanting to quickly edit clips and easily share their results across multiple different platforms and file formats.
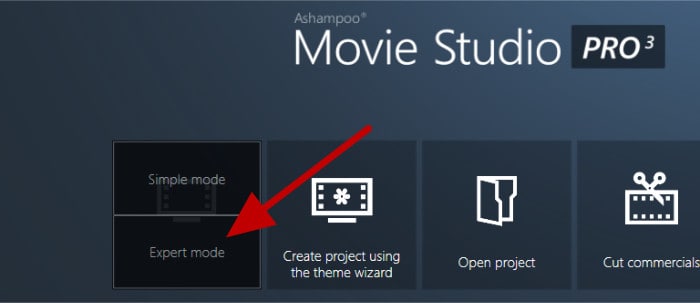
In this section I will leave the simple mode behind and start looking at the advanced (Expert) editing interface, in the same way as we selected the simple mode earlier on, the expert mode is also started up by first clicking to create a new video project and then selecting the expert mode this time around (as is seen below).
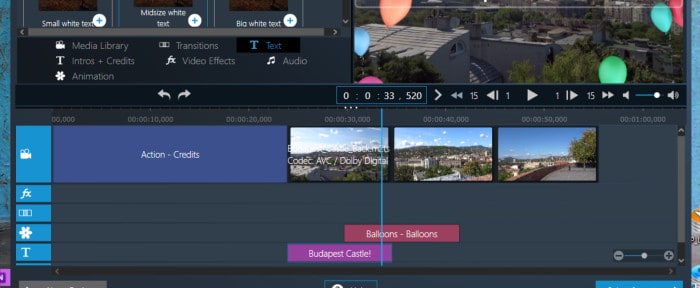
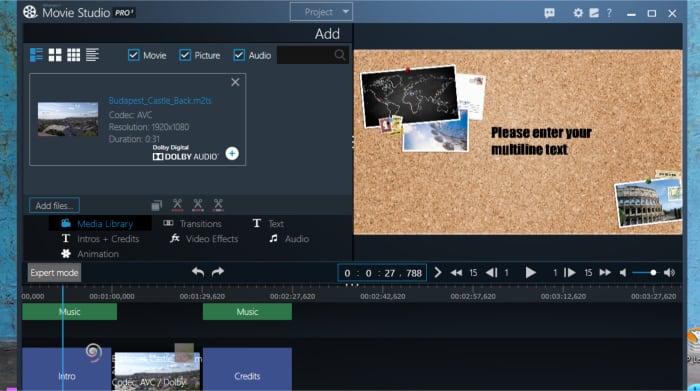
Once in the expert interface we immediately see we have a much more advanced editing track now allowing for video, sound, transitions and effects all to be handled individually and independently of each other in the making of the final video (which, of course, gives us much more control over each individual component now).
Adding the original video files to the media library is very much the same process as in the simple mode, simply drag and drop into the editing window and then again drag any individual video files required as a part of the project to the editing track and order them accordingly.
Again, like in the simple mode, we have available all of the same cutting tools to make cutting the beginnings, ends and any parts in the middle of any individual clips really easy (although these appear to have no additional settings available despite us now been in the “Expert” mode).
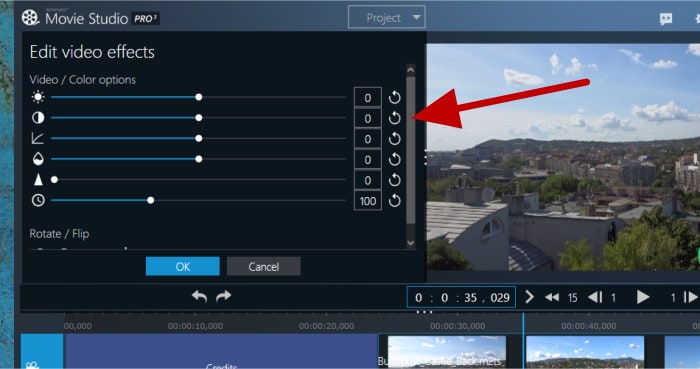
Moving on and another useful tool found in the Expert mode is the video effects editing tool set. Once activated (via an icon in the editing track) these tools allow effects such as the brightness, contrast, gamma balance, saturation and sharpness all to be adjusted in the video thus correcting for low / high light situations etc.
Moving down to the editing tracks, as was mentioned a little earlier on, we see that we have much more detail this time around. By splitting the video into multiple tracks for each component we gain much more control over each component as a result (versus what we had available in the Simple editing mode). For example, in the simple mode we might simply assign a transition to a clip in the editing track, now we have the advanced track editor we can add and configure multiple different effects which can also optionally overlap each other should we need them to.

As can be seen above, multiple video clips can still be joined on the video track as well as credits being added, animation effects and overlay text all together making up a final edited video.
Finally, when it comes to finalising an expert project, we still have the same format and quality options as used before in the simple mode.
Cut Commercials Tool
The “Cut Commercials” tool which features in the main video editing interface (both in simple and expert editing modes) is also available as a stand-alone tool in its own right and is easily accessible from the main Movie Studio Pro 3 menu.
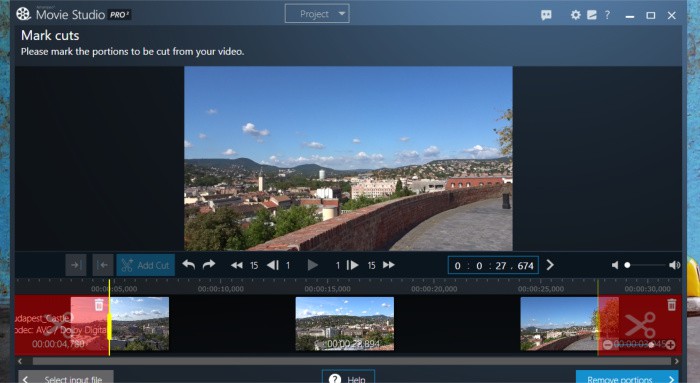
As can be seen above, when using this tool in its stand-alone mode we are first greeted by a file exploring tool whereby we can select a video to cut. Once a video has been selected we are then delivered to the same cutting interface which was available whilst video editing earlier on in this review.
While this stand alone version doesn’t add anything extra in terms of functionality, it does help streamline the process given a new project doesn’t need to be created in order to simply cut some commercials at the beginning and end of a video. Once such parts are cut, the export screen is then the same as was used when editing videos in the project mode, simply select a format and quality setting and export the new video file minus any commercials.
Convert Movies Tool
Another very useful tool found on the main menu of Movie Studio Pro 3 is the “Convert Movies” tool! This tool allows any existing video files to easily be converted into a different file format and, if necessary, the quality reduced to help in making the file size smaller (useful if sharing files etc.).
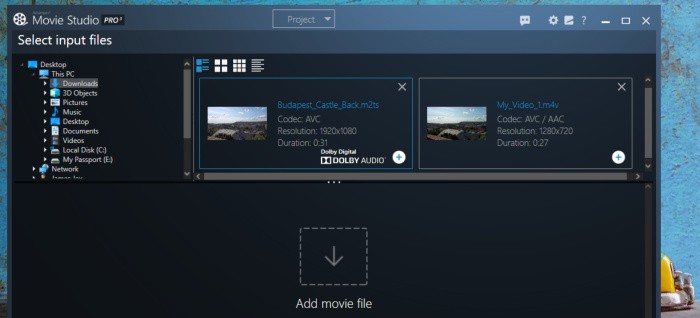
As can be seen above, we have the ability to easily browse all video files on our PC and, crucially add one or more files to this tool before conversion begins (ideal if you have multiple videos which all need converting in the same way).
Once all videos which are to be converted have been added, we then get to use the standard video format and quality selection tool as is used throughout Movie Studio Pro 3. As such, converting a single video or a batch of videos to, say, low quality MP4 files for use on a social media website is very quick and easy thanks to this tool!
Theme Wizard Tool
The last major tool available in Movie Studio Pro 3 is the Theme Wizard Tool, this allows a video editing project to be started with a pre-selected theme already applied.
There are numerous different themes to choose from when using this wizard, each one of which being a pre-configured mix of title screens, transition effects and end credits all set-up and ready to go. This means when using a theme all that is needed is to add your main video clip via the file selection tool and then adjust any title or credit text accordingly, the software will take care of the rest!
Movie Studio Pro 3 Security
Security is not relevant to this particular tool, as such it will not be scored in this review.
Ashampoo Support
Video editing software can sometimes be daunting when first used, especially for those new to the practice and not familiar whit how such software usually functions. As such, it is really nice to see that Ashampoo have set a quick-start guide to automatically open up the first time that Movie Studio Pro 3 is opened, as such any new users will be able to easily find their way around and get editing in the minimal of time (it only does this the first time the software is opened).
Moving on from this quick start guide, Ashampoo also have a great support page available on their website alongside a comprehensive Q&A section which should be capable of handling most problems you might encounter whilst working with Movie Studio Pro 3. Should you still need to get in touch with a support representative for further help you can also submit support tickets online as well.
Movie Studio Pro 3 Pricing
Ashampoo Movie Studio Pro 3 is priced at $59.99 for a single, perpetual licence.
Be sure to also check out Ashampoo’s special deals page as they regularly have great deals across their entire range of software (including Movie Studio Pro 3).
Movie Studio Pro 3 Review Summary
Movie Studio Pro 3 provides a great entry point into the world of video editing, this is thanks to a great set of editing features and effects which are included, simple and expert editing modes being made available and a simple, low, one-off licencing cost of only $59.99!
What I like most about Movie Studio Pro 3 is that is that it really focuses on the basics for which many home editors actually want to achieve with such software. For example, it makes getting one or more videos into a project very simple, as it does cutting and re-arranging sections of a video, as well as the adding of simple title text and transition effects as well.
By taking such an approach to video editing, Ashampoo have made a very nice piece of software which is actually very useable, has a very shallow learning curve and makes the most common video editing tasks (such as cutting out segments of a video) really easy to get to grips with.
Ideal for those wanting to quickly develop basic but effective video editing skills yet still have room to improve said skills thanks to the optional expert editing modes, a great job Ashampoo!
Are you looking for help and advice on choosing the best backup software for your PC or Mac? If so then be sure to check out our guide to choosing backup software which also contains a list of our favorite choices as tested here on BestBackupReviews.com!

