Backup4all Review
Features - 89%
Usability - 89%
Security - 90%
Support - 96%
Pricing - 90%
91%
Very Good
Backup4all is a solid application providing users with multiple backup options, advanced encryption and compression settings and the ability to backup to many different cloud storage providers, a great all rounder.
Backup4all is a comprehensive piece of backup software from Softland, the same company behind the popular (and free) Fbackup software line. As a premium (paid for) application, Backup4all goes much further in its offerings than Fbackup does and provides users with multiple backup options, advanced encryption and compression options and the ability to backup to many different cloud storage providers amongst other things.
One of the main things to note about Backup4all is that the backups themselves are very versatile and are making use of, amongst other technologies, ZIP file formats to ensure maximum compatibility and the ability to recover data without the software itself being installed.
Now on version 8.9, it is clear that Softland have been continuously refining this product and as such we are offered the option of full, incremental, differential, mirror and smart backups methods when taking a backup, the smart options meaning the software will automatically analyse the backup set and choose the best method for us, excellent!
So far everything sounds very promising with Backup4all, let’s go and take a look!
Are you looking for help and advice on choosing the best backup software for your PC or Mac? If so then be sure to check out our guide to choosing backup software which also contains a list of our favorite choices as tested here on BestBackupReviews.com!
Key Features
- (New) Refined, simple and easy to use interface
- Many backup options available (full, differential, incremental, mirror, smart)
- Supports multiple backup sets
- Potentially unlimited historic versioning
- Built in zero knowledge encryption support
- Support for many cloud drives (Google Drive, OneDrive, Dropbox etc.)
- Support for S3 compatible cloud storage (AWS S3, Backblaze etc.)
- Many in-depth configuration options
- Highly configurable job scheduling tool
- Software only available on Windows
- Cloud backups only available in certain versions (Pro version)
- No disk image backups supported
- 30 Day free trial available!
Backup4all Usability
Different Versions of Backup4all
Backup4all is available in 3 different versions, each of which is available at a different price point and providing more backup functionality the higher up the pricing scale you go.
Starting at only $19.99 per PC is the Backup4all Lite version. This Lite version has most of the key backup features available but is noticeably missing some big features vesus the Pro version. Notable missing features include the ability to perform block-level backups, no support for backing up network (shared) drives and no support for cloud storage amongst other things.
The Standard version is available at $39.99 per PC and goes above the Lite version by allowing customers to backup network (shared) drives as well as turn on email notifications. Users of the Standard version can also make use of block-level backup technologies as well as full and differential backup types.
Compression and password protection are available on all 3 versions of the software, the Pro version (priced at $49.99 / PC) includes all features and functionality available including several features exclusively available to the Pro edition. These exclusive features include full AES-256bit encryption, full cloud storage support (including S3 compatible providers) as well as smart and “true incremental” backup types.
For the remainder of this review I will be mainly focusing on the Pro version of Backup4all unless otherwise specified.
Installing Backup4all
At just over 126MB the Backup4all installer can easily be downloaded from the Backup4all website. A 30 day free trial is available without needing to register any personal or payment details meaning you can get the installer and test any version of the software for yourself in just a couple of clicks!
Once downloaded and set running the installer is very easy to work with, the initial screen allows you to configure any of the few available options on a single screen and then click the big “Install Now” button to continue.
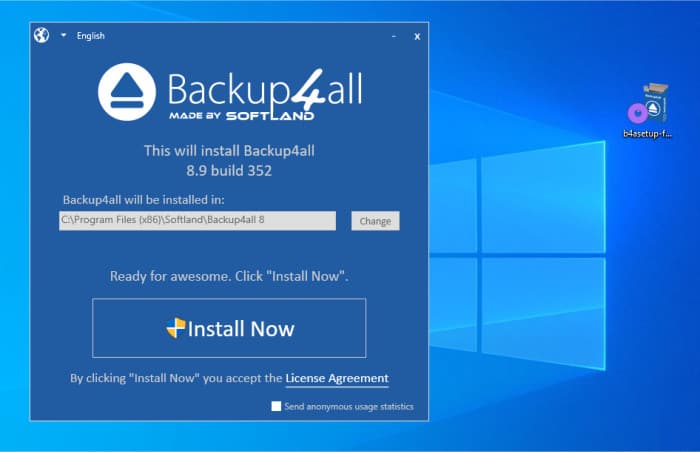
Once running, the installer had the software installed in just a couple of minutes and it was ready to be licenced, if you are trying the software out you can select the “start trial” option and then select the version to try or alternatively enter a full licence key.
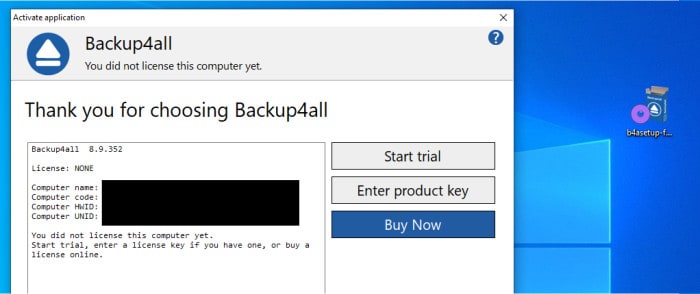
And with this the software is installed and ready to go!
Backing-up Data
Backup4all allows us to backup our data locally, to network attached drives as well as to many popular cloud providers including Google Drive, Dropbox, OneDrive and any S3 compatible storage amongst others. This is a great start to see a provider embracing not only the popular cloud choices (such as Dropbox) but also any S3 compatible storage including, amongst others the excellent Backblaze B2 service!
With that said it is also slightly disappointing to see that backup4all doesn’t have any image based backup capability, this means that we will be limited to making only file-based backups with this application. Definitely something to bear in mind as with this also means no ability to recover your entire PC, no tools available to migrate your PC to a new hard drive nor any form of recovery media builder is available either.
Setting up our first backup involves first clicking on the “New” button found under the “Jobs” tab on the main ribbon menu, this will open up the new backup wizard.
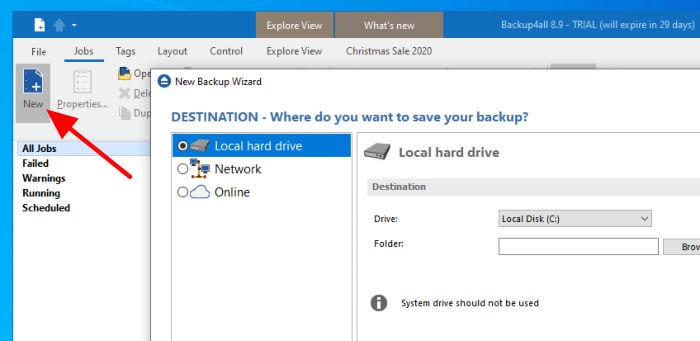
As can be seen above, we are first asked by the wizard to select a destination to store our new backup, this can be on a locally attached disk (external hard disk), a network (shared) drive or one of the many cloud storage providers which are supported.
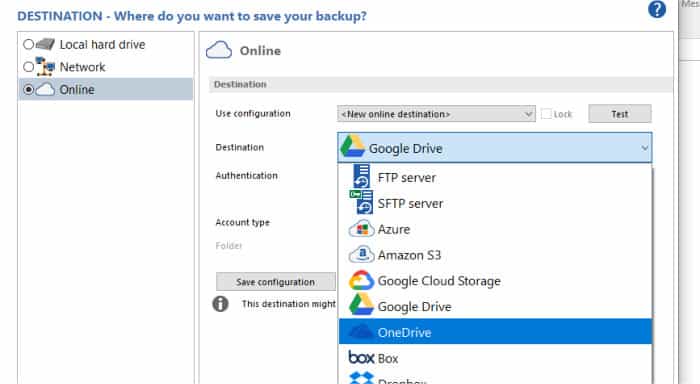
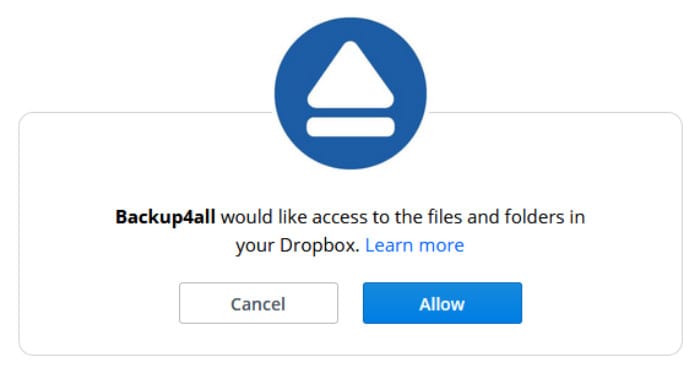
For the purposes of this test I will be making use of my Dropbox account storage, once Dropbox has been selected from the drop down menu (which is shown above) we must click on the “Choose Account” button to connect to the Dropbox account. Once clicked, we will be directed to our web browser and asked to confirm that Backup4all is allowed to connect to the Dropbox account, click allow (as per below screen) to continue.
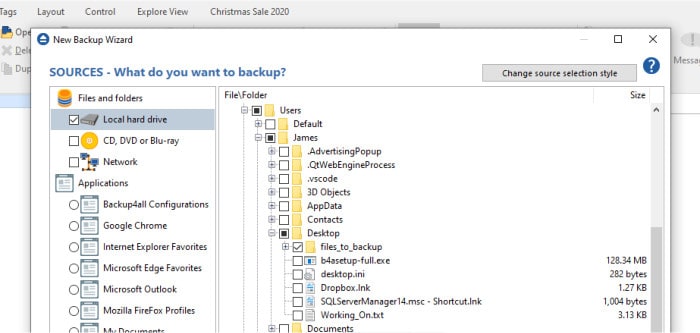
Once the storage has been configured we can move on to the next page of the wizard and select the data we wish to backup. During this process we can specify individual files and folder as well as making use of one of the multiple pre-determined plans which can be seen towards the left side of the screen.
With the necessary files selected we can move on and, if necessary, apply any filters to the backup allowing the tool to ignore certain files and file types. After this exclusions screen is complete we then get to the page where we specify the type of backup we would like to use.
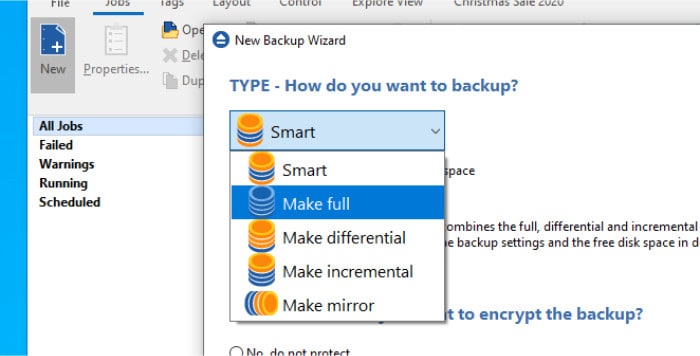
As can be seen above, the default backup type is that of the “Smart” backup. This smart backup option is a special setting which allows the application to automatically choose between the available backup types (Full, Incremental or Differential) and automatically select the optimal one based upon what is being backed up, the size of the backup and the storage space available, a very useful option!
Should you want more control you can select a specified backup type to use, this includes the “Mirror” type which does not make us of ZIP files and makes the backed up data available on the target as it is on the local file system (i.e. in same file / folder layout etc.).
On the next wizard page we can set a schedule for our new backup set and (optionality) configure email based notifications.
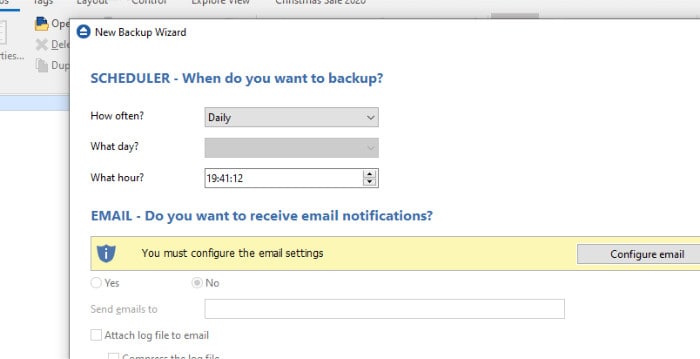
Unfortunately, the scheduling tool available in the Wizard is quite basic and only allows a basic schedule to be set, but I will come back to this later on and show the more advanced scheduling page. For now I will just set the schedule to run manually.
Email notifications can also be set here, as per the warning which can be seen above we must first configure an email account within the application to make use of them and this can be either entering a Gmail account to use or the SMTP settings your email provider gives to you.
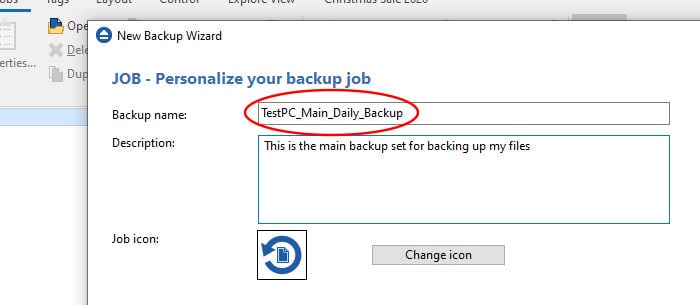
Finally, on the last page of the wizard (above) we can give our new backup set a name and then save the configuration, it will now be ready to run!

To run the new backup set manually (remember we will adjust the schedule later on) we must navigate over to the “Jobs” tab on the main ribbon menu bar and then click on “Backup” next to the relevant backup set.

Once running we will see the progress of the set in the details window which will show to the right side of the application once running.

Advanced Backup Settings
In the above section we looked at making a backup using Backup4all and making use of Dropbox as the storage target, in this section I will look at some of the advanced settings to further enhance our new backup set.
We can make adjustments to our new backup set by locating it on the “Jobs” page and then right-clicking on it and selecting “properties” like below.
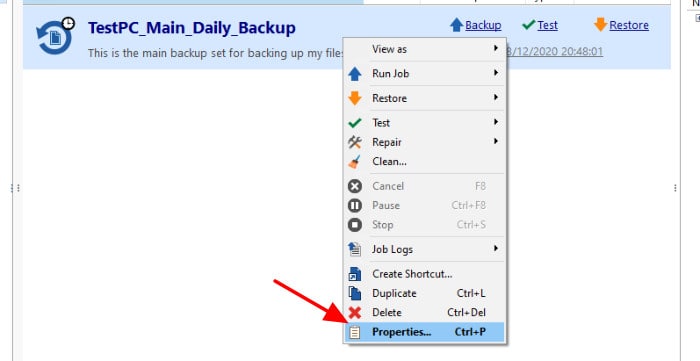
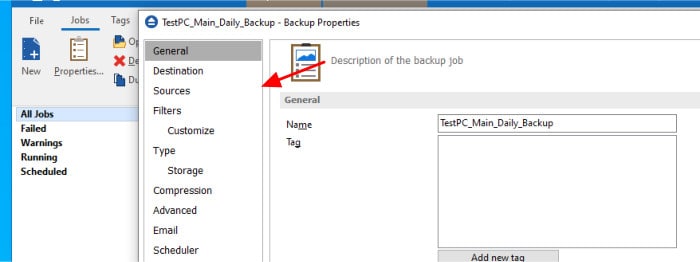
Once in the properties screen we can now edit any of the properties associated with our backup set, these sections are all listed on the left side of this window.
I will start by looking at the scheduling tab, if you remember back to the previous section the backup wizard only allows us to initially set a basic schedule for our new backup set, in this screen we can now expand on this and a set a much more in-depth schedule.
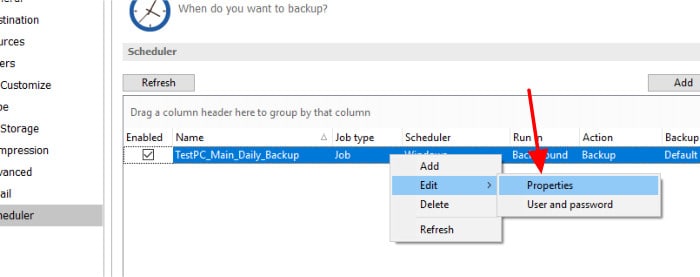
As can be seen above, we can get to the advanced scheduling settings screen by right clicking on the initial schedule we set whilst using the wizard, we can then click on the “When” tab on the left side of the new box which appears to see the schedule entries.
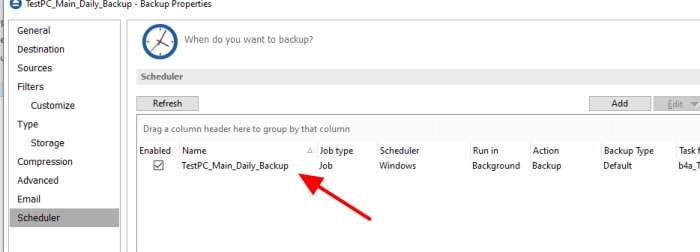
As can be seen above, we currently have just one scheduling entry which we set whilst using the wizard earlier on, I am going to modify this entry into a schedule running every 5 minutes. To start with I must highlight the current “Daily” entry (as is seen above) and then click on the “Edit” button below, this will take us to the editing screen which can be seen below.
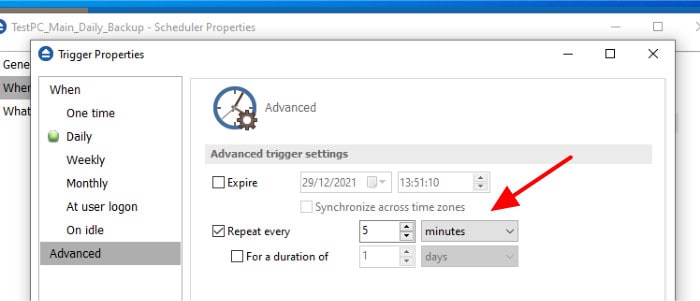
To set up a very frequent schedule (e.g. every 5 minutes) we must first go to the “Advanced” section of the new window (as seen above) and then use the “Repeat every” option to specify a number of minutes as is also seen in the image above.
Once this is set (as above) we can click ok on the two open boxes and then click save on the main scheduling properties screen to commit the new schedule, this backup will now run every 5 minutes.
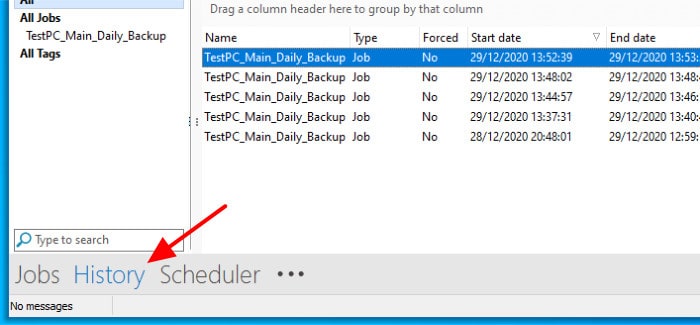
Once the schedule is set we can check in on its progress anytime by using the “History” tab found at the bottom of the application screen, this can be seen below.
Other advanced settings we can look at include compression and encryption, these can both be set at a basic level in the wizard but in the backup set properties screen we can configure them even further. For example, in the screenshot below, you can see we can adjust the strength of the encryption applied as well as the level of compression.
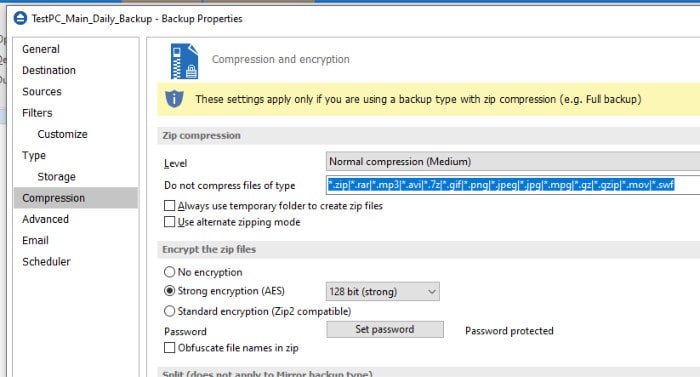
As you will note above, the encryption is set at 128bit AES by default, this is fine for most applications of this software but we can easily set it to 192bit or 256bit using the drop down menu seen below should we need to.
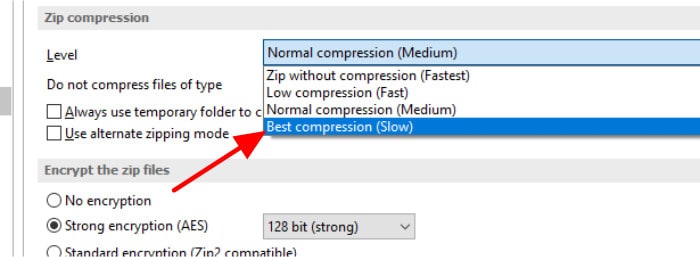
Following on from this compression setting it should be noted that the application compresses and encrypts all backed up files by making use of ZIP files, this can be turned off (should you opt for the mirror backup type) but is a very useful format as it (potentially) allows for the recovery of files without the Backup4all application installed should you need to do this.
Finally, another advanced setting you might need to look at is that of file versioning (historic file versions) which can also be set under this advanced options page.
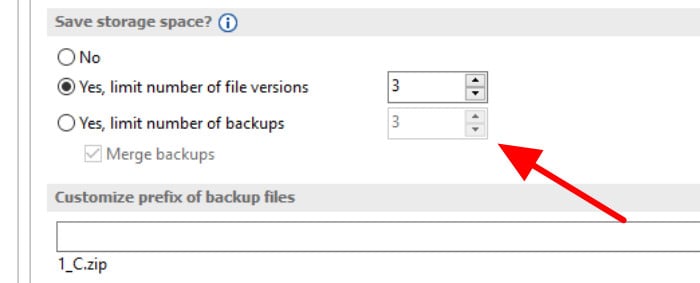
As can be seen above, whilst in the “Storage” tab we can navigate to the “Save Storage Space” section and optionally specify a limit to the number of historic version of files to keep, this will in turn help limit the size of the backup if needs be.
This is just a quick look at some of the more advanced option we have when using this application, there are actually lots more configurable options available should they be needed giving us very good control over our backups and how they will run.
Restoring Data
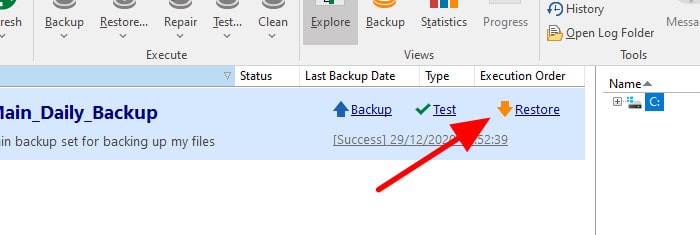
Restoring is very quick and simple within Backup4all, we can start the process by clicking on the “Restore” link besides the backup set as is seen below:
Straight away the restore wizard will open up and ask us where we would like to recover our files, this can be in the original location or to another location of our choosing.
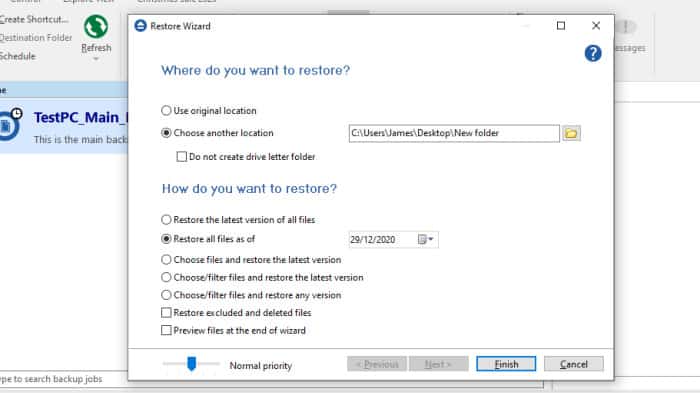
Further down on this restore page we have several more detailed options for our restore operation, these include specifying the date to recover files from, whether to recover all files or selected ones and also the option to specify a restore location. On the next page of the wizard we can then (if necessary) select the files and folders we want to restore using the file picker tool.

Once all necessary files are selected we can then click on “Finish” to begin the restore, the progress of which will be visible in the progress window on the right side of the application screen just as it was when backing up.
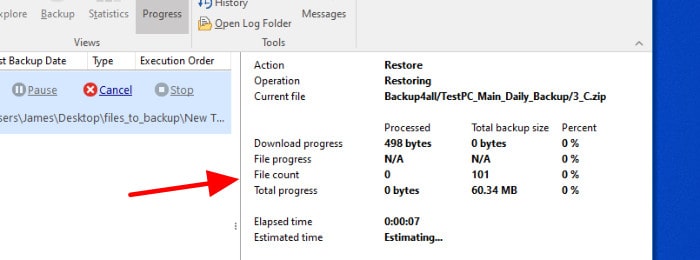
Again, as with backing up, once the restore operation has completed we can see details of the job by looking at the “History” window found using the link at the bottom of the screen.
Other Features
Backup4all is very much focused on the task of backup and recovery and as such doesn’t have too many additional features, one of the interesting things it does feature which is worthy of a look are plugins (which are free add-ons to make using the application easier)!

A “plugin” is a set of instructions for backing up something which would otherwise be quite complicated to configure manually, for example, the Google Chrome browser and all of its underlying preferences and settings. As can be seen in the above screenshot, rather than try and pick all of the necessary files and folders to do this ourselves we can just add the Chrome plugin which will take care of this for us!
Another very useful feature included within Backup4all which I really like is the ability to turn backup sets into shortcuts on a Windows desktop, this means that whenever you need to run a specified backup (manually) you can just double click the shortcut and not have to open up the application software first. Very useful for quickly making very specific backups which only need to be done on an ad-hoc basis!
Backup4all Security
Encryption is one of the most important security features relating to backups, thankfully Backup4all allows us to apply between 128bit AES and up to 256bit AES encryption to our backup sets locally before they ever leave our PC.
There isn’t much else to say on security, 128-bit AES encryption is quick to apply and will suit most users needs, 256-bit AES is available for those looking for the highest levels of security and useful if storing backups with a cloud storage provider.
Backup4all Support
The backup4all website contains a very detailed knowledge base, FAQ section and user forum for getting answers to any questions you might have whilst using the software. Both phone numbers and email addresses are provided for support purposes which is great to see as well as an email form on the website itself.
Backup4all Pricing
As was eluded to earlier on in this review, Backup4all is priced based upon three different versions:
- Lite: $19.99 / PC
- Standard: $39.99 / PC
- Professional: $49.99 / PC
Volume / business discounts are also available for multiple licence purchases. More details can be seen on the Backup4all website.
Backup4all Review Summary
There is a lot to like about backup4all, getting a backup set configured is easy and there is very good support for multiple cloud storage providers including Dropbox, OneDrive, Google Drive and any S3 compatible provider amongst others.
Whilst it is initially disappointing to see the application does not support image based backups this is made up for with a good range of file-level backup options including the versatile Smart backup option. The encryption and compression options are good and more than adequate for use with cloud based backup and the use of ZIP file formats means recovery is possible even if the application itself is unavailable.
All in all a good tool and offered at a very reasonable price considering this includes excellent cloud storage support, a great job Softland!
Are you looking for help and advice on choosing the best backup software for your PC or Mac? If so then be sure to check out our guide to choosing backup software which also contains a list of our favorite choices as tested here on BestBackupReviews.com!

