SpiderOak One Backup Review
Features - 92%
Usability - 90%
Security - 97%
Support - 89%
Pricing - 96%
93%
Very Good
Featuring built-in file synchronisation, file sharing and historic versioning, this security focused cloud backup solution is a solid choice. Additionally allowing unlimited devices per account mean this software comes very highly recommended.
In this review I will be looking at the cloud based backup solution from SpiderOak, a company which takes data security and user privacy very seriously and in-turn have clearly incorporated this into the design of this product.
On the surface at least, SpiderOak One Backup looks like a very strong offering! With very reasonable pricing, fair allocations of storage, unlimited devices per account, unlimited historic versions (within the storage allocation) and zero knowledge encryption we can be sure that all of the main cloud backup boxes are checked.
It is also a cloud backup tool which, out of the box, has secure file synchronisation between all connected devices included alongside built-in secure file sharing. Having this file sharing capability built-in is particularly useful and makes the process of sending large files to others over the internet very easy and mitigates the usual need to upload to a file sharing service / cloud drive first.
With so many features on offer and a clear commitment to the highest levels of data security and user privacy, SpiderOak One Backup looks like a serious cloud backup contender, let’s go and take a look at what it can do!
Are you looking for help and advice on choosing the best backup software for your PC or Mac? If so then be sure to check out our guide to choosing backup software which also contains a list of our favorite choices as tested here on BestBackupReviews.com!
Key Features
- Clean, simple and easy to use desktop client
- Built-in zero knowledge encryption
- Easy and quick to configure first backup
- Unlimited devices allowed (limited only by storage quota)
- Automatic synchronisation included with SpiderOak Hive
- Unlimited historic versioning (limited only by account storage quota)
- Support for Windows, MacOS and Linux devices
- File-level backup only (no options for image backups)
- Good scheduling tool available, simple yet powerful
- Built-in file sharing capabilities
- Supports only a single backup set per device
- No integration with 3rd party cloud available (only supports SpiderOak cloud storage)
- Pricing is very reasonable, especially when using multiple devices
- 21 day free trial available
- Annual pricing discounts available
SpiderOak One Usability
In this section of this SpiderOak One Backup review I will be looking at the SpiderOak One client in detail and evaluating the key features including backup, recovery as well as any other additional services on offer.
Installing SpiderOak One
At only 27MB the One Backup installer can easily be downloaded from the SpiderOak website. Once downloaded and set running this installer requires only a few clicks before the software is fully installed and ready to run. During this process the installer does ask that Windows Explorer be restarted, this shouldn’t be an issue but you can otherwise opt to restart your system yourself straight after the install should you prefer.
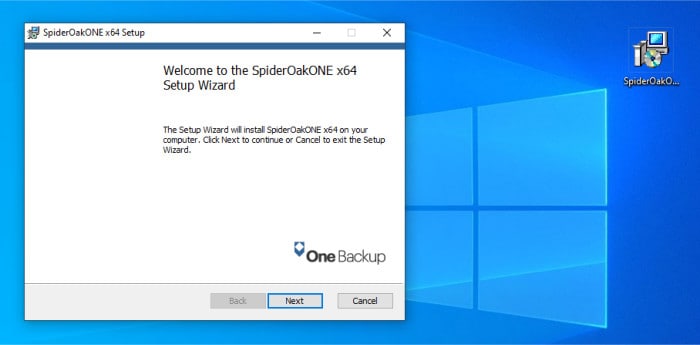
Once installed the software will then ask us to log-in when first launched (if you already have an account) or failing this register an email address and configure a password to set up a new account on the 21 day free trial. With this final installation step out of the way the software will be ready to use!
Backing-up within SpiderOak
Now we have the SpiderOak One software installed we can get to work configuring our first backup, since this is a cloud backup service this will actually be our one and only backup set for this device given that multiple backup sets aren’t supported.
This is a reasonable approach given that this is a cloud backup client for a specific service provider rather than a fully functional backup client in its own right. This approach does, however, mean that if you wanted to make use of an advanced backup set (e.g. backing up large files only on the evenings and everything else on weekdays) you will be out of luck!
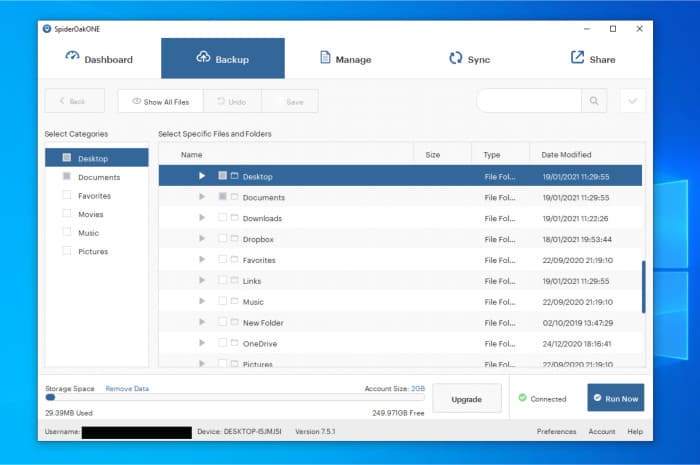
The main backup screen can be seen above, when loading for the first time it does so on the Backup tab meaning we can get straight into configuring our backup at this point. All files to be included in this backup set can be selected using the built-in file picking tool in the middle of the screen with shortcuts on the left for easily selecting all photos, videos, documents etc. with a single click.
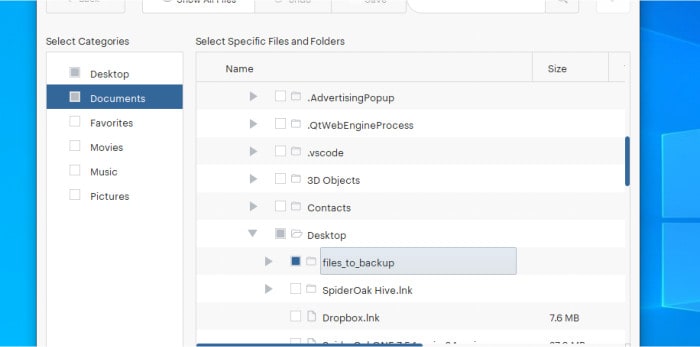
Once we have our files selected we can then (optionally) set up scheduling alongside some other more advanced settings for our backup set, these options can all be found under the “Preferences” link towards the bottom right of the main window.

Once in the preferences window we can specify any advanced settings for our backup set as well as the SpiderOak application itself, this includes whether or not to automatically launch the application when the PC starts up and optionally ask for the account password upon opening up the application.
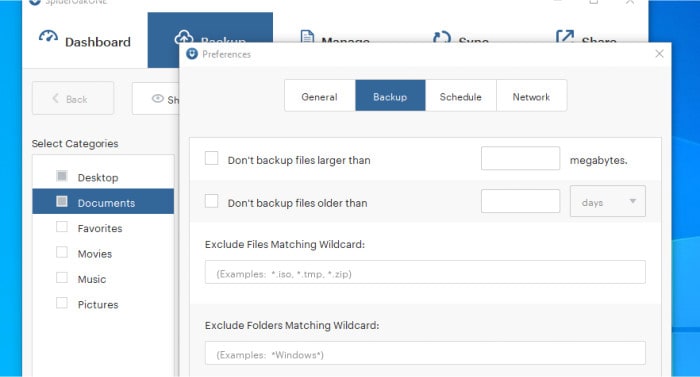
Once in the Backup tab of the advanced settings window (as can be seen above) we can specify some of the advanced settings available for our backup, this includes specifying a maximum file size and a maximum file age. In this section we can also exclude specified files based upon parts of their name or their file extension, this involves manually typing in the name or extension along with any wildcard characters required, an effective solution but not the most user friendly approach (a file picker and list of commonly excluded files such as ISOs to check off would be much easier to use).
After configuring any advanced options we can then look at the scheduling options for our backup, this can be found on the “Schedule” tab still within the current “Preferences” window.
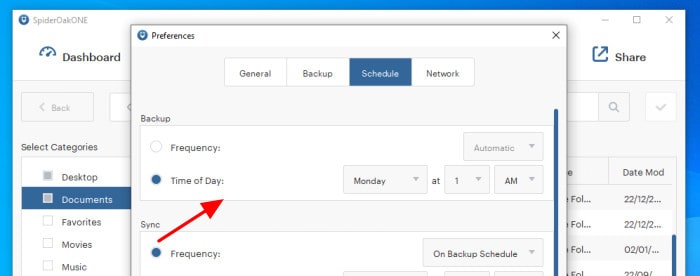
You might notice that whilst using this screen we can actually set all SpiderOak One schedules here, not only for the backup set itself but also for controlling the synchronisation folder intervals and when any shared files are updated and made available via a “share room” as well.
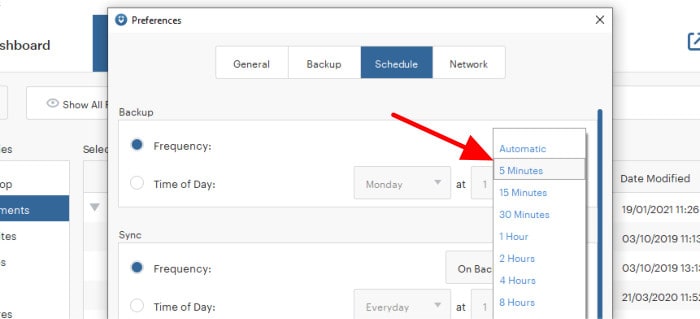
I will look at these other two features later on but for now I will set a schedule for my new backup set using the top of the three synchronisation panes. Firstly, we have the option of using a simple drop-down box to pick a commonly used interval as our schedule, for example, setting the backup to run every 5 minutes, every hour or all the way up to a 48 hour interval.
If this drop-down scheduling menu doesn’t cover your scheduling needs there is, directly underneath it, a “Time of Day” option allowing us to specify the backup be run on specified days such as every Monday, every weekday or even only on weekends (we can also specify the time of day it is run here).
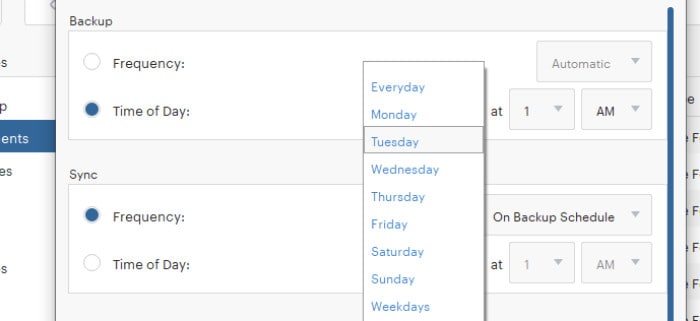
Overall I think this is a good scheduling tool and will easily cover what the vast majority of users want from such a tool. Given that the software doesn’t support multiple backup sets, more advanced scheduling options aren’t really needed and it is much easier to have a powerful yet very easy to use scheduling tool which SpiderOak have provided here for us.
With scheduling completed we can now save these preferences and run our first backup manually using the “Run Now” button towards the bottom right of the window or allow the scheduling engine to pick things up automatically when it is ready.

With the backup complete we can manage our backed-up data using the aptly named “Manage” tab found on the main applications menu. From this page we can see all devices which have been backed up to our account (to the left) and for any given device a file selection tool for browsing and potentially recovering any backed-up items.
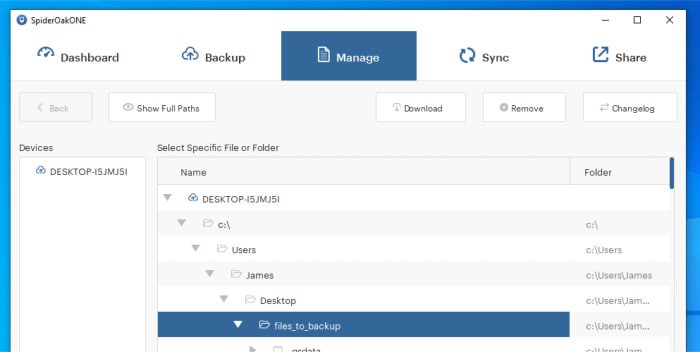
Should we need to do more than a simple recovery, such as recovering from a specific date and time, this is possible thanks to the built-in historic versioning functionality, which I will cover in more depth in the next section.
Finally, before moving on we can quickly see the status of our backup, in addition to that of the sync folder and any shared files from the applications main dashboard page.
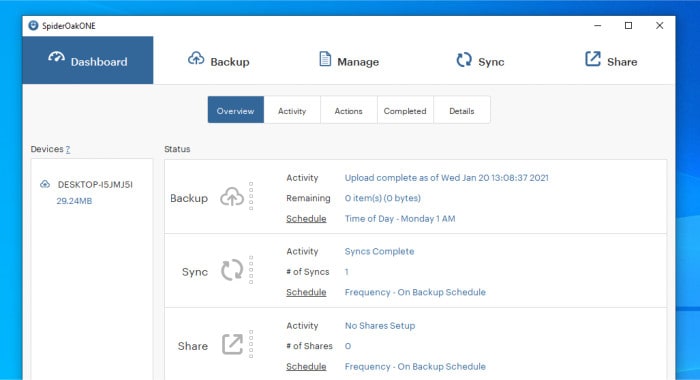
As can be seen above, the dashboard provides a good overview of all the components making up SpiderOak One and makes it clear that our files have been backed up and when the next backup will be taken. Another useful feature (which is actually present throughout the application) is the storage bar towards the bottom of the main screen.

Given that SpiderOak One offers fixed storage quotas (not unlimited storage) it is important to keep in mind how much storage space you have left, this is very visible thanks to this storage usage bar.
Historic File Versioning
I have deliberately broken this feature into its own section as I am very impressed with the approach SpiderOak have taken towards file versioning, this being a “default on” to including unlimited historic versions of any backed-up files by default. Given this approach, we don’t need to actually turn on this feature by ourselves and with this in mind I have made this new section to elaborate why this is such a good feature to see implemented in this way.
Let’s start with why file versioning is so important, you might not think it so but should you ever need to access an older version of a file then the use of your backup software will, in many cases, be the easiest (or indeed only) way of doing so. Reasons for needing access to old versions of files could be the result of a business issue, the need to undo any incorrect changes made to a file or, as is common in this day and age, to help undo any damage caused by malware (specifically ransomware which will encrypt you files making them potentially unusable). As such having unlimited file versioning turned on by default within SpiderOak One is a great start to incorporating this essential and often undervalued aspect of safety.
When needing to access (or remove) an old version of a file within SpiderOak One we must start off at the “Manage” tab and then, using the file selection tool ,navigate through our backed-up files until we reach the one that we require.
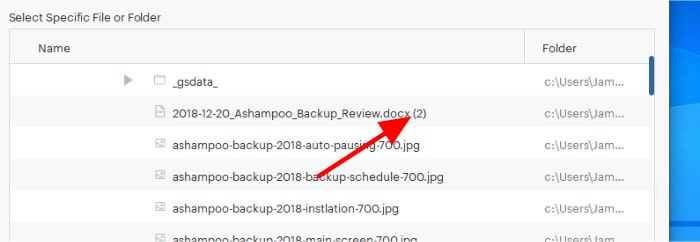
As can be seen above, we know if we have any historic versions of a file (and how many are available) thanks to the number which the software places in brackets at the end of the filename (as is pointed out above). To recover any old version of such a file we must first select it in the main part of the window and then select the version to work with in the right window which will subsequently appear showing all available versions, this can be seen below.

Once we have selected a historic version of the file to work with we can then click on “Download” to obtain a copy of the file in this historic state or, should we need to, click on “Remove” to remove this old version of the file (but still keep the file itself).
My only small criticism here is that older versions of files must be deleted manually should you want to do so, given SpiderOak allocate a fixed amount of storage to each account this could become troublesome should you need to remove old versions of many or even all files en mass! With this in mind I would have liked to see some kind of historic versioning options, even if it is as simple as a tool to clean up all historic versions aged older than a certain number of days (with an option to keep the original, of course).
But nevertheless a great feature and implemented in such a way that it will always be there for you, even if you don’t know that you might need it yet!
Restoring Data within SpiderOak
At this point in this review we have seen the software in action, seen how to backup our files and how the historic versioning can help protect our data from various threats including ransomware. In this section I will have a look at how we can recover files when using SpiderOak One Backup.
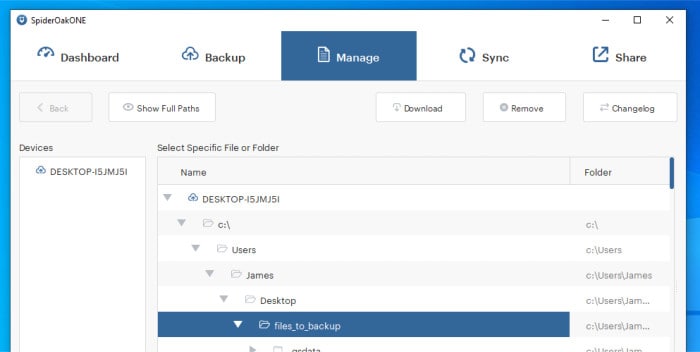
To start restoring files we must first navigate to the “Manage” tab within the main application itself, here we can use the file picking tool to select any files and folders we wish to recover and then select them by clicking on them. Interestingly, whilst we can select historic versions of individual items we don’t seem to have an option of recovering multiple files or folders on or before a specified date!
Once all files are selected we can click on the “Download” button on the menu to begin restoring our chosen files and folders, this begins with choosing to download the files into a specified folder or (optionally) recover them to their original location or to another specified location.
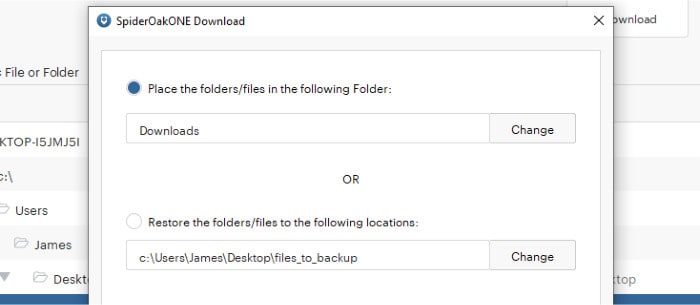
Once we have the location selected (as per above) we can set the recovery process running, the download manager will appear at this stage and allow us to to monitor the progress of the download and then inform us when the process is complete.
Other Features of SpiderOak
With the backup and recovery elements of SpiderOak One aside, we can now take a look at some of the additional features included within the application, this mainly comprises of the SpiderOak Hive (a file synchronisation tool) and the built-in file sharing capabilities.
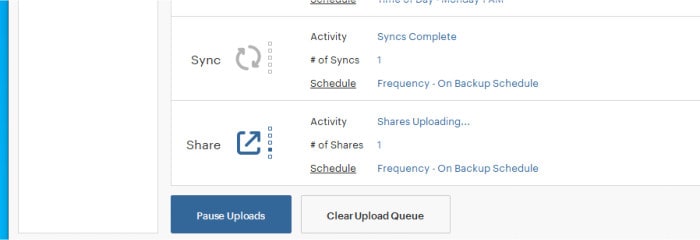
Starting with the SpiderOak Hive, this is a file synchronisation tool which is installed automatically alongside the SpiderOak One backup solution itself. Any files saved in the Hive folder will be automatically synchronised to all other devices on the same SpiderOak One account (unless otherwise specified).

Since set-up is automatic when the SpiderOak One application is itself installed, there isn’t much else to do in order to start using Hive. Simply add files and folders to the Hive folder (found on the desktop) and these files will be automatically synchronised across your devices!
If for any reason you don’t want the device you are using to make use of the synchronisation features, simply open up the application’s preferences window (bottom right for the link) and choose the option to disable the Hive service, this is shown below:

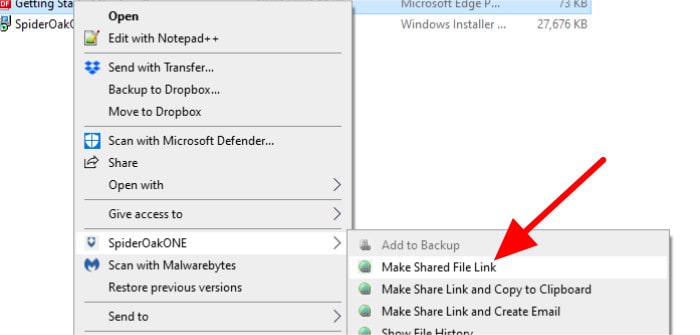
The file sharing tools are a little more in-depth and do require a little set-up in certain parts before they can be used. To share a single file or folder is very easy and involves simply selecting the item, right-clicking on it and then selecting “Make Shared File Link” under the SpiderOak context menu (as shown below).
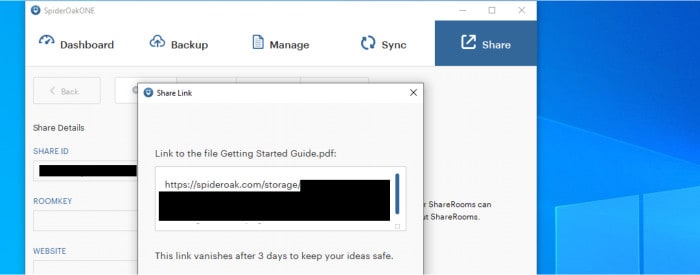
Once selected, SpiderOak will then create a sharing link which can be copied, any links created in this way will automatically be deleted after 3 days making the process safe against potentially forgotten about links.
Finally, SpiderOak also offer what are refereed to as “Share Rooms”, a slightly more formal file sharing solution which allows 3rd parties to connect to your sharing room (with the correct password) and then download from any of the available files from within it. Perhaps more of a business orientated tool but nevertheless nice to see included for those who might be able to make use of it!
SpiderOak Security
Privacy and data security are two things which are clearly taken very seriously by SpiderOak, to the point that they even discourage logging into their own web-based control panel due to it being more secure to manage your account entirely from within the app (which is of course possible). In addition to this, a read of the SpiderOak website will quickly convince you that this is a company that takes security very seriously by building their “no knowledge” security approach into everything they do. This approach to software development means SpiderOak users can be confident only they themselves ever have any access to their data and their privacy is taken very seriously.
Moving on to the One backup platform itself we see that zero knowledge encryption understandably plays a very important role in the backup process. Zero knowledge encryption is automatically applied to all data being backed-up by SpiderOak One before it leaves the device by means of AES-256bit encryption, all traffic is also sent exclusively over secure TLS/SSL connections.
You can learn more about the SpiderOak “Secure-by-Default” process at the no knowledge information page.
Overall it is clear SpiderOak take security and privacy very seriously, this is not just limited to encrypting data but instead treated more as a philosophy which is integrated into everything they build and operate as a business. A great approach to help ensure user data stays safe and secure!
SpiderOak Support
The SpiderOak support portal contains a very detailed knowledge base covering all aspects of using the One Backup service. Should more help be required the support team can be contacted via an online ticketing system found on the support portal.
SpiderOak One Pricing
Pricing for SpiderOak One is very competitive given that unlimited devices can be used on any given plan, this is in contrast to many other cloud backup services that charge on a per-device basis!
The basic plan is also very reasonable starting at only $6/month (or $69 annually) for a total of 150GB storage (remember this service also includes unlimited historic file versioning, device synchronisation and file sharing within this storage quota).
The full SpiderOak One pricing at time of writing (Jan 2021):
- 150GB Plan: $6 / Month (or $69 annually)
- 400GB Plan: $11 / Month (or $115 annually)
- 2TB Plan: $14 / Month (or $149 annually)
- 5TB Plan: $29 / Month (or $320 annually)
More information on SpiderOak One Backup pricing can be found at the official SpiderOak One backup webpage.
SpiderOak One Review Summary
So far I have been very impressed with SpiderOak One Backup, a service which is not only very good on a technical level but by allowing users to backup multiple devices and include unlimited historic file versions (without any additional fees) a very fairly priced one!
My experience installing and configuring the product was also very good and it is possible to get a full backup running very quickly and easily. As was previously mentioned, I really like that unlimited file versioning is included and turned on by default in the backup client, even though I still think this could be improved upon slightly (e.g. allowing a full restore before a specified date and providing of an easy to use cleaning up tool for removing old versions).
Other features including device synchronisation and built-in file sharing mean that SpiderOak One becomes much more than just a backup solution and akin to a fully featured cloud storage solution in its own right.
Finally, the zero knowledge encryption built into the software alongside the clear commitment that SpiderOak themselves have towards securing their users data means this service not only protects your data but could also play a key part in helping ensure your device and personal information also stay secure!
Overall a very impressive cloud backup solution providing very good value, well done SpiderOak!
Are you looking for help and advice on choosing the best backup software for your PC or Mac? If so then be sure to check out our guide to choosing backup software which also contains a list of our favorite choices as tested here on BestBackupReviews.com!

