If you have been wondering whether Windows 10 has its own, built-in backup software then the answer is, yes, it does!

Whilst Windows 10 does have some backup software built-in and available at no additional cost, in this guide I will be taking a closer look a what is on offer and exploring whether it is (or isn’t) useful as a backup tool and if 3rd party software could be more beneficial.
Getting Started Windows Backup Software
Starting of with the newer “File History” tool, which is now the main backup tool included within Windows 10, we must begin by selecting a drive in which we wish to back our system up to (selecting this drive can be seen below).
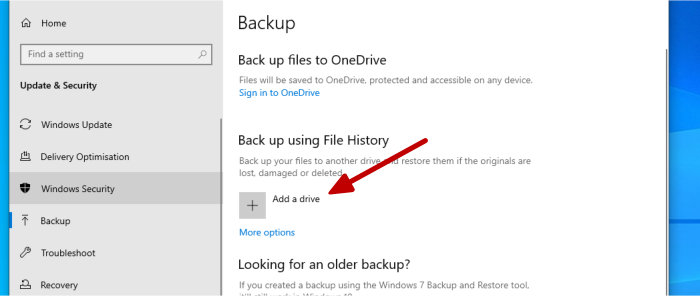
As can be seen above, we can select any drive attached to the Windows system (such as an external hard drive or USB flash drive) as well as a shared folder (from a NAS device) as the location upon which our backup will be stored.
Unfortunately, the File History tool does not officially support any direct integration with any cloud backup providers itself, this means we must make us of locally attached storage or network drives when making use of this tool. It could be possible to work around this limitation with the help of cloud drive drive synchronization software, however, results might not be stable under certain circumstances and this is probably best avoided.
Moving on with the configuration and under the “More Options” link we can configure this new backup set further. By default, once a storage location for the backup has been selected, Windows will start keeping our files backed-up every hour with unlimited file revisions as can be seen below:

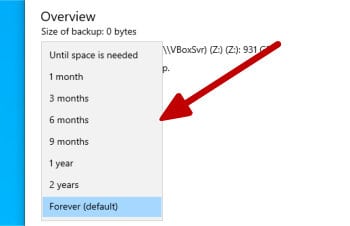
Should you want to make use of a more or less frequent backup schedule then this can be adjusted to be as frequent as every 10 minutes or, on the other end of the scale, run only once per day. We can also set how long historic file versions are to be kept, this can vary from the default setting of forever to a specified monthly or yearly figure (as can seen below);
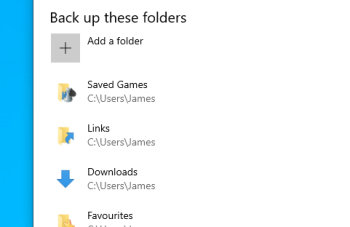
Most of the standard folders underneath the Windows user profile will be included in this backup by default (e.g. My Documents, My Photos etc.), additional folders can be added (or existing folders removed) form this same options screen via the “Back up these folders” section as can be seen below:
Finally, with everything configured, the back-up can be run manually or left for the pre-set scheduling tool to take over.
Recovering Files with Windows File History Backup
Once the Windows File History backup is up and running, the next thing to take a look at is how we can actually restore files or versions of files when we need to. This process begins by heading on over to the “Advanced Settings” window (found using the link in the “More Options” screen as can be seen below).
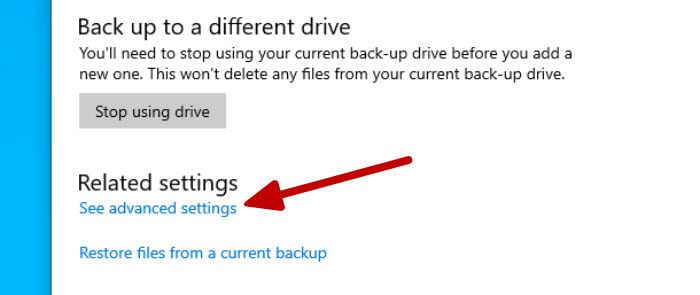
Once in this advanced settings screen the “Restore personal files” link on the left side menu can then be used to get to the file-level restore screen as can be seen below:

Once in this File History screen we can see all files which make up the last backup by default, we can also make use of the built on search box to find specific files and folders or simply browse though them as we would with any other Windows Explorer window to find what we want to recover.

Going back to an older version of the backup is simple thanks to the version controls found at the bottom of this screen (as can be seen above). Simply use the controller to move between different versions and when the files or folders to be restored have been found, simply select them ready for the restore (this is done via the settings menu found at the top right of the screen, see below).
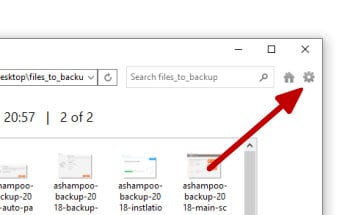
As can be seen above, once in this settings menu we have the option to simply restore the files (which will make use of the original file locations), or alternately use the “Restore to” option which will allow us to specify a secondary location for the restore operation.
Disabling the Windows File History Backup
If or when the times comes to disable this backup we have a couple of options to do so, one is simply to leave the backup configured, in-situ, and then turn the schedule to manual (so it is only run when we manually go and run the backup ourselves, an option which leaves everything pre-configured should we need the backup again in the future).
The second method involves turning off File History for a specified drive on the “Advanced options” screen, this can be seen below:
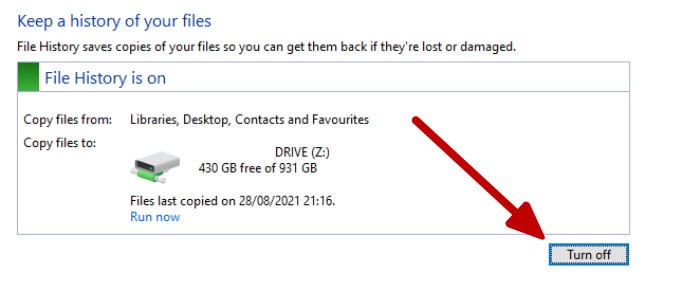
Either way this is a fairly simple process and, if necessary, any existing backup files can also be deleted form the settings screen should the disk space need recovering.
Backing up with Windows Backup and Restore
The second option for backing-up using the built-in backup tools within Windows 10 is the Backup and Restore tool, this can be accessed using the “Go to Backup and Restore (Windows 7)” link in the main backup settings page:

The main difference between “Backup and Restore” and “File History” is that the older Backup and Restore tool allow us to also make system image backups should we need to. Such an image backup can be especially useful if you ever encounter any PC hardware problems and potentially need to recover your entire working PC (with all applications and user data included) to another device.
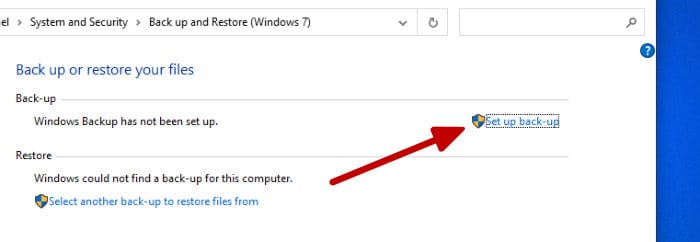
Creating a new backup set with Windows Backup and Recovery begins by clicking on the “Set up back-up” link found on the main Backup and Restore landing page like so:
Once on the configuration page we can initially configure the location for our new backup, this could be an external hard drive, a CD/DVD directly or a shared / network drive (thus allowing use of a NAS system). Unfortunately, Microsoft do not directly support cloud drives within this interface, it could be possible to work around this using cloud drive synchronisation software but caution should be taken if you plan on doing this!
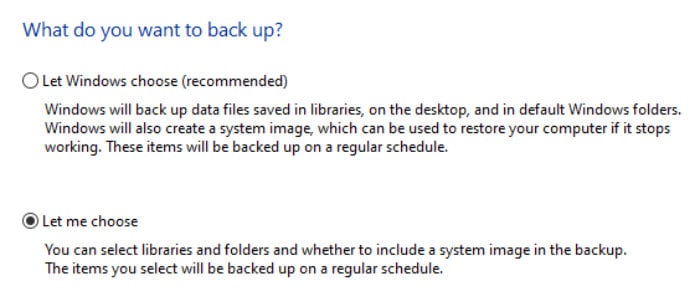
With the target location to save the backup on chosen, the next thing to do is select what is to be backed-up. As per the above screenshot we can allow Windows to intelligently choose what to back up itself or, alternatively, manually select files and folders to backup ourselves.
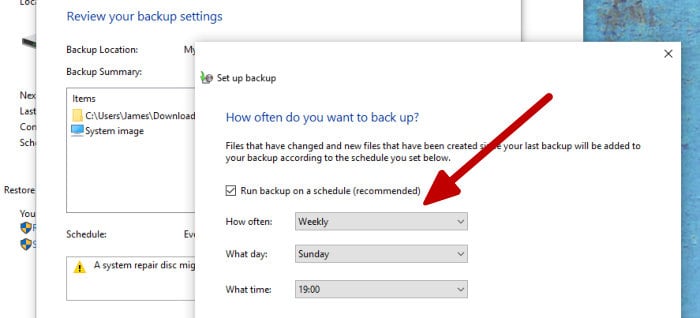
With the main backup settings configured, we can now optionally apply a schedule (as can be seen above) or set the backup set to be run manually instead. Unfortunately, unlike the File History backup tool looked at earlier on which allowed scheduling down to every 10 minutes, the most frequent time period we can schedule for when using the “Backup and Restore” tool is only once daily!
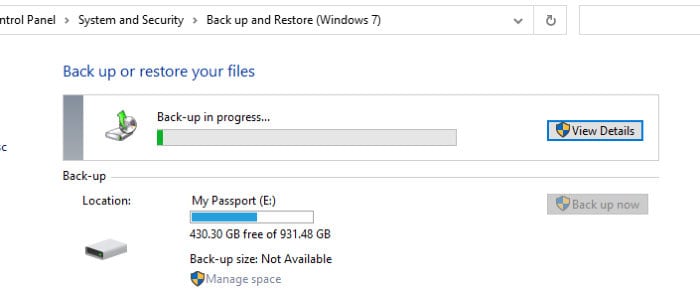
Restoring with Windows Backup and Restore
With a backup completed we can now take a look at restoring files using the Windows Backup and Restore tool, this begins in the Backup and Restore configuration window where we can click the “Restore Files” button towards the bottom of the screen to start the process off:

Once in the main restore screen we are able to browse though the contents of our backup, this can be done on a file-by-file or folder basis or we can also make use of the search box when looking for specific files or file types.
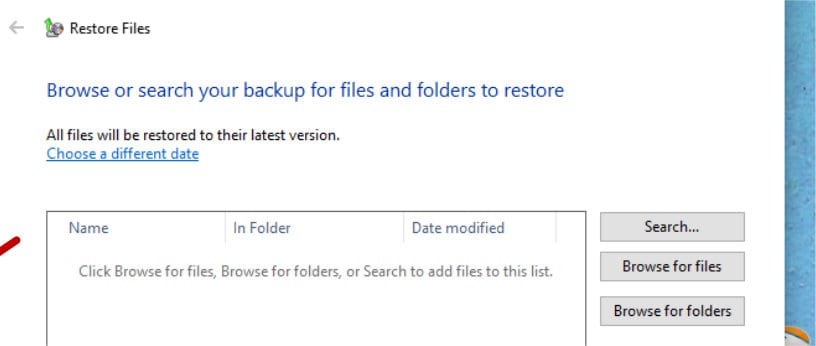
With any files to be recovered selected, we can then select whether to restore them to the original location or choose a new location for our files to be recovered to thus preserving the originals. Finally, clicking on “restore” will perform the restore operation.
System Recovery with Windows Backup and Restore
With simple file-level restoring of files aside, by making use of a system image backup, Windows Backup and Restore also allows a full system image recovery (including the OS, installed apps and user data) to be performed should this be needed.
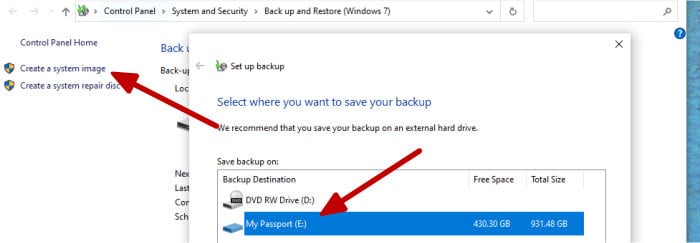
As can be seen above, making use of the “Create a system image” tool (available on the left of the Backup and Restore window) allows a full system image to be taken of the Windows PC in use. This image file can then be stored on an external hard disk, a network folder or burned directly to a CD / DVD when applicable to do so.
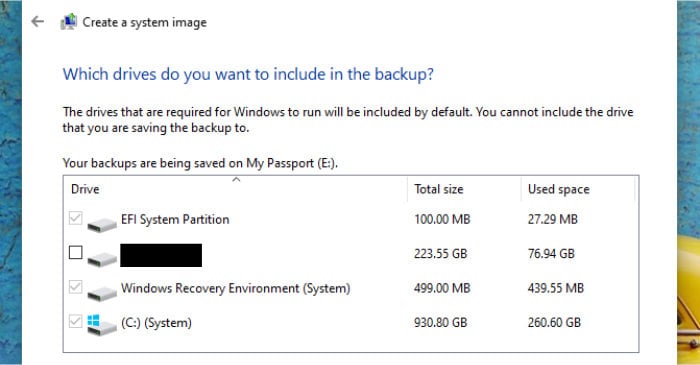
As can be seen above, part of this process of configuring the system image backup includes the option to include or exclude certain drives or partitions which make us the Windows system, useful if you are wanting to save space and exclude certain disks which do no need to be backed-up!
Finally, we also have the option to create recovery media from within the Backup and Restore tool itself (again, available via the left side menu). Once opened, this media builder tool can write the recovery media directly to a CD / DVD ready for booting a PC into should it not start and need to be recovered for any reason.
Unfortunately, this recovery media tool does not allow an ISO file to be written to disk nor a bootable USB flash drive be made meaning it is of limited use to certain PC users (i.e. those without a CD/ DVD drive).
Limitations of Windows Backup
Despite being broadly useful for quickly getting some kind of workable backup in place, the backup tools included with Windows 10 do, sadly, fall behind in a number of important areas!
Starting off with the recovery media tool looked at in the last section of this guide, as was noted there, when using the Backup and Restore tool we can only create a piece of recovery media should we so happen to have a physical CD / DVD available to our PC. With no options to create an ISO file separately nor write directly to a USB flash drive this will, sadly, be of little use to many users of more modern PC (which don’t tend to come with CD / DVD drives from new any more).
Security is another important factor to consider when looking at backing up your data using either of these two included tools. Again, rather disappointingly, neither tool offers any ability to apply encryption nor specify compression levels for the backup set meaning you backup could potentially be left both insecure and using up more disk space than might have otherwise been the case.
Finally, whilst scheduling is included in both tools it is somewhat limited, especially in the older Backup and Restore tool which only allows daily backups as the most frequent scheduled option (this comes down to every 10 minutes in the File History tool which is much more reasonable). Carrying on from this lack of scheduling control it should also be pointed out that we cant control the backup methods being used on any particular schedule, for example, we couldn’t specify that a full backup be taken after every Sunday night with hourly incremental backups made throughout the weekdays, something easily done with a lot of commercial backup software available today!
More information on Windows backup tools and their functionality can be found at the official Microsoft Website.
Windows Backup FAQ
The backup software included for free within Windows 10 functions well and is more than adequate to create a basic backup. The lack of built-in security or cloud functionality, however, might mean many Windows PC users will still be better off with commercial 3rd party backup software!
File History is the more flexible of the two included Windows backup tools and has more options including the ability to set more frequent scheduling options amongst other things. The older Backup and Restore tool is still useful as it allows for a full system image to be taken and recovery media built, both very useful when dealing with problems such as hardware failure.
The File History backup tool included with Windows 10 is perfectly adequate for making a simple backup of your files to a local device such as an external hard drive, flash drive or shared folder. It does, however lack more advanced backup functionality such as the ability to connect to well known cloud providers and also the ability to apply encryption to any files being backed up!
The File History tool will automatically backup any commonly used folders and subfolders which make up your Windows user profile folder (for example, My Documents, My Pictures, My Videos etc.). Should you need to specifically ensure a certain folder or subfolder is included in the backup then it can be manually added using the File History configuration screen.
Yes, after an initial full backup has been made the File History tool will only make incremental backups involving only files which have since been changed after the previous backup was taken.
Conclusion
Should you use the included Windows 10 Backup Tools? This is the main question that needs to be answered here and, ultimately, if you are just wanting a quick backup with no additional costs or time wasted configuring 3rd party backup software involved then the answer has to be, yes!
Unfortunately, if you do want anything more than this fairly basic offering, and probably also something more user friendly to boot, then you might still want to consider professional 3rd party backup software after all.
Such commercial backup software can help to get a more substantial backup in place and brings with it the ability to set encryption, compression, more advanced scheduling and the backup methodology being used amongst many other things.
Finally, the lack of any built-in cloud storage for both of these Windows backup tools means that it is not possible to create a cloud based backup from within the tools themselves. If this is important, along with filling in some of the other gaps mentioned above, then I would suggest looking at some multi-functional 3rd party backup software such as Backblaze, Ashampoo Backup Pro 16 or Acronis Cyber Protect Home Office to create a much more usable backup solution for a Windows 10 PC!
