EaseUS ToDo Backup Review
Features - 96%
Usability - 94%
Security - 95%
Support - 92%
Pricing - 96%
95%
Excellent
EaseUS ToDo Backup remains a great choice for anyone seeking an easy-to-use backup application with disk imaging support. One which is highly functional and versatile across both the free and premium editions alike
EaseUS ToDo Backup is a highly functional and multipurpose backup application featuring support for file, disk and full system image backups whilst also providing good support for utilising third party cloud storage.
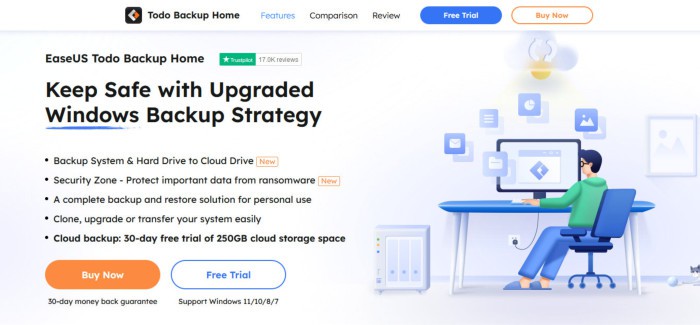
Whilst the basic backup functionality found within ToDo Backup enables users to make file-level, disk image and full system image backups with ease, there is also provision for many other useful features including the “Smart” backup mode, disk cloning tools plus the ability to mount disk image backups as virtual drives within Windows. Furthermore, ToDo Backup is available in both a free to use edition which retains a high degree of backup functionality alongside the fully functional “Home” edition which brings even more backup related features to both Windows and macOS devices.
I previously tested EaseUS ToDo Backup back in 2021 and was impressed by how well designed and easy to use this software is whilst managing to provide a great deal of really useful backup functionality. In this latest version of my review (updated in November 2023), I will be installing the latest version of ToDo Backup to see how this latest version fares – vamos!
Are you looking for help and advice on choosing the best backup software for your PC or Mac? If so then be sure to check out our guide to choosing backup software which also contains a list of our favorite choices as tested here on BestBackupReviews.com!
Key Features
- Well designed and easy to use backup software
- Highly functional free and premium editions available
- Windows PC and Mac OS devices supported
- Support for file, disk image and full system image backups
- Third Party cloud backup support (including pCloud, Dropbox & Google Drive)
- Secure, zero-knowledge file encryption (AES 256-bit)
- Mount disk image backups as virtual disk drives
- Disk cloning and full system cloning / migration tools
- SSD drive cloning / migration support (inc. 4K alignment support)
- Smart backup mode & Security Zone features (premium editions)
- Good scheduling options & multiple backup sets supported
- Migrate system image backups to dissimilar hardware (universal restore)
- ToDo Home edition priced from $39.95 ($59 with free lifetime upgrades)
- Subscription edition with 1TB cloud included from only $59.95 per year
- 30 Day free trial of ToDo Backup Home also available
ToDo Backup Editions
EaseUS ToDo Backup is currently available in several different editions as of the time of writing this review. These range from the “Free” edition through to the premium “Home” edition, the Mac OS edition and also includes several business focused editions which are also available (but will not be covered in this particular review).
As of time of writing, the range of consumer-focused editions includes:
- EaseUS ToDo Backup Free: The free to use edition of ToDo Backup has access to a good amount of the core backup functionality usually found in the fully functional “Home” edition. This includes the ability to make both file-level and full system image backups as well as conserve disk space thanks to use of the full, incremental and differential backup schemes and file compression options. The Free edition also allows full use of third-party cloud storage providers including Dropbox, pCloud, OneDrive and Google Drive.
- EaseUS ToDo Home (Subscription): The full “Home” edition of ToDo Backup builds upon the solid “Free” edition to make for a fully functional backup application. One of the first and most notable additions here involves use of the “Smart” backup tool, a special feature which is ideal for creating and managing a backup set with optimal settings which are actively managed by the backup software itself. Alongside this, several other useful tools are also available which provide the ability to clone both single disks and entire systems, perform SSD migrations plus the ability to migrate disk image backups on to new hardware (via the universal restore functionality included within “Home” editions and higher).
- EaseUS ToDo Home (Perpetual): The perpetually licenced version of ToDo Backup Home is functionally the same as the subscription version mentioned above, the main difference being that the cloud storage service provided by EaseUS themselves (for an additional fee) cannot be integrated into this edition (although the 3rd party cloud providers including Dropbox and Google Drive can still be used). This edition can be purchased as a perpetual licence with lifetime free upgrades for just a single $59 payment per device.
- EaseUS ToDo Home (for Mac): A separate edition of EaseUS ToDo Backup Home is also available for Apple Mac OS users, this is priced at $39.95 per year, per device.
NB – Remember, EaseUS offer both ToDo Backup Free alongside a free 30-day free trial of ToDo Backup Home via the official EaseUS website!
ToDo Backup Free vs Home
One of the biggest questions many will have relating to EaseUS ToDo Backup is whether or not the Free edition will be sufficient for their own backup requirements. As such, as is detailed below, I will be comparing both editions of the software and attempting to highlight some of the core features in the “Free” edition as well as the additional functionality found only in the “Home” edition (and higher).
Below is a non-exhaustive list detailing some of the core features available in the premium “Home” edition of the ToDo Backup software which are missing from the “Free” edition.
- Full Disk & System Cloning – The fully functional disk cloning tools which feature support for disk, partition and full system cloning on to new disks (including SSD 4K alignment support) are only available in the premium (“Home” or higher) editions of ToDo Backup.
- System Transfer Tools – Building on the disk cloning tools which are included in the premium editions of the tool (mentioned above), we also see specialist features which support easily migrating an entire system to a new device (including devices with new or different hardware). The built-in transfer tools also support transferring physical systems to virtual machines for anyone requiring such functionality.
- Universal Restore – When making full disk and system image backups, premium editions of ToDo Backup additionally provide specialist support for restoring from these backups over to new devices featuring dissimilar hardware (ideal for restoring backups from an existing device to a newer device with different hardware).
- Security Zone Protection – Featured only in premium editions of ToDo Backup, the Security Zone is a security related file monitoring utility which can help in preventing any unauthorised changes being made to any existing backup sets. This tool will also help to mitigate any potential damage both from malware and ransomware attacks which might otherwise cause unauthorised changes and damage to such files.
- Outlook Email Backup & Recovery – Premium editions of ToDo Backup make available specialist functionality for including Outlook mailboxes within any backup sets made (this also includes specialist support for recovering Outlook mailboxes as well).
- Higher Compression Options – ToDo Backup Free users are limited to making backups with only limited file compression options available. Users of ToDo Backup Home (and higher) can extend these levels of compression resulting in more disk space efficient and potentially faster backups.
- Smart Backup – Whilst the Free edition of ToDo Backup does provide good scheduling support allowing for automated backups to be run, premium editions extend this with help of the Smart Backup functionality. This Smart functionality will, amongst other things, monitor selected backup sets and decide when and how best to keep any changes backed up.
- Premium Technical Support – Premium customers of EaseUS ToDo Home (or higher editions) are also able to receive priority support from EaseUS directly.
Despite it missing some of the more advanced functionality found in the uprated “Home” edition, the “Free” edition of ToDo Backup still includes many great features for a free backup solution. This includes support for making both file-level and disk image backups, AES 256-bit encryption plus the ability to use bootable recovery media amongst many other features. This means ToDo Backup Free is an ideal way of getting a solid backup in place without the need to purchase any premium software.
Building upon this solid free edition, ToDo Backup Home brings various additional tools and features into the mix including use of the “Smart” backup functionality for easy to manage backups, higher compression levels, disk cloning tools, universal restore plus Security Zone backup protection for those seeking a more advanced, all-round backup solution.
ToDo Backup Usability
In this section of my review, I will be installing ToDo Backup on my own PC and assessing how well it functions as a multipurpose backup solution. This begins with the installation process itself before moving on to look at the process for creating both file-level and disk image backups, testing the multiple recovery options available as well as looking at some of the other useful features included.
NB – Remember, EaseUS offer both a free edition of ToDo Backup (ToDo backup Free) as well as a 30-day free trial of the premium ToDo Backup Home edition should you want to test out any of these features for yourself!
Installing ToDo Backup
Both the free and premium editions of ToDo Backup can be downloaded via the official EaseUS website. Since I have already highlighted the most important differences between the Free and Home editions earlier on, I will be continuing with the ToDo Backup Home edition for the remainder of this review.
At the time of my testing, the initial download of the installer was very fast (at just 1.2MB in size) and, once running, the installation process was fast and straightforward requiring minimal further user input. Once installation is complete, we can make use of the limited free functionality of the software as it currently stands or, via the “Activate now” button, enter a licence key and activate the full version of ToDo Backup Home.
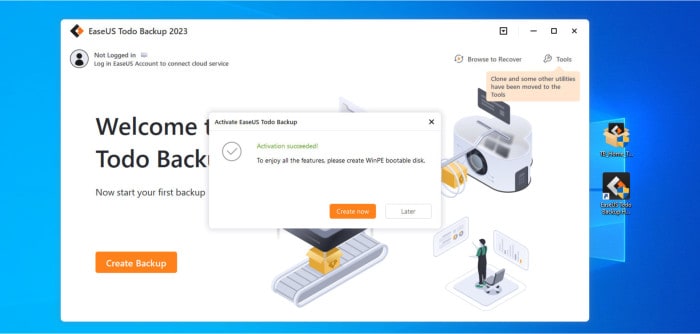
As can be seen above, once registration is complete, ToDo Backup will now be fully functional and ready to use with the bright orange “Create Backup” button now prominent on the application homepage.
Making File-Level Backups
One of the quickest and easiest methods for creating any new backup set is to simply select a set of files and then set them to be backed up on a fixed schedule (e.g., automatically backed-up once per day, week or month as required). In this first section of my review, I am going to focus on the file-level backup capabilities of ToDo Backup and highlight the process required for creating such backups.
This work begins by clicking on the orange “Create Backup” button found on the app’s homepage to enter the new backup wizard, as can be seen below.
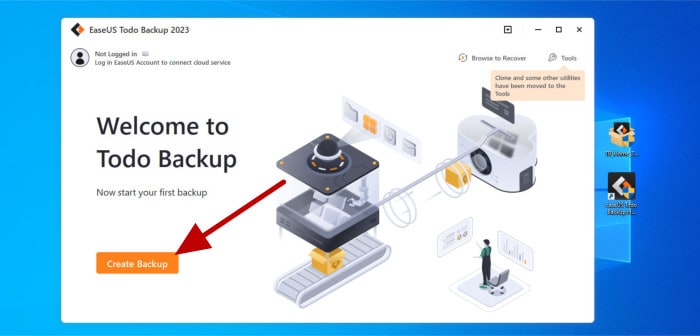
One of the first tasks here is to choose the type of backup we want to make (a file level backup in this particular case) before then choosing the corresponding icon in the middle of the configuration page to continue with said backup type.
NB – As is pointed out in the image above, note that we can at this point also change the name of this new backup set to something more meaningful right from the start (as I, myself have already done).
With the new backup set named and the “File” backup type chosen, the next page in the configuration process is where we choose which files and folders are to be included.
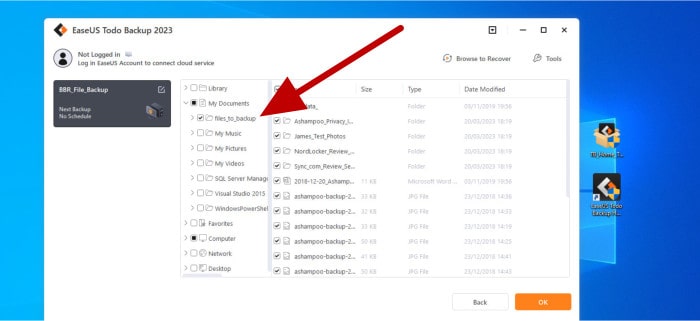
As can be seen above, selecting all necessary files and folders to be included in the backup is as simple as checking these items using the built-in file selection tool. Clicking on “OK” afterwards will reveal a summary screen where we can set the backup set running straight away without any further configuration when required.
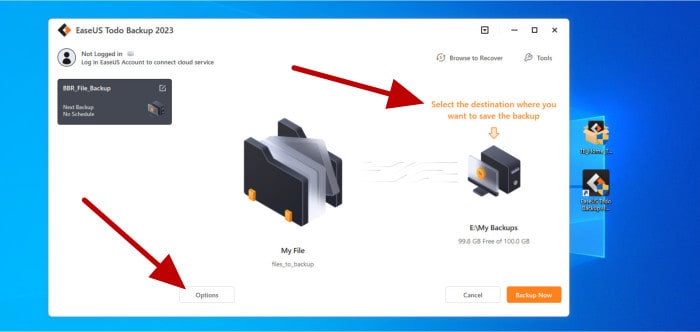
As we have seen so far, EaseUS make it really easy to get a new backup set setup and running when using the default settings. When using these default settings, the only real thing to consider on this above page would be the destination for storing the backup files as the default location chosen by the software might not be correct in all cases. In my example I am not going to make use of these default settings, instead, I will click on the “Options” button (highlighted above) in order to fine tune these backup settings for my own backup.
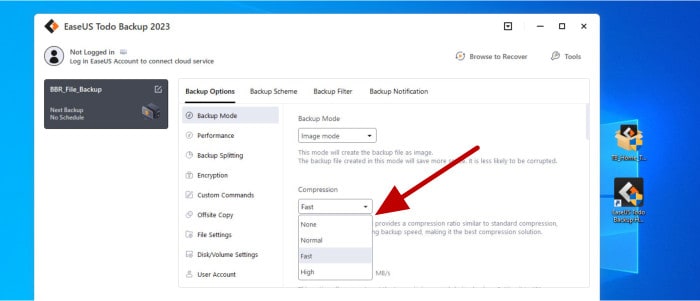
Under the “Backup Options” tab (see above), we have a good series of options available for which we can fine-tune regarding our new backup set. This starts off with us being able to specify the backup mode, the compression settings, the data transfer speed (should we want to limit this) and the backup splitting options (which could be useful when writing backups to multiple CD/DVDs).
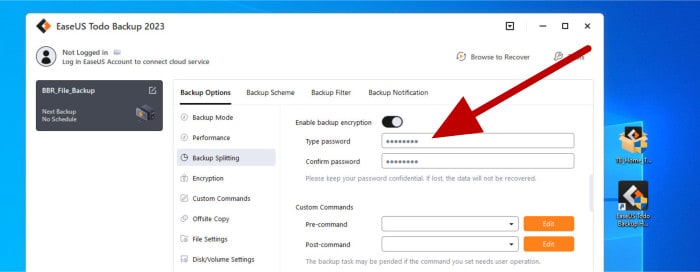
The next important setting to take note of is that of backup encryption. This can optionally be turned on or off as required and, when enabled, applies strong, zero-knowledge AES 256-bit encryption to any resulting backup files (meaning they are afforded a very high degree of security should they ever find their way into the wrong hands).
The final three settings found under this tab include the “File Settings” section (where we can choose to maintain file security settings), “Disk/Volume” Settings and the “User Account” settings where we can optionally run the backup under a different Windows account user should this be required. With all options under the “backup Options” tab now configured, the next part in configuring this new backup set is to (optionally) define a fixed schedule for running this backup set automatically as required.
NB – ToDo Backup also provides use of the “Smart backup” scheduling tool which will provide a high degree of automation relating to the scheduling process. I will, however, be looking at the regular scheduling options (available on both Free and Home editions of the software) in this section and covering Smart Backup later on.
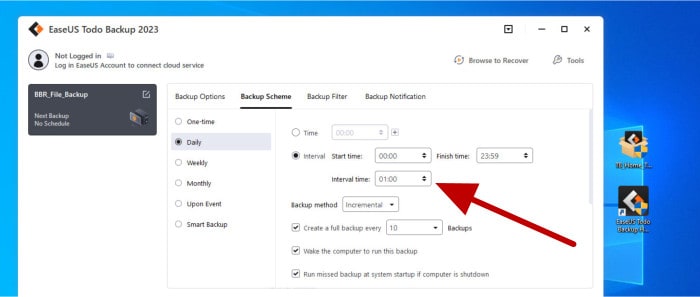
As can be seen above, ToDo Backup has a very powerful scheduling engine built in with options for creating hourly, daily, weekly or monthly backups alongside one-time runs and backups which trigger when certain events happen such as users logging into the system.
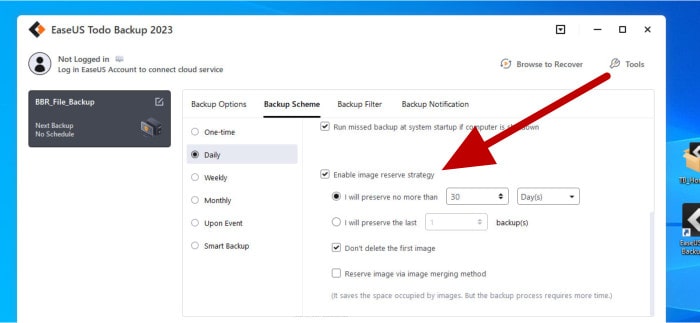
Before moving on, I feel it is important to point out (as can be seen above) that ToDo Backup also supports an “Image Reserve Strategy” on the scheduling page which helps to manage the number of historic versions of any files backed up. This is not only a good way of ensuring that the backup set doesn’t get too big in size, but by being able to specify the number of historic revisions which are kept, the software makes it easier for us to ensure we have enough file versioning in place to cover our own needs.
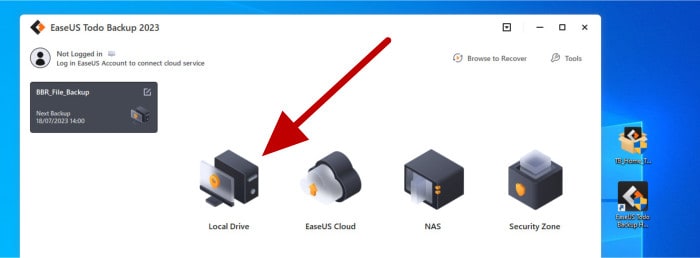
Finally, I am going to specify a location for storing this backup which is different to the default location suggested by the software. This begins by clicking the destination option (seen earlier on in the setup process) and then selecting from one of the four available storage options (see above).
NB – Above we see the ToDo Backup “Security Zone” showing as a storage location, I will be looking at this feature in more detail when looking at disk and system image backups later on in this review.
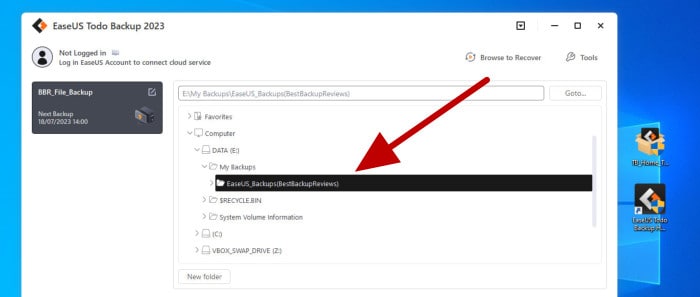
Having chosen the “Local Drive” option in my example (which is also useful for backing up to an external hard drive), we can now specify the exact drive and folder to be used for storing these backup files.
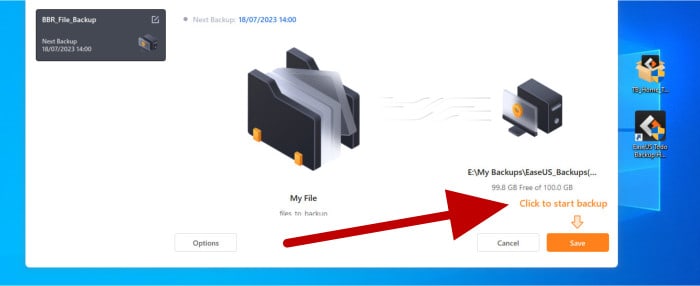
With the location now specified, we will be returned to a backup summary page with an overview of the new backup set showing. Clicking on the “Save” backup will save the backup set and we can then set it running from the next page straight afterwards.
Once running, this new backup set can be monitored from the main backup overview page. As can be seen below, we can see the progress of the backup including an estimation of the completion time and the speed at which data is being transferred.
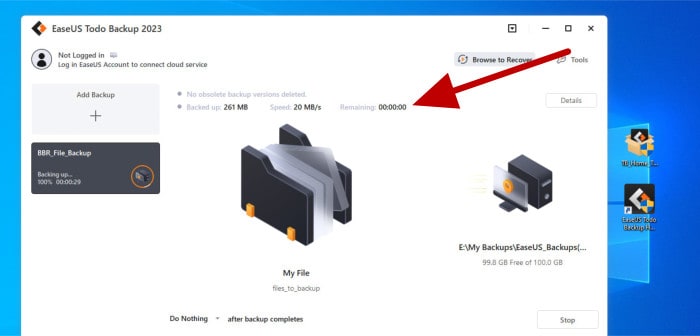
And with this, the new file-level backup set is both configured and has now been run as well. As per the schedule I set earlier on in the set-up process, this set will continue to run every hour and will keep 30-days of historic versions as was also specified.
NB- Historic file versioning is one of the most important components of any backup and is what allows retrieving older versions of files (other than that of the latest one backed-up). Historic versioning is also one of the best methods for protecting valuable data against malware and ransomware attacks with at least 30-days of versioning recommended to provide a good baseline of protection. Be sure to read my guide on How Backup Software Can Help Protect Against Ransomware for more details on this particular topic!
Creating Disk Image Backups
In this section I will move on to look at the disk image backup technology which included in both the free and premium editions of the ToDo Backup software. This begins at the main application homepage where we can create a new backup set using the “Add backup” button found on the left side of the page.
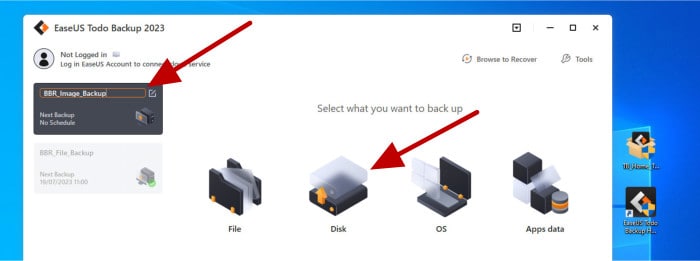
As can be seen above, we can rename our new backup set straight away (on the left of the page) and then select the type of backup set we want to make. In this case we have options for both “Disk” and “OS” images, the main difference here being that the “Disk” option is for making an image backup of a specific disk whilst the “OS” option will automatically include all items (including multiple disks) to ensure the entire system is backed up.
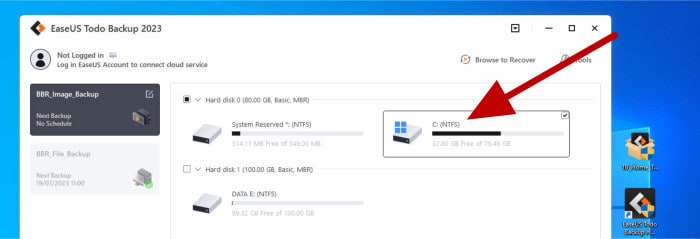
In my particular example I am going to choose the “Disk” option which allows one or more specific disks to be imaged as a part of the backup set. Having made this choice, as was also the case when making the file-level backup earlier on, the next step is to (optionally) click on the “Options” button to modify the default backup settings.
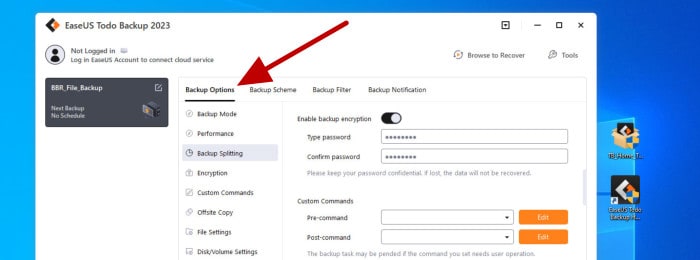
I believe it is important to review these default settings, even if you believe the default options will be sufficient for your own backup requirements. For the purpose of the review, however, I will skip straight to the scheduling page given that the configuration options under the “Backup Options” tab are essentially the same as those which were seen earlier on in this review.
NB – One disk image related setting you might want to take note of is the ability to switch on sector-by-sector disk imaging. This technology can be useful when making disk image backups in certain circumstances which require that everything (including any free space) is included within the disk image backup!
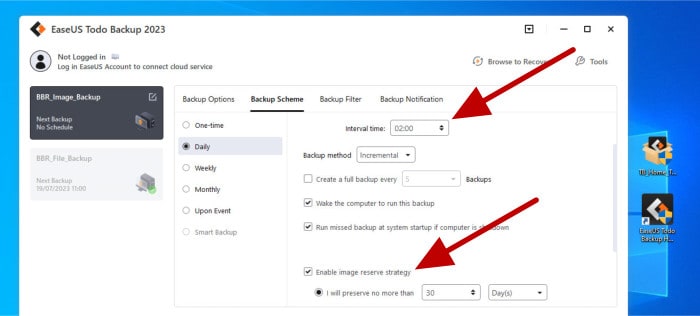
Moving on with the configuration and, as can be seen before, we can optionally configure a schedule for this new disk image backup. This can be as simple as running the set once per day / week / month or, as can be seen above, running the set regularly every 2 hours (with 30-days of historic retention also set to help manage the overall backup size).
Finally, as before, we can also set backup filter and notification settings before being ready to select the location for storing these new backup set files on the next page.
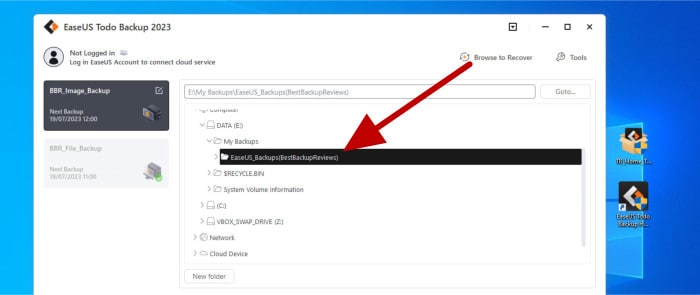
With the storage location now chosen, we will be ready to start the new disk image backup when ready or, alternatively, simply allow the software to start it automatically at the next scheduled run time.
NB – Remember, EaseUS offer both a free edition of ToDo Backup (ToDo Backup Free) as well as a 30-day free trial of the premium ToDo Backup Home edition should you want to test out any of these features for yourself!
Using EaseUS Smart Backup & Security Zone
Having now seen both a file-level and disk image backup in use, in this section I will be looking at two special tools which are found within the “Home” (and higher) editions of ToDo Backup and provide advanced options for both managing and securing backups.
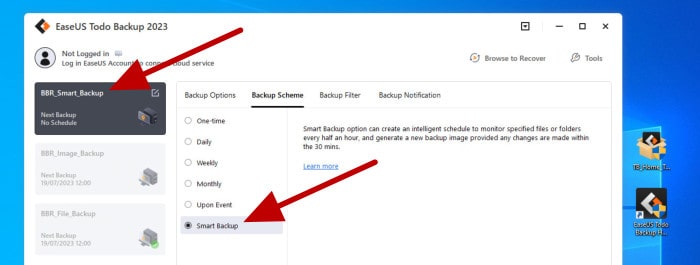
As can be seen above, the first advanced backup management tool I will be looking at is the “Smart Backup” tool. This scheduling and backup management tool, once selected, will allow ToDo Backup itself to take control of the configuration of the backup and choose the best times to run it whilst also ensuring the best backup methodology (e.g., full or incremental) is being used.
Once put in place, Smart Backup will automatically monitor any file changes which might be made every 30 minutes and then run an appropriate backup to ensure these changes are best protected. Smart Backup technology will also keep up to 15-days of historic versioning meaning a good number of older file versions will be available (although I would personally recommend looking at manually implementing a fixed backup schedule if longer historic file versioning is required).
Moving on and the next advanced feature found within ToDo Backup I will be looking at is the EaseUS Security Zone. This is a tool which provides a secure storage destination within an existing backup storage location to help ensure the security and integrity of any backed-up data stored within it.
This Security Zone functionality works by allocating a special secured partition (within an existing disk) which will be monitored by ToDo backup to ensure that no unauthorised changes are made to any data stored within it. Many threats including malware and ransomware can be catastrophic to the integrity of any data stored upon a PC and by mitigating such dangers via this special partition, the Security Zone service will help to protect backed up data against such dangers.
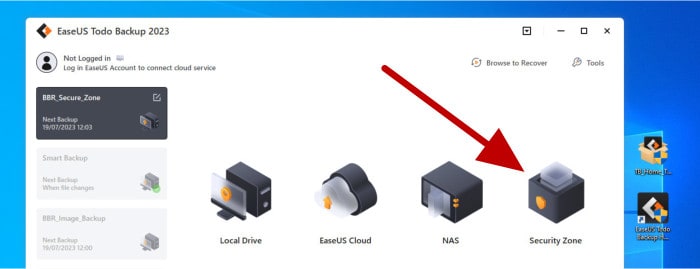
To configure a new backup set with the Security Zone service enabled, we must start by configuring said backup set as normal (this can be either a file-level or disk image set) and then, when selecting the storage destination, select the “Security Zone” option as can be seen below.
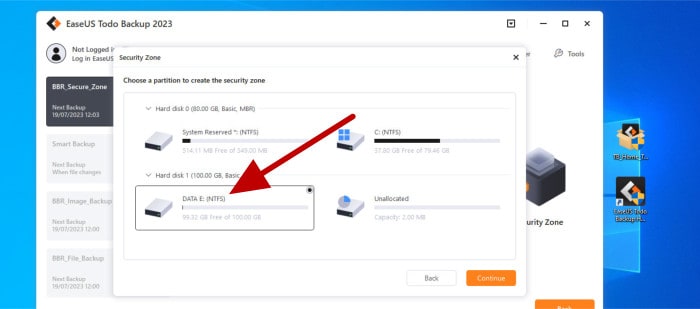
After choosing the Security Zone service, the next step is to select the disk upon which this special secure partition will be created. After this, the next step is selecting the amount of disk space which is to be used for the new partition.
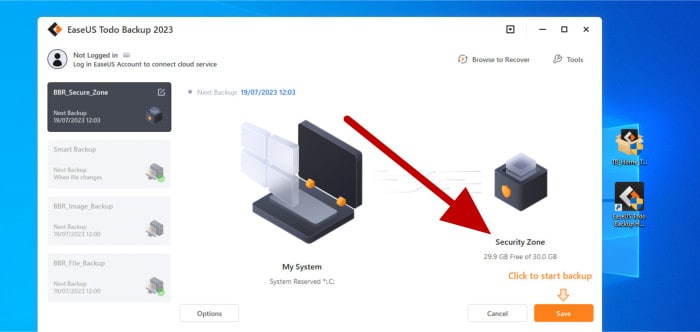
Finally, with the Security Zone now configured and in place, we can use this as a storage location for any new backup sets by simply selecting it as and when required. As can be seen above, once in place, the Security Zone location and any backups making use of it will function like any other backup sets form this point forward (although such backup sets will feature the additional tamper protection provided by the Security Zone service).
Using Cloud Backups
In this final section relating to backing up data, I will be looking at some of the cloud storage functionality which is included within EaseUS ToDo Backup. This begins, as before, by creating a new backup set and then choosing “Local Drive” (stay with me) as the storage location as was seen earlier on.
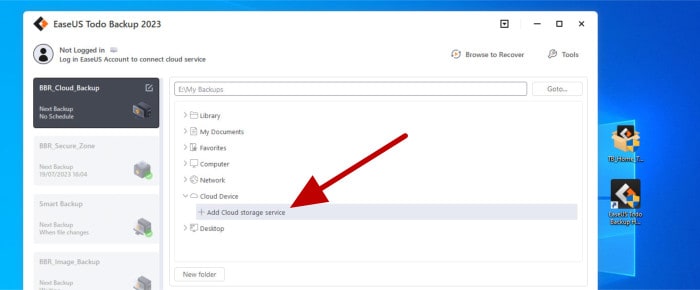
As can be seen above, once in the “Local Drive” selection tool we can then select the “Add Cloud storage service” to begin configuring a new backup set which will make use of a third-party cloud storage provider. Seen below is the next box in the process which shows some of the available third-party cloud storage providers currently supported.
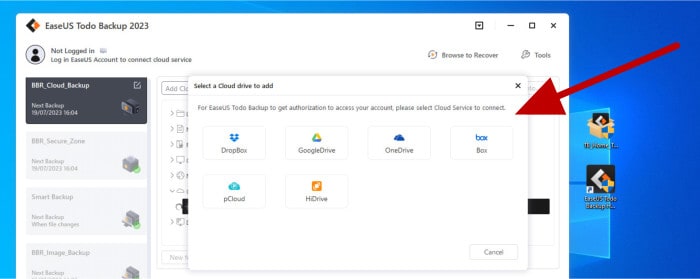
Whilst not extensive, EaseUS ToDo Backup does support some of the most popular and well-known cloud storage services including pCloud, OneDrive, Google Drive and Dropbox as of the time of writing this review. In my particular case I am going to use Dropbox as the target for my cloud backup set, something which will involve using the special Dropbox authorisation page in order to connect to and authorise ToDo Backup to use any available cloud storage found here.

NB – This exact authorisation process might differ slightly between the different third-party cloud storage providers!
At this point the cloud drive is configured, integrated into the application and ready to be used across any number of backup sets as might be required. Whenever making use of cloud storage, always be mindful of managing your storage quota with the provider themselves and be aware that large backups (such as full disk image backups) can be slow to complete if a slow internet connection is present.
Restoring Data
In this section I am going to look at what is, arguably, just as important a task as the initial backing up of any data itself. This is, of course, the restoration of any data which has previously been backed-up using the EaseUS ToDo Backup software so far.
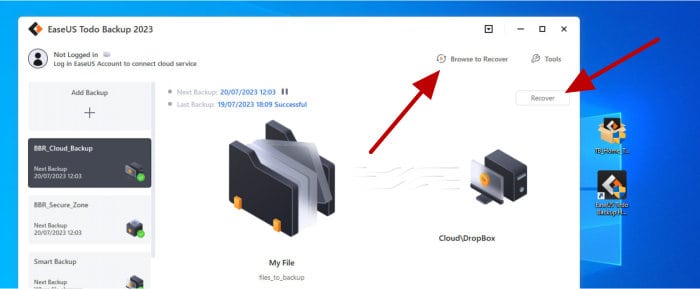
As can be seen above, two of the main options for restoring data can be found on the main backup summary page itself. These include the “Browse to Recover” tool which allows for loading and recovering an EaseUS ToDo backup file directly as well as use of the standard “Recover” button which starts the recovery wizard.
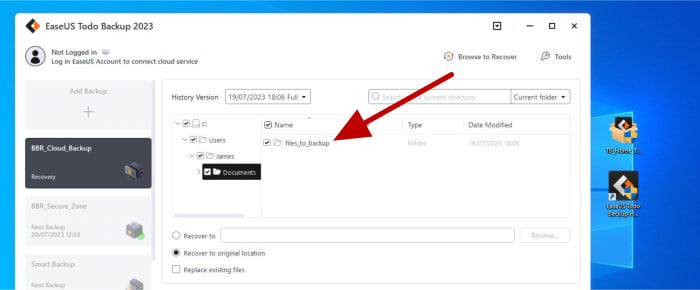
If set, the first task in recovering any data will be to enter the password which is protecting the backup set. Once authorised, the next step in recovering from a file-level backup will be to select the necessary files to be resorted and then (towards the bottom of the page) select whether to recover to the original location or a separate recovery folder.
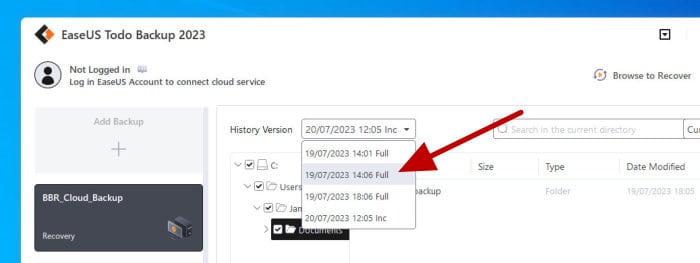
When recovering any data, we will also need to be mindful of choosing the correct version of any files as well. Seen above is the drop-down box for selecting this historic version (if required) with the default value always being set to the latest version of the backup.
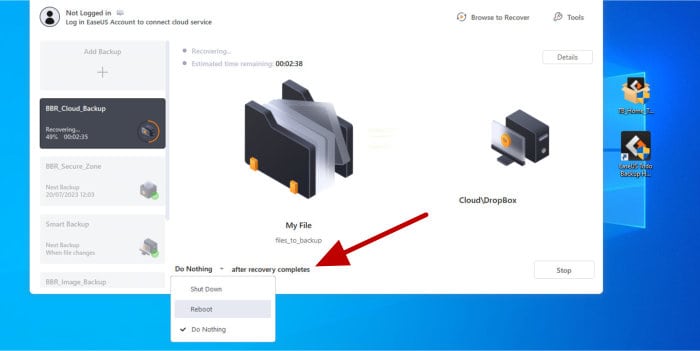
Once the recovery job is configured, it can be set running and the progress monitored using the same backup overview page (seen working above). It is interesting to see that ToDo Backup additionally offers the option to shut down or restart the current device after the restore is complete, something which is potentially very useful for larger restores which might take several hours to complete.
Moving on to the recovery of image-based backups and we see that we have two choices available when using the built-in recovery tool. These choices are to use the tool in “Disk/Partition” mode or in “File” mode (which will allow for the recovery of individual files extracted from the disk image file).
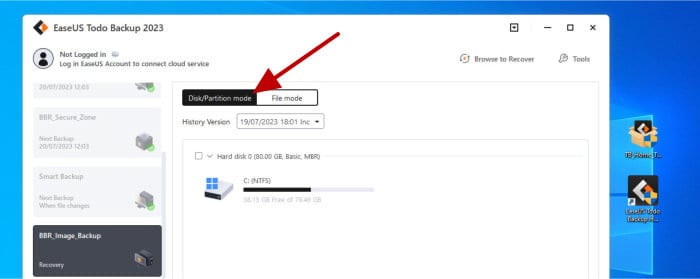
Since I recovered a set of individual files earlier on, I am going to focus on the recovery of an entire disk at this point. Also note (above) that before we start the image recovery process, we must also select the correct historic version of the backup as well as the disk to be recovered (if more than one disk exists in the backup set).
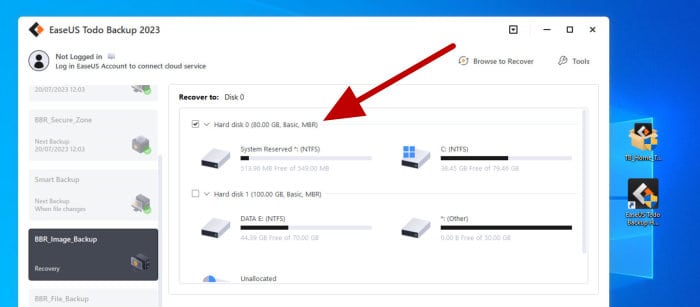
Once the target disk to be imaged is selected, the next step is to set any advanced options for the recovery (including optimising for SSD drives, when applicable, using the “Advanced Options” button towards the bottom of the page) before then, on the next page, configuring the target disk layout.

As per the above screenshot, we can simply use the default settings here which will see ToDo Backup automatically manage the image recovery process to best make use of any free target disk space available. With this and all prior options now selected, the disk image recovery process will be ready to begin.
Moving on from the standard full recovery of a disk image backup and another very useful option found within ToDo Backup is the ability to mount a disk image backup as a virtual disk drive within Windows. Once in the “Mount/Unmount” tool we will be able to see all available disk image backups, mounting any of these image backups is as simple as clicking on “Mount” next the respective backup set, entering the password (if required) and also selecting the correct version of the backup to be mounted.
Disk Cloning Capabilities
Also included within all premium editions of ToDo Backup is a fully featured disk cloning utility which supports both individual disk and full system cloning.

As can be seen above, using the built-in cloning tool is as simple as selecting the source disk to be cloned and then, via the cloning wizard, selecting the target disk which is to imaged. We also have available several advanced cloning options which include optimising for SSD drives (including 4K alignment support) as well as making use of sector-by-sector cloning when required.

Finally, before cloning commences, we also get the opportunity to specify how the target disk drive will be configured. This can simply be left on the “Autofit” option which will see any larger target disks automatically adjusted for or on the “Copy as source” option which could, potentially, leave an amount of unallocated (free) disk space after the cloning operation has completed.
NB – For more information on disk cloning technologies, be sure to check out my guides to both The Best Free Disk Cloning Software as well as the Best SSD Migration Software.
Privacy & Security
One of the most important aspects of any backup software is the protection of any data being backed-up. Whilst simply keeping a secondary copy of important data in a different location will often provide a good degree of protection by itself, this backed-up data might then become vulnerable to further data security related issues as a result.
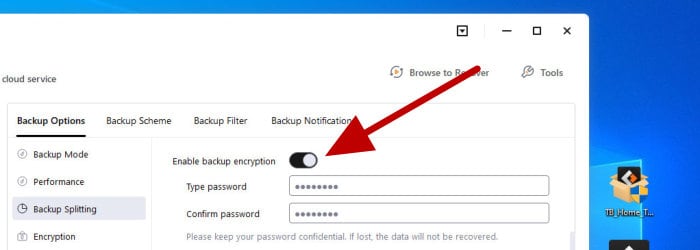
As can be seen above, the ability to apply strong zero-knowledge encryption is one of the most trusted and reliable methods for protecting any backed-up data. EaseUS ToDo Backup provides support for applying highly secure AES 256-bit encryption to any backup sets created within the application, thus providing some of the best security and privacy protection of any mainstream backup software.
NB – Unlike some other backup software providers, it is great to see that EaseUS have enabled AES 256-bit encryption in both the free and premium editions of ToDo Backup (so, well done EaseUS)!
Other notable security tools found with ToDo Backup include both the “Security Zone” secured partition tool and the “Backup Protection” utility, both of which are focused on protecting the actual backup files themselves from unauthorised tampering and malware / ransomware related issues.
EaseUS Support
EaseUS have a detailed and useful support portal including an online user manual, knowledge base, video tutorials, an FAQ section plus the ability to contact the EaseUS support team via email or live chat when required.
Once purchasing any EaseUS product, users of the software will also be able to login to the support portal for the purposes of managing any active subscriptions or purchases as well as being able to retrieve licence keys and download software installers for future installs as required.
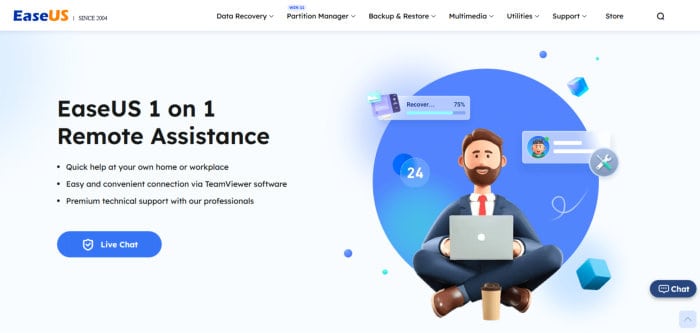
Finally, for those purchasing selected licences, a premium (1 to 1) support service is also available providing additional help and support directly from EaseUS as and when required.
EaseUS ToDo Backup Pricing
EaseUS offer a free edition of ToDo Backup which includes many of the core backup components also found in the premium editions (more details on what is reserved for the premium editions can be found in the “ToDo Backup Free vs Home” section earlier in this review). Supporting this free edition is the fully functional EaseUS ToDo Backup Home edition which includes many additional backup features for both Windows PC and Mac OS users.
As of time of writing, ToDo Backup is priced as follows:
- EaseUS ToDo Backup Free – 100% free to use backup software!
- EaseUS ToDo Backup Home (Subscription) – This subscription-based edition of ToDo Backup Home starts at just $39.95 per year and includes the option to add 1TB of cloud storage provided by EaseUS themselves for an additional $20 per year.
- EaseUS ToDo Backup Home (Perpetual) – In addition to the subscription model mentioned above, ToDo Backup Home can also be purchased as a perpetual licence for a single one-off payment of just $59 per PC.
- EaseUS ToDo Backup Home (Lifetime Upgrades) – This licence is similar to the option mentioned above and priced at a one-off cost of $79.95. It is, however, extended to also include free lifetime upgrades to any new versions of the tool for a single PC and also includes access to the EaseUS premium technical support service as well.
- EaseUS ToDo Backup Home (for Mac OS) – ToDo Backup Home is also available for the Mac OS operating system at a simple one-off cost of just $39.95 per device.
More information on any five of these ToDo Backup editions, plus the latest pricing, cloud storage support and lifetime upgrade options which are also available can be found via the official EaseUS Website.
EaseUS ToDo Backup FAQs
Yes, a free version of ToDo Backup is provided by EaseUS!
This free-to-use edition contains a good degree of backup and disk imaging functionality. It is, however, missing some of the more advanced features found in the premium editions including use of the “Smart” backup functionality, disk cloning tools and Security Zone backup protection features amongst other things.
Yes, EaseUS is a long-standing, reputable and reliable software company and the ToDo Backup software line itself is generally very well regarded as a safe and effective backup solution.
EaseUS ToDo Backup makes use of strong AES 256-bit encryption. This encryption can optionally be applied to file, disk or full system image backup types and is available on both the free-to-use and premium editions of the software.
Yes, all premium editions of EaseUS ToDo Backup include the use of a fully functional disk cloning utility. This cloning tool supports performing both individual disk and full system cloning operations alongside full support for both sector-by-sector cloning and SSD 4K alignment as well.
NB – It is important to note, however, that this disk cloning utility is not available in the free-to-use edition of the software!
Yes, premium editions of EaseUS ToDo Backup support restoring disk image backups across to new or otherwise dissimilar hardware. It is important to note that this functionality is not available in the free edition of the tool.
Yes, when using premium editions of ToDo Backup (which feature disk cloning support), the cloning tool itself provides options to automatically manage the sizing of the target disk or, if required, manually set a size to be used (the size of the data minus any free space will, of course, still need to be smaller than the total size of the target disk).
ToDo Backup Alternatives
In this section of my review, I will be looking at some good alternatives to EaseUS ToDo Backup. This will be focused on backup software which includes both file-level and disk image backups alongside related functionality including disk cloning, universal restores and both cloud backup and encryption support.
Remember, any ratings and opinions given below reflect my own personal views and should be treated only as a guide. When purchasing any kind form of backup software, it is always advisable to check the details of the offering carefully and to always try and to make use of any free trials (whenever possible) to help ensure the solution fits your own needs before committing to a purchase.
1) Ashampoo Backup Pro 25
Backup Pro 25 is the latest edition of the fully featured and multi-purpose PC backup solution form software experts, Ashampoo.
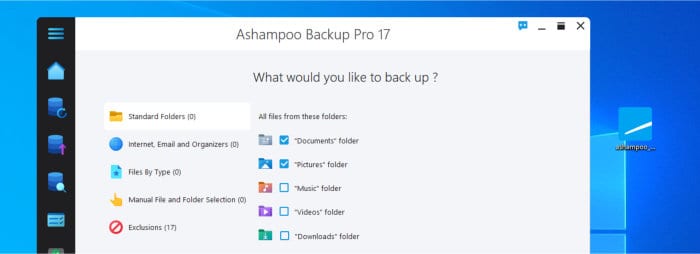
With good support for both file and full system image-based backups which can be saved locally, to network drives or to one of many third-party cloud providers integrated into the service (including Google Drive and Dropbox), Backup Pro 25 offers a great degree of versatility when backing up important data. Also included within the software is support for custom historic file versioning periods, free backup email alerts, pre-made backup templates, UEFI recovery media building tools plus strong scheduling support (including support for running real-time backups amongst other options).
Security wise and, like EaseUS ToDo Backup does, Backup Pro 25 also provides full support for protecting backups using strong zero-knowledge AES 256-bit encryption. Such encryption is widely considered as an industry standard approach to providing some of the highest levels of privacy and security for any backups stored either locally or upon a third-party cloud storage service.
Backup Pro 25 is priced at a one-off cost of just $50 per PC and is free from any ongoing subscription costs. A 30-day free trial of the software is also available via the official Ashampoo website.
- Disk image backups
- Cloud storage support
- AES 256-bit encryption
- 30-Day free trial
- Just $50 per PC
2) Acronis Cyber Protect Home Office
Cyber Protect Home Office is the leading backup and cyber security solution form long time disk imaging and backup software experts, Acronis.
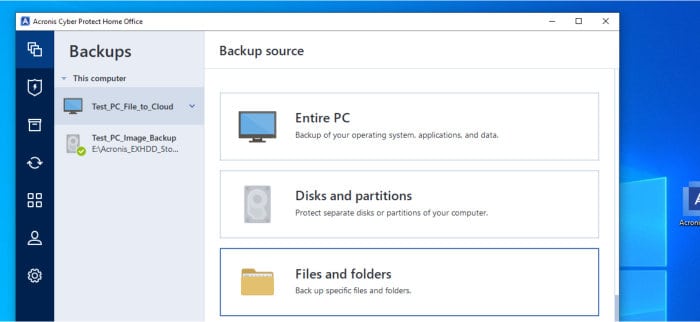
Available on a subscription basis both with and without an allocation of cloud storage (from Acronis themselves) plus a strong set of anti-virus and anti-malware features built into the tool, Cyber Protect Home Office is much more than a just a simple backup tool. Support is provided for both file-level and full disk image backups, bootable recovery media building tools, universal restores to dissimilar hardware, automatic file synchronisation plus smartphone apps for iOS and Android are also available.
Security wise and Acronis goes much further than virtually any other backup solution by including a fully featured anti-virus application which is integrated into the software, one which is enhanced with various additional security features including specialist protection for Microsoft Teams and specialist protection against illicit crypto mining amongst other features. Also available within Cyber Protect Home office is full support for encrypting all backups using strong zero-knowledge AES 256-bit encryption.
Cyber Protect Home Office is priced from $49.99 per year for the Essentials edition with the Advanced edition (with 50GB of cloud storage included) available form just $54.99 per year. More information on all editions plus the multi-device discounts which are currently available can be found via the official Acronis website.
- Disk image backups
- Built-in antivirus
- AES 256-bit encryption
- 30-Day free trial
- From $49.99 / year
3) O&O DiskImage 19
DiskImage 19 is a leading piece of disk imaging focused backup software form disk imaging experts, O&O Software.
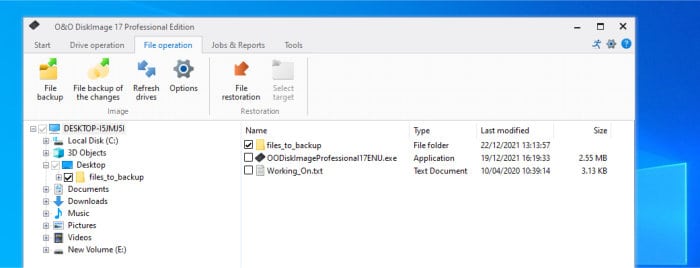
In much the same way as ToDo Backup, DiskImage 19 also provides a strong set of disk imaging related backup and recovery tools. This includes the ability to make use of specialist recovery media and universal restore functionality alongside other advanced features including mounting backups as virtual drives within Windows and saving disk image backups as VHD/VHDX files when working with virtual machines amongst other related features.
Also included within DiskImage 19 is support for file-level backups, a strong scheduling engine, an easy-to-use backup configuration wizard, one-click disk imaging and disk cloning tools plus support for highly secure AES 256-bit encryption which can be applied to all backups created using the software.
O&O DiskImage 19 is priced from a one-off cost of just $49.95 for a single licence with a 5-device multi-licence also available for just $69.95. More information on DiskImage 19, as well as the option to download the 30-day free trial version can be found via the official O&O Software website.
- Advanced disk imaging
- AES 256-bit encryption
- One-click disk imaging
- 30-Day free trial
- From $49.95 per PC
EaseUS ToDo Backup Review Summary
EaseUS ToDo Backup stands out as a highly functional yet easy to use backup tool. It is a tool which not only provides a very good set of backup related features by default, but one which also takes the management and security of such backups very seriously making it an ideal “all-in-one” backup solution.
Whilst the premium “Home” edition of the software is, undeniably, very versatile and provides a great number of features, the Free edition of ToDo Backup is also worthy of special mention given how many useful features EaseUS have decided to leave active. As a result, this is an ideal free backup solution for anyone seeking third-party cloud storage support, strong AES 256-bit encryption, good scheduling options plus the ability to make both file-level and disk image backups.
Whilst the free edition of ToDo Backup is undeniably very impressive, the “Home” edition does still bring a number of useful enhancements including use of the “Smart” backup technology, the Security Zone backup protection features, full disk cloning capabilities plus the universal restore functionality.
Overall, ToDo Backup remains a great choice for anyone seeking an easy-to-use and highly functional backup application. One which is not only very versatile in the tools and features provided, but one also offering advanced image-based backup capabilities and advanced security options across both the free-to-use and premium editions alike – great work EaseUS!
Are you looking for help and advice on choosing the best backup software for your PC or Mac? If so then be sure to check out our guide to choosing backup software which also contains a list of our favorite choices as tested here on BestBackupReviews.com!


