Nero BackItUp Review
Features - 86%
Usability - 91%
Security - 89%
Support - 91%
Pricing - 92%
90%
Very Good
BackItUp is a simple and easy to use backup application, one which is designed well and includes all of the basic features which help make up a reliable Windows backup solution.
Nero BackItUp is a simple and easy to use backup application providing a good standard of backup functionality to Windows PC Users. Thanks to many useful features including automatic scheduling, pre-set file selection options (e.g. all photos), file compression and secure AES 256-bit encryption been made available amongst other things, it is a simple application which still manages to provide everything you would expect from a solid backup application.
Backing this core functionality up is built-in support for many popular 3rd party cloud storage services (including OneDrive, Google Drive and pCloud) making this a very useful tool for easily implementing the 3-2-1 backup method whereby a backup copy is stored locally, such as on an external hard drive and another copy stored off-site, for example, on a reliable cloud storage platform.
Despite being fairly simplistic and easy to use, it is fair to say this application does still have everything that is important for implementing a good backup strategy. With this in mind, I’m looking forwards to installing BackItUp for myself and seeing how well it performs, let’s go!
Are you looking for help and advice on choosing the best backup software for your PC or Mac? If so then be sure to check out our guide to choosing backup software which also contains a list of our favorite choices as tested here on BestBackupReviews.com!
Key Features
- Full support for Windows 7 onwards
- Simple and easy to use user interface
- Support for 3rd party cloud storage (OneDrive, pCloud etc.)
- Unlimited historic file versioning available
- File-level backup support only (no disk imaging)
- Strong AES 256-bit file encryption available
- Continuous (real-time) cloud backups
- Good automated backup scheduling support
- No support for MacOS devices (Windows only)
- Reasonable one-off pricing @ $47.95
- 7 day Free trial available (registration is required)
BackItUp Usability
In this section of my review I will be looking at how BackItUp fares in terms of usability, this includes assessing how easy it is to install and configure the software followed by a look at some of the backup and restore related functionality found within.
This begins in the next section of this review where I will be installing Nero BackItUp on to my own PC, a 7 day free trial is available directly from Nero should you want to try BackItUp for yourself!
Installing BackItUp
Installing BackItUp begins by first installing the Nero Start application, a special piece of software which can be used to install and manage any of the numerous Nero software applications which are currently available for PC users as of today (alongside the BackItUp application which I will be focusing on in this review).
The process starts off at the Nero BackItUp webpage where, after entering a valid email address, the trial installer can be downloaded. In my instance this was a reasonably sized 146MB download and I had the Nero Start application installed and working just a few moments later.
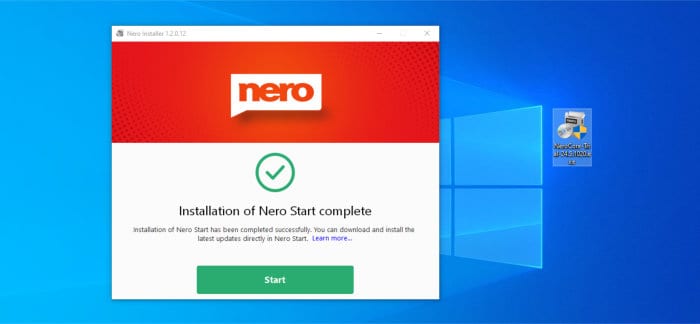
Once the Nero Start application has been installed we can then install and try any of the currently available Nero applications with a 7 day free trial, I am only going to be looking at the BackItUp software in this review so I can install it by finding it in the list of titles and then clicking install (as can be seen below):

Once running, this second installation (of sorts) takes only a few seconds in my instance before the BackItUp software was ready to run. Once installation is complete, the software opens up on the initial homepage (as can be seen below) and is ready to be used for starting our first backup.
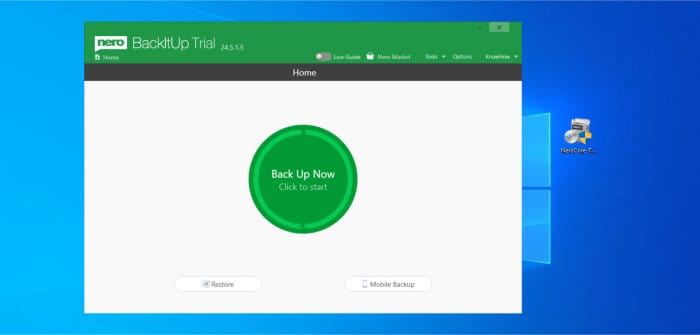
Overall, this was a quick and easy installation, only slightly delayed by the need to install the Nero Start application beforehand. Now I have the software installed, in the next section I will look at the process for creating a local backup set before moving on to the cloud backup functionality and then restoring data later on in this review.
Configuring Local Backups
With the install complete and the BackItUp application now opened up, creating the first backup set begins by clicking on the big green button labelled “Back Up Now” in the centre of the homepage, this will take us to a new screen where we can initially choose to make a locally stored or cloud based backup:
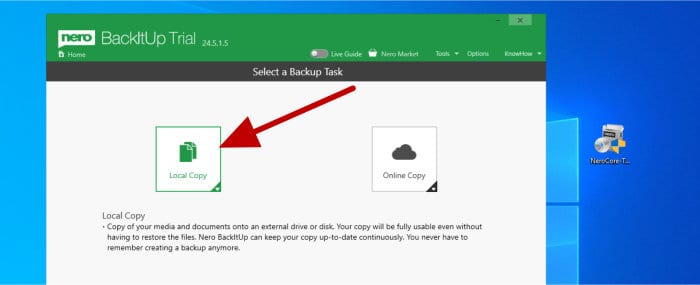
In this section of the review I will be creating a locally stored backup so will choose the local (left side) option, clicking the drop down arrow will show some of the available backup modes when making a local backup:
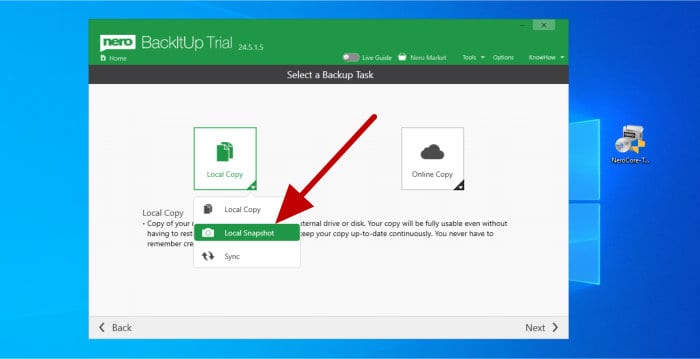
Of the three available modes here we have a “Local Copy” mode (which is essentially a one-way synchronisation between the PC and a storage device), a “Sync” job (essentially a full two-way file synchronisation) plus the “Local Snapshot” option which will make multiple versions of files during the process (i.e. a versioned backup) and is the option I will be using in this section.
NB – When using the “Local Snapshot” method the software will automatically keep unlimited historic versions of any files which are backed-up. Unfortunately, this is one of the things we have little control of within the software meaning it is essentially offering unlimited historic versions by default! Not the worst approach to providing such functionality, but something to be mindful of if limited storage space is an issue!
With the “Local Snapshot” option now selected, the next screen in the set-up is for the selection of the files to be backed-up. As can be seen in the screenshot below, Nero makes this very easy for us by offering shortcut buttons for automatically selecting all of our documents, photos, music and videos which are stored on the PC:
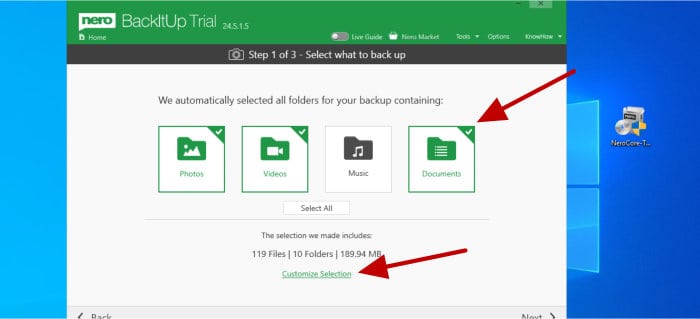
Should we not want to make use of these auto-select buttons for any reason, BackItUp also allows for us to select a set of files using a file picking tool (accessed using the “Customize Selection” button towards the bottom of the screen seen above). Clicking this “Customize Selection” button will take us to the file picking tool where we can select individual files and folders to be included in the backup on a one-by-one basis:
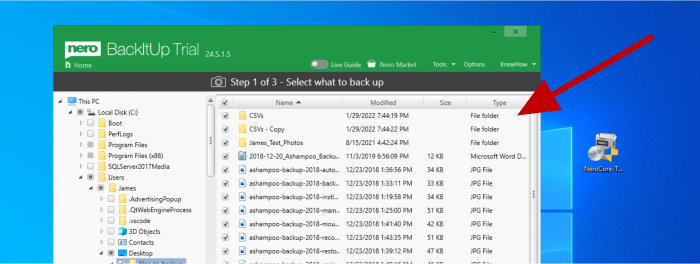
NB – Nero BackItUp only supports file-level backups and does not currently provide any ability to make full disk image backups.
With any files to be included in the backup now selected, the next screen is where we can select the destination for the backed-up data to be stored. As per the screen shot below, we have the choice of a locally attached drive or external hard drive, optical media (CD/DVD) or a network attached location such as that provided by a NAS system on the local network.
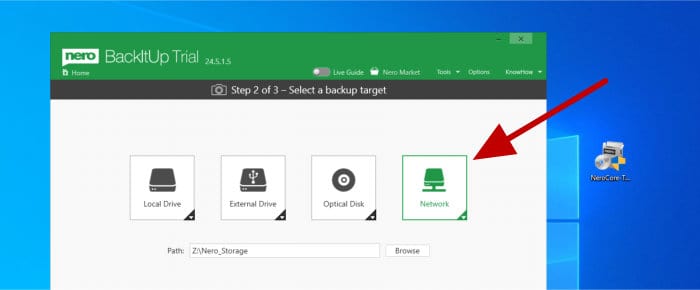
Having selected the backup storage destination (a network drive in my case), the next screen we see is the scheduling screen, it is from here we can both name the backup set and set it to be run either manually as required or on a pre-set schedule (as can be seen below):
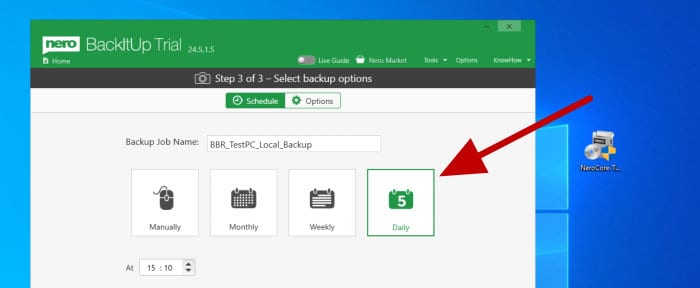
Unfortunately, as can be seen above, the daily option is the most frequent option available here (although we can still run a scheduled backup manually at any time should this be required). Next, clicking on the “Options” button towards the top of the page will take us to the options screen for this backup set:
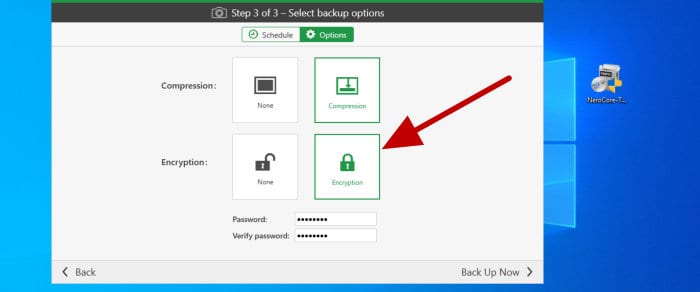
NB – BackItUp makes use of strong, zero-knowledge AES-256 bit encryption, when making use of this functionality it is very important to remember your password as Nero will not be able to reset it nor recover any data should you loose it!
As can be seen above, despite being very basic at first glance, this options screen does let us turn on or off two of the most important considerations when making a backup, this being file compression and strong AES 256-bit file encryption. With both options set we can then click next, at this point the configuration will be finished and the backup will start its initial run straight away, progress will be shown in the main window (as can be seen below):
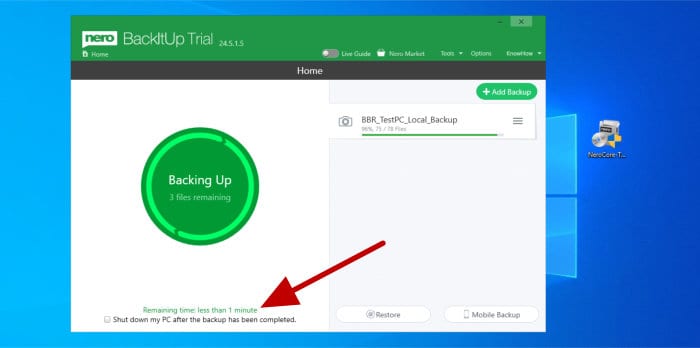
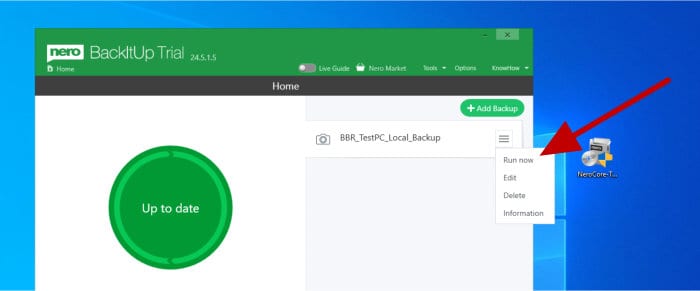
With the initial running of the backup set now in progress, this section is now complete. If for any reason the set needs to be run manually before the next scheduled start time, simply click the drop-down menu found next to the backup set on the main app homepage and click on “run now”:
NB – When choosing an external hard drive as the storage media we can also specify that the backup be run automatically whenever this media is attached via a USB connection, something which is not shown in this configuration when using network attached storage.
In the next section I will be looking at configuring the cloud backup functionality which is built into BackItUp and then later on looking at recovering some of the backed-up data.
Configuring Cloud Backups
With a local backup set now configured and running within BackItUp, I will now start looking at the cloud backup functionality and how to make use of the multiple cloud storage providers which are fully supported and built into the software itself. This process begins by clicking the “Add Backup” button on the main homepage and then selecting “Online Copy”, at this point a drop down menu will appear giving us the option to configure our first cloud storage service within the application:
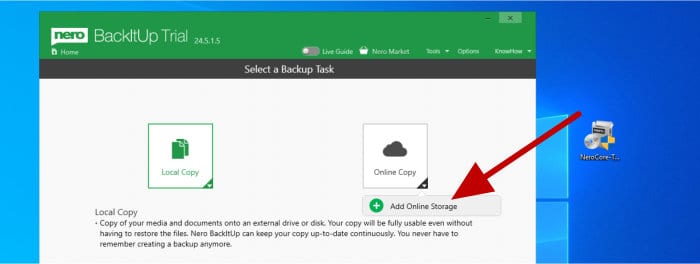
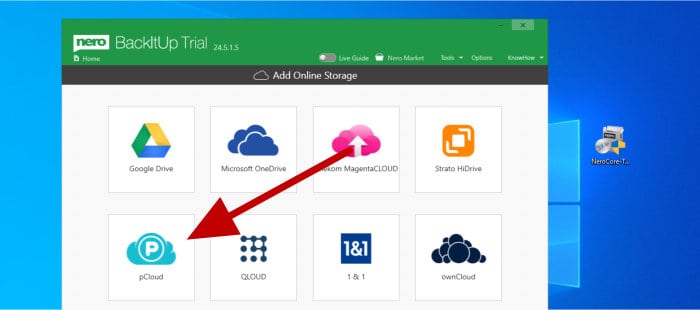
After clicking on “Add Cloud Storage” (as can be seen above) we will be taken to a new screen where we can select one of many available (and well known) 3rd party cloud storage providers to make use of, in my example here I am going to be making use of the excellent pCloud service!
NB – In addition to the choices listed above, BackItUp will support any WebDAV enabled cloud storage service!
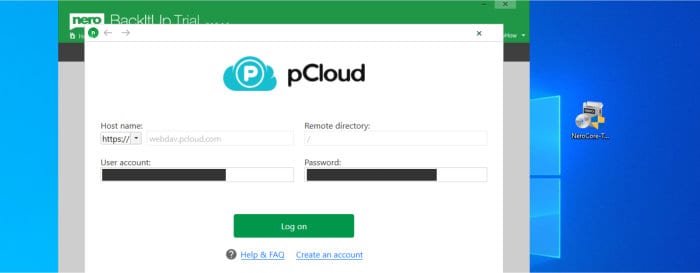
With the storage provider chosen, the software will then ask for access credentials in order to be able to connect to and make use of the chosen service. In my case (using pCloud) I simply needed to enter my login details which I usually use for logging into the service (but be aware that this might change slightly depending upon which 3rd party cloud service you eventually decide to make use of).
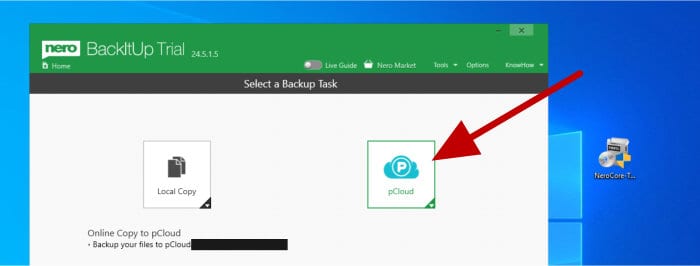
With the selected cloud drive configured, the application will return us to the previous screen where we can select to make a cloud backup (instead of a local backup) and can also now choose the recently configured cloud account as the final storage destination (as can be seen below, this now appears in the list of available cloud locations):
Having now configured the cloud storage, the next screen is where we can select the files and folders which are to be included in the backup set. This method is exactly the same as was seen when creating the local backup in the previous section, as before it allows us to make use of one of the pre-set buttons (e.g. all photos) or make use of the file picking tool for a backing-up a customised selection.
Next, having selected any files to be included, we can name the backup set and select the schedule (if any) to make use of on the following screen. Note (as seen below) when making a cloud backup we have all of the regular scheduling options seen earlier on (e.g. daily, weekly etc.) as well as an additional option to run the backup continuously as well (this means running the backup whenever any of the selected files are changed).
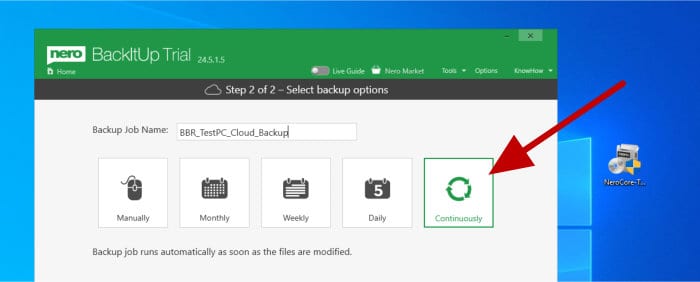
NB – It should be noted at this point that, unlike before when making the local backup, we are not given the option to apply compression or encryption to our cloud backup set!
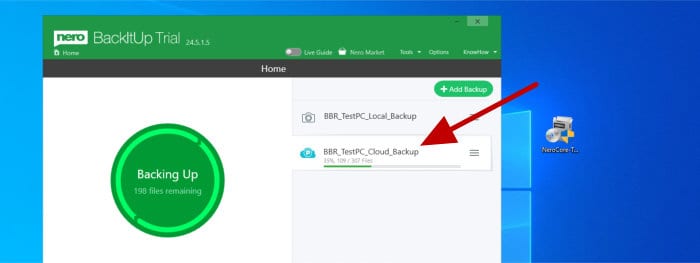
With the schedule now confirmed we can click on next, this will (as it did with the local backup) start the process of running the initial backup straight away, progress can (again) be monitored from the main application homepage as can be seen below:
Restoring data
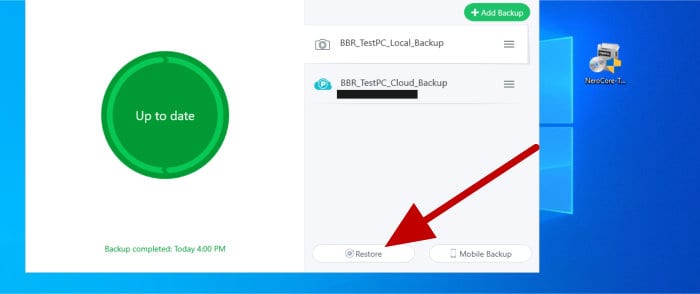
With both a local and cloud backup set now configured within BackItUp, it is now time to look into the process of restoring data from within the application. This process begins on the main application homepage (again) where a backup set can be selected from the right side of the screen and the “Restore” button then clicked towards the bottom of the screen to get things started.
If encryption has been set on the backup (local backups only) then the first step in this process will be entering the password to unlock the files, after this, the next screen is where any backed up files can be browsed through and then optionally selected for restoration:
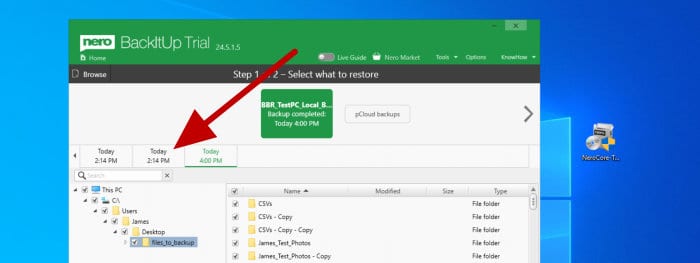
As can be seen above, one of the first things to do at this stage is to select the correct version of the files been recovered (using the version history bar just above the file picking tool). Once the correct version (date) and any files to be restored are selected using the file picking tool, we can then click on next to continue with the restoration.
The next page in the recovery system is where we can select a location to recover any files to, this can be as simple as keeping the default option of recovering files to their original location or, alternatively, specifying another location. We can also specify how duplicate files are handled (including renaming any duplicated files or simply overwriting the existing copy with the new one).
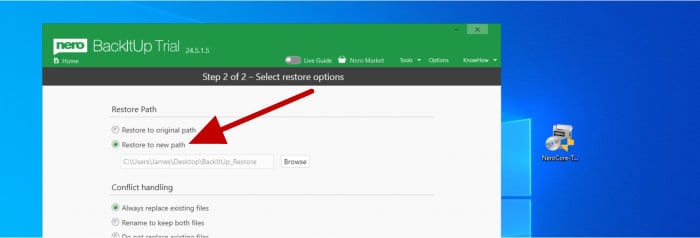
With this final set of options confirmed, the restore operation will begin, upon its completion the application will confirm that the work was done successfully and return back to the main application homepage upon completion. Overall, a very nice and easy to use restore process which has all of the main features I would expect to see (especially the ability to recover to an alternative location which is very useful to have included).
Other Functionality
Nero BackItUp is highly focused on been a simple and easy to use backup application, with this in mind it is not unexpected to see there is little else available by way of additional functionality (aside form the core backup functionality which has already been covered in this review).

As can be seen above, when opening the main application options screen, we simply see just one option available to us for making use of a proxy server when connecting to the internet. Moving on and by opening up the Tools menu we see that we have access to just two additional utilities, these been the Erase Disc app (for erasing re-writeable optical discs) and the Disc Info app which shows the status of any optical discs currently accessible by the PC.
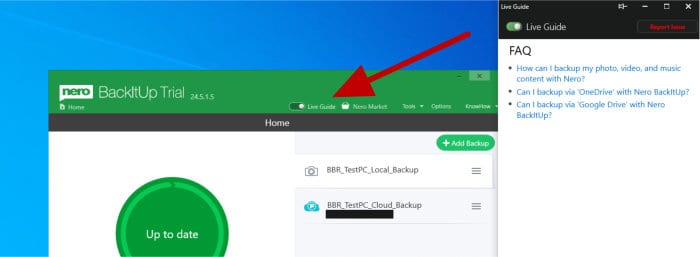
The final additional function worthy of mention within BackItUp is the “Live Guide” switch which can be found on the main application menu (as is pointed out above). Switching this function on will open up a help and knowledge base system to the right of the screen whilst the application is in use, ideal for quickly finding guides, information and help whilst making use of the application.
BackItUp Security
One of the most effective ways of securing any backed-up data is to apply strong encryption as it is being backed-up, something which is recommended for the vast majority of PC users, especially so when storing said data off-site or using a 3rd party cloud storage service. Thankfully, BackItUp does include built-in support for applying very strong (AES 256-bit) encryption, the easy to use interface also makes turning on or off this feature as simple as setting the switch and entering the password to be used. A great approach which will make using such encryption technology much easier for PC users of all abilities.
Unfortunately, this option to encrypt the backup contents appears to only be available when making use of the local backup option and not whilst making cloud backups (in my case using the pCloud service). As such, I find it difficult to understand why this feature would not be available in this instance, especially so when Nero have done such a good job of already integrating the technology and making it so easy to use?
Nero Support
Nero have a very good support section on their main website, this contains many useful support articles and FAQs for the entire range of Nero products on offer. Should further support be required, Nero offer an on-line ticketing system as well as a web-chat system for contacting the Nero support team.
BackItUp Pricing
Nero BackItUp is priced at a one-off cost of $47.95 for a full, perpetual licence covering a single PC for a lifetime of use. Other options to make use of the software include subscribing to the Nero Platinum Suite, this suite being a collection of many leading software titles from Nero available under a single licence fee of just $59.95 / year or $149.95 for a lifetime licence per PC!
A 7 day free trial of BackItUp (plus all other Nero software titles) is available via the official Nero website.
BackItUp FAQ
Yes, BackItUp is an easy to use and reliable piece of backup software from the well established software maker Nero. Furthermore, Nero BackItUp supports full AES 256-bit data encryption helping to protect any data which it might have been used to backup.
BackItUp has strong AES 256-bit encryption integrated into the software, often regarded as the leading encryption standard for securing any valuable backed-up data.
BackItUp is an easy to use backup application from software makers Nero. It supports making both locally stored and cloud based file backups and has integrated into it many useful features including strong file encryption, compression and support for unlimited historic file versioning by default.
Nero BackItUp Alternatives
In this section I will be mentioning some close alternatives to Nero BackItUp, these are backup solutions which focus primarily on providing file level and cloud backup functionality for Windows PC users.
1) Ashampoo Backup Pro 16
Backup Pro 16 is a leading backup application form software makers Ashampoo. It is a multi-purpose backup application which supports making both file level and full disk image backups as well as supporting cloud based backups to multiple well known cloud providers including Microsoft OneDrive, Google Drive and Dropbox!
In addition to this core backup functionality, Backup Pro 16 is very well designed, easy to use and supports many accompanying features inducing a choice of encryption settings (up to strong AES 256-bit), compression, automatic backup scheduling and integrated UEFI recovery tools amongst many other useful features.
NB – Backup Pro 16 is priced at $49.99 and now supports 3x PCs per single licence!
Click here to visit the Ashampoo website and download a 30 day free trial of Backup Pro 16 or click here to read our latest Ashampoo Backup Pro review.
2) EaseUS ToDo Backup
ToDo Backup Home is a top rated and easy to use backup application from software makers EaseUS. It supports both file level and full disk image backup as well as the option to use cloud backups via their own cloud storage service or via one of several well known cloud providers including Microsoft OneDrive and Dropbox.
Additional features to be found within ToDo Backup include support for strong AES 256-bit encryption, file compression, disk cloning tools (which support migrating to dissimilar hardware) and a recovery media building tool amongst many other useful items which combine to help make ToDo Backup a leading backup application.
NB – ToDo Backup is priced either on a subscription basis at $39.95 / year or as a single (one-off) perpetual licence at $59 with free lifetime upgrades. A free version containing the core backup functionality is also available.
Click here to visit the EaseUS website and download a 30 day free trial of ToDo Backup or click here to read our latest EaseUS ToDo Backup review.
3) ASCOMP BackUp Maker
ASCOMP BackUp Maker is a lightweight, reliable and easy to use piece of backup software which is suitable for both home and commercial Windows PC users alike. Despite being very easy to use, BackUp Maker still supports a lot of useful features including strong AES 256-bit encryption, file compression, automatic backup scheduling, unlimited historic file versioning plus support for multiple 3rd party cloud storage providers including Dropbox and OneDrive.
Best of all, ASCOMP BackUp Maker is 100% free to use for personal (non commercial) use! A commercial licence for business use is also available and is very competitively priced at just $39.90 for use on up to 2x PCs.
Click here to visit the ASCOMP website and download BackUp Maker for free or click here to read our latest ASCOMP BackUp Maker review.
Nero BackItUp Review Summary
I have been very impressed with BackItUp so far, not only is it well designed and easy to use but it also opens up and simplifies the process of getting a decent backup in place with strong encryption and unlimited file revisions for PC users of all abilities. For this reason alone, it is worthy of consideration for anyone looking for a quick and simple way of getting everything important on their PC backed up with the minimal of fuss!
Following on from this ease of use and, despite being a simple application overall, it is still great to see that multiple backup targets (including network storage and popular 3rd party cloud providers) are integrated into the application as is important functionality such as strong AES 256-bit encryption, compression and unlimited historic file versioning amongst other things.
Overall, a good backup application and good value being available with either a one-off licence fee or as a part of the larger Nero Platinum suite, great work Nero!
Are you looking for help and advice on choosing the best backup software for your PC or Mac? If so then be sure to check out our guide to choosing backup software which also contains a list of our favorite choices as tested here on BestBackupReviews.com!

