NovaBACKUP Review
Features - 91%
Usability - 87%
Security - 93%
Support - 91%
Pricing - 85%
89%
Good
NovaBACKUP seems like a good backup solution and worked well during my testing. It is great to see that both file level and full disk image functionality is available as is the option for using cloud backups when required.
NovaBACKUP is an all-in-one PC backup solution from backup experts NovaStor. Supporting the Windows platform from version 7 onwards and offering many useful features including cloud backups, full disk image backups, secure AES 256-bit encryption, file compression, good scheduling support and a recovery media builder amongst many other things.
Time to take advantage of the free trial and get NovaBACKUP installed for myself, let’s go!
Are you looking for help and advice on choosing the best backup software for your PC or Mac? If so then be sure to check out our guide to choosing backup software which also contains a list of our favorite choices as tested here on BestBackupReviews.com!
Key Features
- Full support for Windows 7 onwards
- Full disk imaging & file-level backup backup support
- Support for full, differential and incremental backup modes
- Good zero-knowledge encryption support (up to AES 256-bit)
- Support for VHD and VHDX image format backups
- Support for local disk, NAS and cloud backups
- Good recovery media building tool included
- No 3rd Party cloud storage (must be purchased from NovaStor)
- No support for MacOS devices (Windows only)
- Subscription-only pricing, starting at $49.95 / Year for a single PC
- 15 day Free trial version available (registration is required)
NovaBACKUP Usability
In this section of my review I will be looking at the usability aspects of NovaBACKUP, this includes assessing how easy it is to install and configure the software followed by a look at some of the backup related functionality available within.
This begins in the next section of this review where I will be installing NovaBACKUP for myself, note that NovaStor offer a 15 day free trial of NovaBACKUP alongside a 30-day money back guarantee should you wish to try out the software for yourself!
Installing NovaBACKUP
At approximately 282MB in size, downloading NovaBACKUP was a relatively quick and easy experience, the installer can be run straight after downloading and after an initial check for pre-required components (including checking if the .NET framework is installed) the full NovaBACKUP installation will begin.
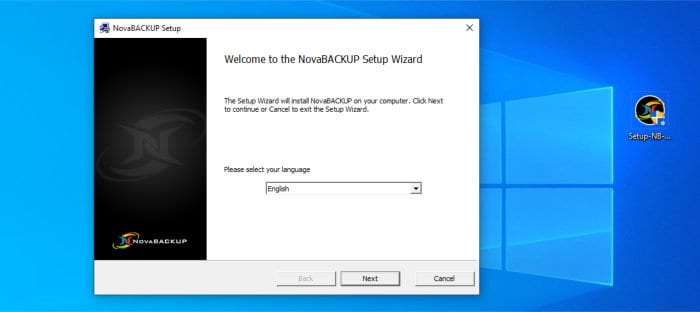
As can be seen above, once the main installer is running, one of the first things we will need to do is select the language followed by choosing a “Typical” or “Custom” install (I went for the typical option here, but you can customize things more should you wish to). A few moments after these selections have been made, we will be asked to register the software, this involves selecting the option to provide a licence key (if the software has been purchased already) or, alternatively, selecting the evaluation option as can be seen below.
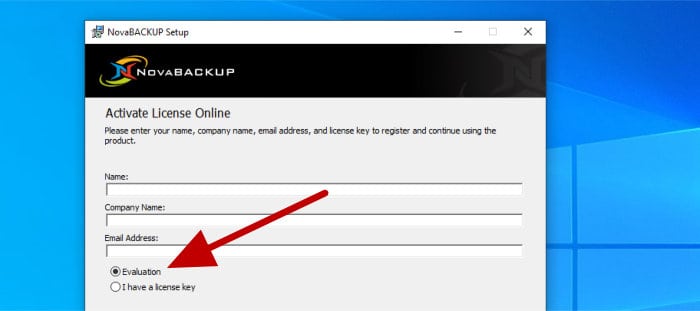
After the registration process is complete, the installer will finish off its work and eventually bring us to the initial application splash screen, here we must (again) choose whether to activate the licence or specify we want to make use of the 15 day free trial. After confirming either of the choices, the main application itself will then open up and be ready to make use of.
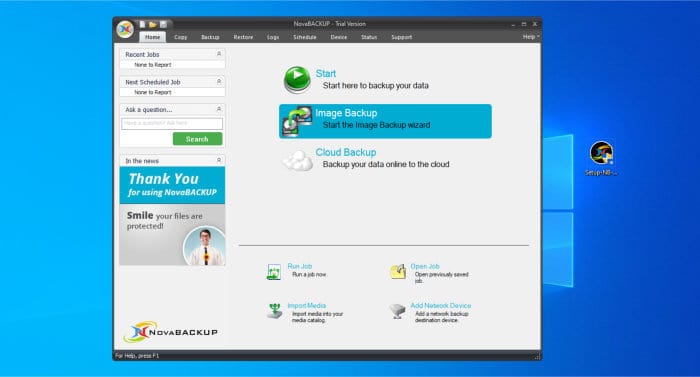
A relatively quick and easy installation overall, although I do think NovaBackup could omit one of the steps here by not showing the second activation page (on the main application splash screen) given that at this point we have already been asked to either enter an activation key or register for the free trial as a part of the original install, just a thought!
NB – Note that registration is required to make use of the 15 day free trial of NovaBACKUP and that a 30 day money back guarantee is available with the full version should you want to make a full test of the software for yourself!
Configuring File Level Backups
Having now fully installed the NovaBACKUP software, it is time to create an initial backup, a process which is made easy thanks to the prominent “Start” button found on the main application homepage as can be seen below:
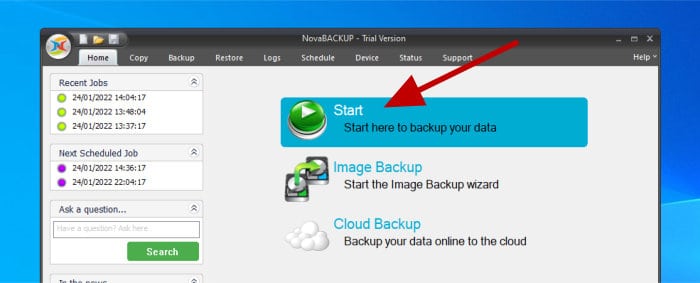
NovaBACKUP does in-fact offer multiple ways of getting a PC backed-up, this includes making use of full disk image backups (which backup an entire hard disk including the operating system, user data and any installed applications) as well as the more common file-level approach as is used by this quick start button we see here:
NB – I will be looking at the imaging based backup functionality found within NovaBACKUP a little later on in this review!
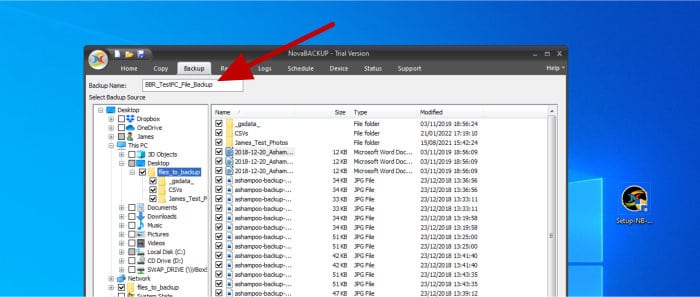
After clicking on “Start” via the main app homepage (as can be seen above) we are taken to the main file backup screen, it is from here we can start creating our first backup set. From this screen we can first name the new backup set and then make use of the file-picking tool below to easily select all files and folder to be backed-up.

Finally (as can be seen above) with the backup set named and all files selected, we can then choose the storage location for this backup set to be saved to using the tool found in the bottom left of the page. With the storage location set, we can then begin configuring some of the many additional settings which are found within NovaBACKUP, this starts by entering the main settings page by clicking on “Settings” towards the bottom right of the current backup screen like below:
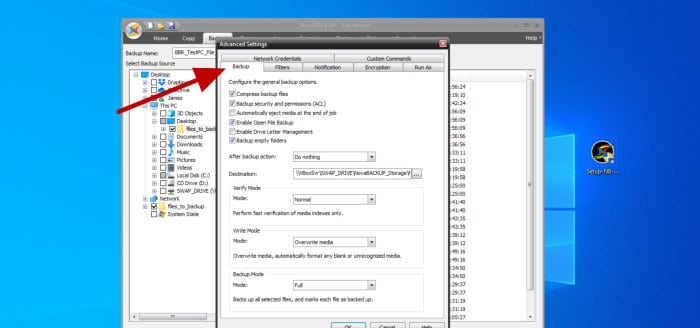
Once in the main settings page (which is seen above) we can begin applying one of many available settings across several categorised tabs, the first tab (Backup) is where we can can specify several options such as compression, verification settings, the backup destination and what backup mode is to be used:
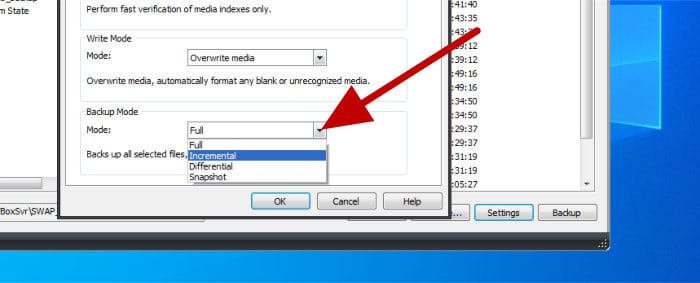
As can be seen above, the backup mode is one of the most important settings on this particular tab and controls how our backup set will be managed based upon one of four available modes, these are Full, Incremental, Differential and Snapshot. For the purposes of this backup I will be using the Full method which is a very low risk approach and will ensure all files are backed-up every time the set is run, other options including incremental and differential are often quicker and more disk space efficient, but ultimately can lack the overall robustness of running a full backup.
NB – For more information on the available backup modes within NovaBACKUP, how they differ between the file-level and image based backup types and choosing the right one for your own needs, be sure to visit the dedicated knowledge base article on the subject provided by NovaStor themselves.
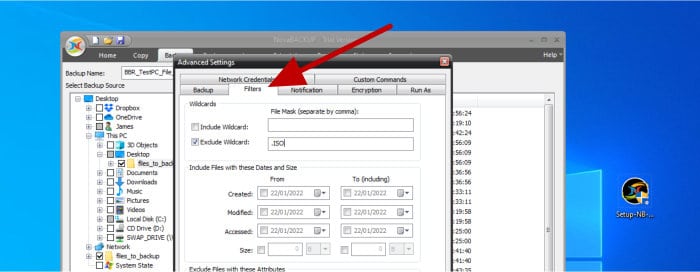
Continuing with the settings for this initial backup and the next tab (labelled “Filters”) is where we can optionally filter selected files from being included in the backup set, a move which can help to reduce the size of the backup and the time needed for it to run in the process. Filtering selected files can involve specifying a file date range or size or the specifying of a wildcard mask to exclude a certain type of file (say “.ISO” to exclude all ISO image files).
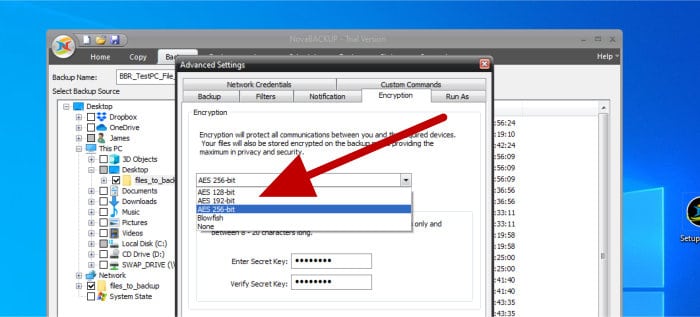
Moving on to the “Encryption” tab and it is here we can optionally specify that our backup set be encrypted with one of several available encryption options up to and including AES 256-bit encryption. The full range of encryption options available within NovaBACKUP is currently AES 128-bit, AES 192-bit, AES 256-bit and Blowfish.
Other settings tabs allow for several other conditions to be set including the running of the application as a specified Windows user, running custom Windows commands before or after the backup is run and the ability to enter network access credentials when making use of network storage targets and NAS systems.
With any applicable settings now configured, we can run the backup manually at any time (using the “Backup” button towards the bottom right) or alternatively, set a schedule for the backup to be run upon as can be seen in the scheduling window below:
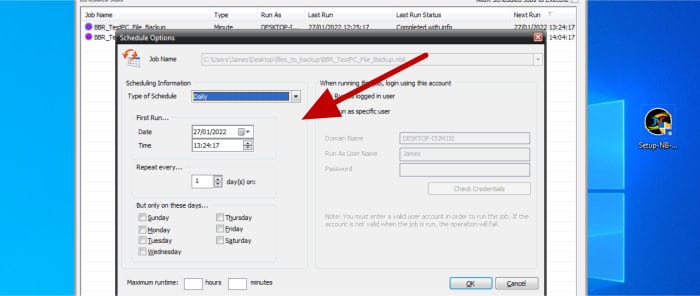
As can be seen above, NovaBACKUP features a very good scheduling system which allows for hourly, daily, weekly and monthly schedules to easily be set as well as a single (one time) run be configured. In addition to these commonly used scheduling options the software also offers one minute intervals meaning we could, for example, set a backup to run every 5, 10, 15 minutes etc. should we need to.
Backing up these pre-set scheduling options is also the option to run the backup application with a specified Windows user account (when applicable) as well as the option to specify a maximum runtime for any given backup.
With all settings complete and any schedules in place, the backup can be run manually as and when is required or simply saved for the schedule to pick up later on. As can be seen below, NovaBACKUP provides a status tab which can be used to monitor any backups whilst they are in progress and also see the status of a backup job after it has been run.
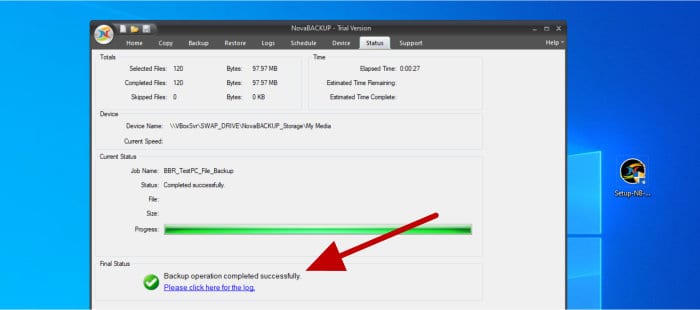
At this point in my review I have configured an initial file-level backup job which has completed its first run and is set to run on a schedule going forwards, returning to the application homepage and we can see any recently run jobs as well as those which are scheduled to start soon on the left side of the homepage.
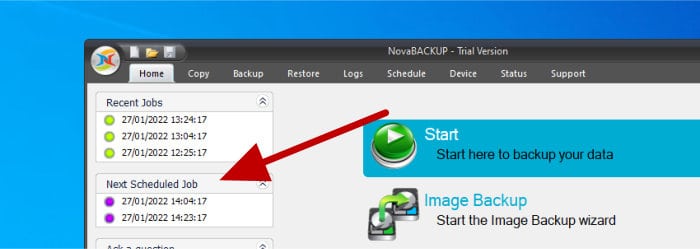
This completes the section on making an initial file-level backup, in the next section I am going to look at the image backup functionality found within NovaBACKUP and then later on the recovery media console which can be used in conjunction with an image backup for PC recovery.
Configuring Image Backups
Creating a new image backup within NovaBackup begins, again, at the application homepage by pressing the “Image Backup” button, this will launch the image backup job wizard (a separate wizard to the pages we used for creating a file-level backup job earlier on).
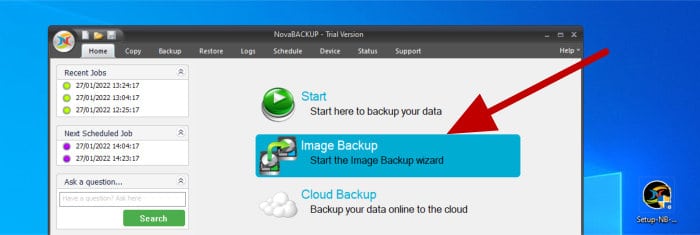
Once in this image backup wizard we must first select whether to create a new image backup job or, alternatively, launch the recovery media builder which can be used to create a bootable medium such as a CD/DVD for recovering a PC back to an earlier state should it not be bootable for any reason (e.g. a failed hard drive which has been replaced).

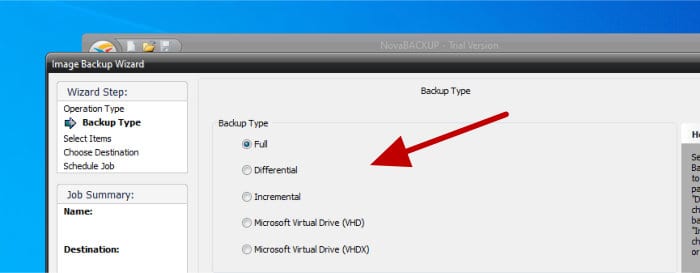
With the option to create an image backup (as opposed to creating recovery media) now selected, as per the above screenshot, we can now select the type of image backup we wish to create:
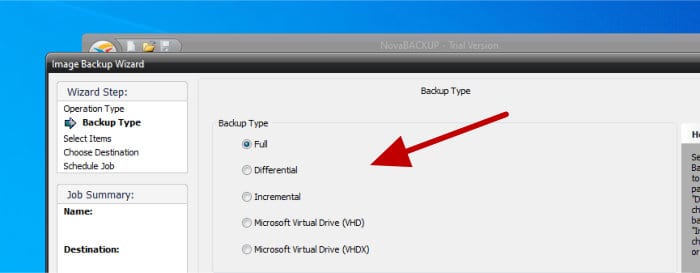
As can be seen above, we have a choice of creating a full image backup as well as a differential or incremental backup should we want to favour smaller and quicker future backups over the added stability and safety of a full backup being run each and every time (incremental backups can be more risky as ALL incremental files are needed for a successful recovery and a single corrupt or missing file in the chain could render the whole backup unusable!). NovaBACKUP have also added two other options here for making use of the Microsoft VHD and VHDX compatible file formats as a part of this choice.
Having now chosen to make a disk image backup, the next page in the wizard is where we can specify whether to backup the entire disk including all partitions or to choose only specific partitions on the disk should this be required.
The next page on the wizard is where we can name the backup job, select the target storage location where the backup files are to be saved as well as choose some other features including the type of imaging to be made and the setting of encryption to protect the backed-up data.
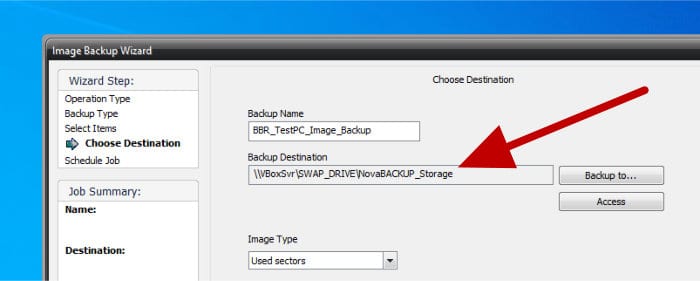
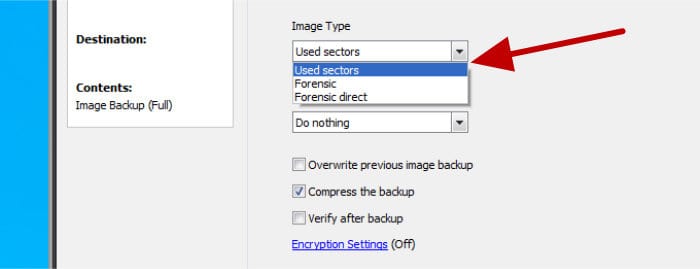
With the storage destination selected, we can specify some other settings further down on this same page, these include being able to exclude unused sectors from the image to save time and disk space (or use a “forensic” setting which will attempt to backup all sectors including those currently not being used) in addition to setting compression and overwrite settings alongside this.
Finally, at the bottom of this page, we also have the option of setting up encryption for the image backup in much the same the same way as was done when creating the file-level backup job earlier on (and with this we have the option of using up to and including AES 256-bit encryption).
NB – NovaBACKUP makes use of zero knowledge encryption, this means if you do choose to make use of the encryption functionality found within this application you must remember your password in order to be able to recover your data! NovaBACKUP will not have access to your encrypted data nor will they be able to reset your password should you forget it (and doing so could result in data loss).
Moving on and the next page in the wizard is where we can set the schedule for this new image backup set to be run on. As can be seen below, we have the same options available to us as were available when creating the file level job earlier on, these include being able to run the backup a single time as a one-off job or on an hourly, daily, weekly or monthly schedule in addition a specified number of minutes delay if very frequent (close to real-time) backups are required.
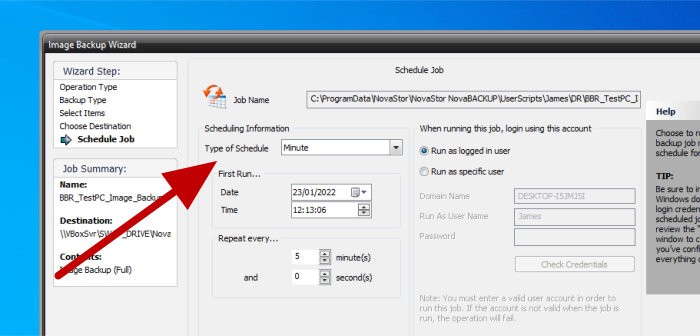
NB – In the above screenshot (showing the scheduling options) we can also specify the Windows user account to be used for running the backup with (potentially an account with higher access privileges to be used as and when required).
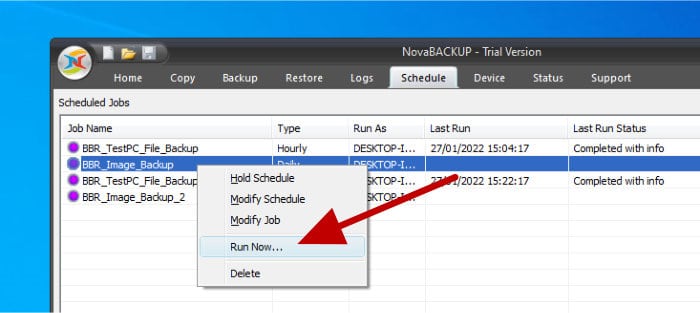
With the scheduling settings now saved, the new image backup job will be configured and ready to run as per the specified schedule. Interestingly, the wizard closes as soon as the schedule is set without offering the ability to run the initial backup job manually beforehand, it can still be run however, by visiting the “Schedule” tab, right-clicking on the job (as can be seen below) and then choosing to “Run now”.
And with that we have created an image backup job which will run as per the specified schedule, in the next section I will move on to look at resorting data within NovaBACKUP before looking at the recovery media and some other included functionality later on.
Restoring data
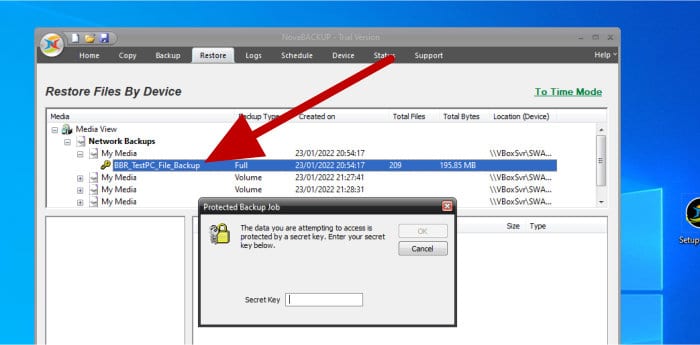
With both a file level and image based backup now setup and running, it is time to look at the process for recovering some of this backed-up data within NovaBACKUP. Starting off at the “Restore” tab within the main application we can first select a file level backup set to recover from (enter the encryption password if one has been set) and then select the files and folders to be restored as can be seen below:
If making use of an incremental or differential backup then we will, of course, also have the option to recover previous versions of any files as and when this is required. Recovering previous versions begins by clicking on the “To Time Mode” link found on the top right of the page (as can be seen below), this will in-turn open up a new page where we can specify a previous version date via a slider at the top of the page (seen below):
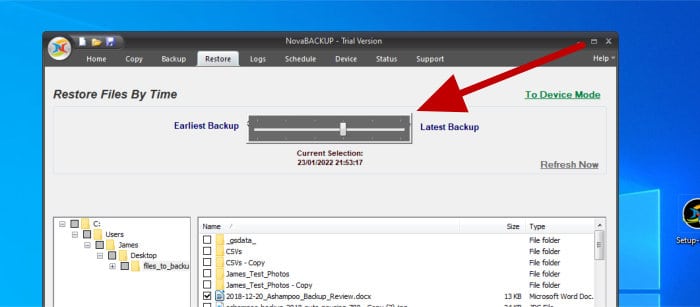
With the correct date selected, we can then browse the available files from that date and select any files to recover (we will, of course, recover versions of the file available on that date when making use of the previous versions slider). We can also see, at a glance, any available versions on a file-by-file basis by simply clicking on any file within the file picking tool and then selecting “Version Information” as can be seen below:

With all necessary files and folders selected for recovery, one of the final steps before starting the process is to check the restore settings using the “Settings” button found towards the bottom right of the recovery screen. From this page we can specify whether to restore files to their original location or somewhere else as well as specify multiple other settings including the restoration of file permissions and the filtering of file types amongst many other things.
Creating Recovery Media
One of the biggest advantages to making full disk image backups (versus the more simplistic file level backups) is that they can often form the basis for recovering an entire PC (including the operating system, any installed applications and all user data) whenever such a recovery is needed. This is particularly useful in the event of major system problems such as those caused by failed hardware or malware attacks which can, in turn, mean that the PC is unstable or un-bootable as a result.
To launch the recovery media builder we must first start creating a disk image backup in the main NovaBACKUP application, the tool can then be launched from the first page of the image backup wizard as can be seen below:

Once the recovery media tool launches, we will have several options available to us for making use of it, the first of which is the ability to make a full disk image backup, an important component as a backup such as this is required for recovering from should the need ever arise.
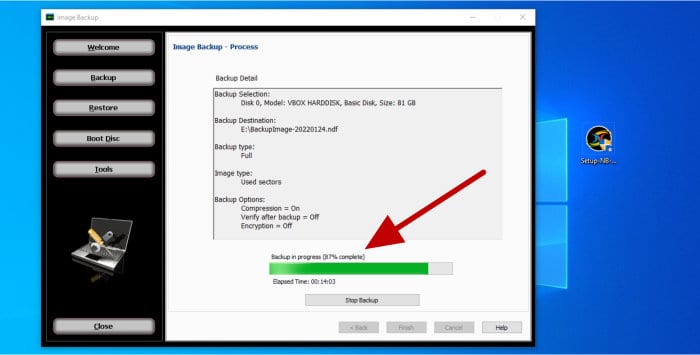
With a full disk image backup made (either using the recovery media tool or from within the main NovaBACKUP application itself) we can then use the recovery media tool to recover the PC or, alternatively, create some bootable media to boot the PC into and perform the recovery before Windows loads up.
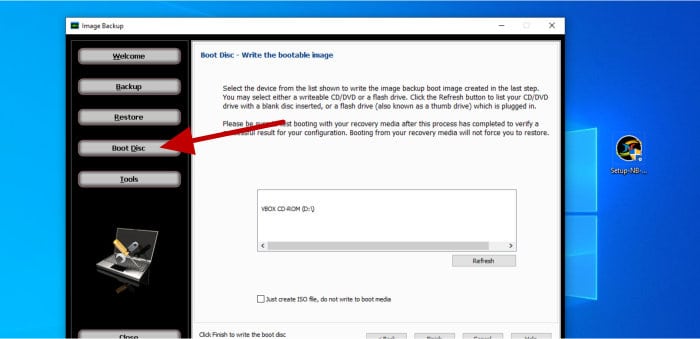
NB – Building the recovery media requires the Windows PE environment installed, if the PC being used doesn’t have the required components installed then the recovery media tool will guide users through how to install them.
NovaBACKUP Security
One of the most effective methods for protecting any backed-up data is to apply strong encryption to the data whilst it is at rest, an important concept for all backed-up data and especially so when the data will be stored off-site, for example via a 3rd party cloud storage provider.
NovaBACKUP features several strong encryption options up to and including the very strong AES 256-bit standard, along side this several other versions are available including AES 128-bit, AES 192 and Blowfish encryption, all of which having different advantages such as a quicker backup time when using one of the lower (weaker) methods.
NovaStor Support
NovaStor have a very detailed and helpful support section for NovaBACKUP customers, this includes a very detailed online knowledge base, an FAQ section plus the ability to raise online support tickets when additional support is required (a support phone number is also available between 8AM and 5PM Mon-Fri PT).
NovaBACKUP Pricing
NovaBACKUP is priced on a subscription basis at $49.95 / year for a single PC licence, $79.95 / year for 3 PCs and $99.95 / year for 5 PCs (Other pricing options covering business and server usage are also available). Each full subscription also includes 5GB of free cloud storage directly from NovaStor themselves, more storage can be purchased from NovaStor once the software is installed and licenced.
A 15 day free trial of NovaBACKUP is also available for evaluating the software as well as a 30 day money back guarantee when purchasing directly via the NovaStor website.
NovaBACKUP FAQ
Yes, NovaBACKUP is an established backup software brand, furthermore, they offer user the ability to protect their backed-up data with (up to) strong AES 256-bit encryption.
NovaBACKUP supports up to and including very strong AES 256-bit encryption, the fill list of supported encryption technologies incudes: AES 128-bit, AES 192-bit, AES 256-bit and Blowfish.
NovaBACKUP provides automatic and secure backup functionality for Windows PC users (Windows 7 and onwards). It is capable of providing file level backups, disk image backups as well as cloud backups (using the cloud storage available from NovaStor themselves only).
NovaBACKUP Alternatives
In this section I will be mentioning a few close alternatives to NovaBACKUP, these are backup solutions which focus primarily on providing both file level and full disk image backup functionality for Windows PC users.
1) Ashampoo Backup Pro 16
Backup Pro 16 is a leading Windows-based backup solution from software makers Ashampoo, a piece of software which is available with a one-off licence fee and provides both file and image based backup functionality as well as the option to make use of 3rd party cloud storage (with popular services including OneDrive and Dropbox) when required.
In addition to the backup functionality on offer, Backup Pro 16 also provides use of strong AES 256-bit private key encryption, a well designed and easy to use interface, strong scheduling options alongside the ability to make use of built-in UEFI recovery tools when required.
NB – Backup Pro 16 is priced at $49.99 and now supports 3x PCs per single licence!
Click here to visit the Ashampoo website and download a 30 day free trial of Backup Pro 16 or click here to read our latest Ashampoo Backup Pro review.
2) Acronis Cyber Protect Home Office
Cyber Protect Home Office is the leading backup software from well known provider Acronis, a backup solution which not only provides file and disk imaging protection but also access to cloud backups via the Acronis Cloud integration.
Taking the excellent backup capabilities of Cyber Protect Home Office as a given, one of the other main selling points of this latest version is the integration of a strong anti-malware suite which is built directly into the software itself. Not only can such an integration save Acronis customers money on purchasing a separate anti-malware application but also help to ensure only clean (virus free) files are backed-up, in turn increasing the protection that a good backup can provide to any PC user.
NB – Acronis Cyber Protect Home Office is available on several different pricing plans (some with cloud storage included in the price) starting form $49.99 / Year.
Click here to visit the Acronis website and download a 30 day free trial of Cyber Protect Home Office or click here to read our latest Cyber Protect Home Office review.
3) EaseUS ToDo Backup Home
ToDo Backup, from software makers EaseUS, is an easy to use PC backup solution which supports both file level and full disk image backups to be made for both PC and MacOS users alike. In addition to this core backup functionality, ToDo Backup also supports cloud backups, both using their own cloud storage service or via popular 3rd party cloud integrations including DropBox and Microsoft OneDrive amongst others.
Available both as a perpetual licence or on a subscription basis (as well as a free version), ToDo Backup also features support for strong AES 256-bit encryption, a good recovery media building solution, tools for migrating and cloning existing systems to new hardware alongside many other features which make backing-up with ToDo Backup a great experience!
NB – ToDo Backup is priced either on a subscription basis (from $39.95 / Year) or as a single (one-off) perpetual licence at $59. A limited free version is also available.
Click here to visit the EaseUS website and download a 30 day free trial of ToDo Backup or click here to read our latest EaseUS ToDo Backup review.
NovaBACKUP Review Summary
Overall, NovaBACKUP seems like a good backup solution, one which seemed to work well during my own testing. It is particularly great to see that both file level and full disk image functionality is available here as is the option for using cloud backups when required (even though the cloud storage is (after the initial 5GB which is free) only available with an additional cost from NovaStor themselves).
Additional functionality including the recovery media builder, secure AES-256-bit encryption, file compression, VHD and VHDX image file formats plus a good scheduling engine all combine to deliver what is a very functional application.
Overall, a reasonably good backup solution for PC users, although in my opinion at least, this would be much better value if it were available as a one-off licence cost instead of an annual subscription – good work NovaStor!
Are you looking for help and advice on choosing the best backup software for your PC or Mac? If so then be sure to check out our guide to choosing backup software which also contains a list of our favorite choices as tested here on BestBackupReviews.com!

